Set Up Messaging Channels and Test Your Agent
Learning Objectives
After completing this unit, you’ll be able to:
- Explain how Enhanced Chat enables shopper agent conversations from mobile apps or websites.
- Summarize how to create an Omni-Channel routing flow.
- Summarize how to create an Enhanced Chat channel.
- Explain how to set up and test your Guided Shopping Agent.
Set Up Messaging for the In-App and Web Channel
Enhanced Chat is a Salesforce customer engagement solution designed to enable seamless communication between shoppers and your Guided Shopping Agent. The Enhanced Chat channel allows shoppers to initiate conversations directly from a mobile app or website and provides a personalized and asynchronous messaging experience. With Enhanced Chat and Omni-Channel, your shoppers can start, pause, and resume conversations with your Guided Shopping Agent across various devices and browser tabs without losing their chat history.
An Enhanced Chat channel also supports your agent's connection to customer data. It dynamically references the context variables you created, providing a personalized and context-aware customer experience.
To configure Enhanced Chat for your Guided Shopping Agent, you set up these connections and services.
- Omni-Channel and a fallback queue
- Omni-Channel Routing flow, which decides how customer requests are routed to the right AI agents
- Enhanced Chat channel
- Messaging component for Enhanced Chat conversations
- An updated agent welcome message
Enable Omni-Channel and Create a Fallback Queue
Omni-Channel ensures that customers have a consistent AI agent experience across all touchpoints. To enable Omni-Channel and create a fallback queue:
- Complete the steps in Enable and Configure Omni-Channel and Prepare a Salesforce Org for Enhanced Chat.
- Add the Messaging Session object to the queue.
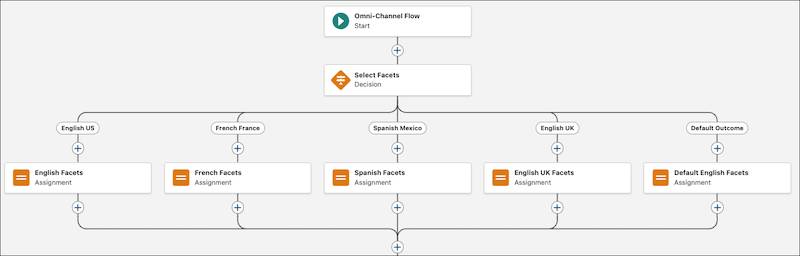
Create an Omni-Channel Routing Flow
An Omni-Channel routing flow uses Flow Builder to route the chat session to the appropriate agent or queue. This ensures that customers receive timely and accurate agent interaction, enhancing the overall customer experience.
- From Setup, in the Quick Find box, search for and select Flows.
- Click New Flow.
- Select Omni-Channel Flow.
- Click Save, and name the flow, for example, Route to Guided Shopping Agent.
- Enter a description for the flow.
- Click Save.
- Create variable resources. Use the context variables for messaging sessions that you created for your agent:
- BasketID
- Currency
- DomainURL
- isCartManagementSupported
- OrganizationId
- QueryFacetsSelected
- recordid
- RefreshToken
- SiteId
- UserLanguage
- UserLocale
- UsId
- BasketID
- In the tool bar, use the dropdown to select Free-Form.
- Select the Manager tab and click New Resource.
- For each variable use these settings:
- Resource Type: Variable
- API Name: Enter a name.
- Data Type: Text
- Check Available for input
- Resource Type: Variable
- Click Save.
- After the Start of the flow, add a decision element, for example, Select Facets.
- For each path the decision element can take, add output conditions for all user locales that your storefront supports.
- Under each user locale facet, add an Assignment element. To the assignment variables, add the QueryFacetsSelected variable you created in the previous step and enter a JSON string that defines the facet. The string includes the facet name (“f”), the facet definition (“d”), and the facet values (“e”).
For non-English locales, keep the facet name and description in English. Enter only the facet values in the language suitable for the locale.
Here's an example for the English locale:
- For each path the decision element can take, add output conditions for all user locales that your storefront supports.
"[{"f":"c_refinementColor","d":"this is the color of the product","e":"White, Blue, Purple, Red"},
{"f":"brand","d":"this is the brand","e":"Sony, Samsung"},
{"f":"cgid","d":"indicates the category of the product","e":""},
{"f":"price","d":"indicates the range of prices for the product","e":"(20..49.99), (50..99.99), (100..499.99)"},
{"f":"c_isNew","d":"indicates if a product is a new arrival or not","e":"true, false"}]" |
|---|
Add an Update Records element to the flow to update the Messaging Session record.
- In the flow diagram, click the plus sign.
- Select Update Records.
- To set up the Update Records element, configure these settings.
Setting |
Example |
Description |
|---|---|---|
Label |
Update Messaging Session with Pre-Chat Info |
User-friendly name for the action. |
API Name |
Update_Messaging_Session_with_pre_chat_Info |
A unique API identifier for the action. |
Description |
Update Messaging Session with Pre-chat info. |
A brief description of the update records function. |
How to Find Records to Update and Set Their Values |
Specify conditions to identity records, and set fields individually. |
How Salesforce identifies the records to update and what values to set. |
Update Records of this Object Type: Specify the Object | ||
Object field |
Messaging Session |
The object for which records are updated. |
Filter Messaging Session Records: Specify conditions to filter the records to update. This condition is critical for maintaining accuracy and ensuring that the flow operates on the correct messaging session, avoiding unintended updates or actions on unrelated records. | ||
Filter Requirements to Update Records |
All Conditions Are Met (AND) |
The conditions that determine when a record is included in the update. |
Field |
Messaging Session ID |
The object field being evaluated. |
Operator |
Equals |
Compares the field and value to determine if they are equal. |
Value |
RecordId |
The specific data that the field is being compared to in the filter condition. |
Set Field Values for the Messaging Session Records: In the Set Field Values for the Messaging Session Records section, set values for pre-chat variables. | ||
Field |
Value |
Description |
Basket ID |
BasketId |
The shopper’s basket ID |
Currency |
Currency |
The site currency |
Domain URL |
DomainURL |
The site domain url |
IsCartMgmtSupported |
IsCartMgmtSupported |
Is cart management supported |
Organization ID |
OrganizationId |
The org Id |
QueryFacetsSelected |
QueryFacetsSelected |
The selected query facet |
recordid |
recordid |
The id of the work item being routed |
Refresh Token |
RefreshToken |
Token value for authentication |
Site ID |
SiteId |
The site Id |
User Language |
UserLanguage |
The user language |
User Locale |
UserLocale |
The shopper’s locale |
US ID |
usId |
The shopper’s user Id |

In the Omni-Channel flow, add a Route Work element after the Messaging Session element.
- Configure these settings:
Setting |
Example |
Description |
|---|---|---|
Label |
Route Work Action 1 |
Name for the action. |
API Name |
Route_Work_Action_1 |
A unique API identifier. |
Description |
Route the work item to its destination. |
A brief description of the purpose for the Route Work element. |
Set Input Values | ||
How Many Work Records to Route? |
Single |
A flow variable of type Text containing the record ID of the work item to be routed. |
Record ID Variable |
{!RecordId)} |
The unique identifier (record ID) of the work item(s) to be routed. |
Service Channel |
Messaging |
The type of work being routed. |
Route To |
Agentforce Service Agent |
The destination for the work item. |
Agentforce Service Agent |
Guided Shopping Agent |
The Guided Shopping Agent. |
Fallback Queue |
The fallback queue you created when you enabled Omni-Channel. |
|
- Save your work and activate the flow.

Create an Enhanced Chat Channel
Next, create your messaging channel, and add pre-chat variable values to pass information to the agent about the customer before a chat begins.
- From Setup, in the Quick Find box, search for and select Messaging Settings.
- Click New Channel.
- In the Add a Messaging Channel modal, click Start.
- Select Messaging for In-App and Web as your channel type, and click Next. The Omni-Channel that you previously created lets your org message with customers. Your Messaging Channel specifies what type of messaging you do (web, in-app, WhatsApp, Facebook, or SMS).
- In the Name Your Channel window, define your channels settings:
- Channel Name: Differentiate it from other channels you may create.
- Developer Name: This is the API name for the channel.
- Deployment Type: Specifies what type of messaging you’ll do.
- Domain: The domain URL for the site where your customers chat. For example, yourcompany.com.
- Channel Name: Differentiate it from other channels you may create.
- Click Next.
- In the Channel Routing window, select the Omni-Flow that you created previously. Select the Flow Definition and the Fallback Queue that you created earlier. Choosing Omni-Flow allows you to work with the Pre-Chat form enhancements.
- If your org has already accepted Terms and Conditions, you’ll see an option to click Save; after clicking Save, skip to step 11. If your org hasn’t accepted Terms and Conditions, click Next.
- In the Terms and Conditions window, select I’ve read and agree to all terms and conditions.
- Click Save.
- Don’t navigate away from the window while you see the loading screen. When you see a green success message, click the options to Customize it (web and in-app) or test it out (web).
Set Up Custom Prechat
Custom prechat provides your agent with information about the customer so that the agent can personalize the conversation without requiring repetitive input from the customer.
In the Enhanced Chat channel, set up custom prechat.
- From Setup, in the Quick Find box, search for and select Messaging Settings.
- Click the name of your messaging channel.
- Under Custom Parameters, click New.
- Fill in the details of each parameter. Match the parameter name and channel variable name.
Channel Variable Name appears as a selection when adding custom fields to your pre-chat form. Think of each custom parameter as the link between your pre-chat form’s custom fields (both hidden and visible) and your flow.
Parameter Name |
Parameter API Name |
Channel Variable Name |
Data Type |
Max Length |
|---|---|---|---|---|
OrganizationId |
OrganizationId |
OrganizationId |
String |
255 |
UsId |
UsId |
UsId |
String |
255 |
SiteId |
SiteId |
SiteId |
String |
255 |
BasketId |
BasketId |
BasketId |
String |
255 |
UserLocale |
Locale |
Locale |
String |
255 |
DomainURL |
DomainUrl |
DomainUrl |
String |
255 |
- Create the parameter mapping:
Important: Use the same variable names you defined in your flow.
Parameter Name |
Parameter API Name |
Channel Variable Name |
Flow Variable Name |
|---|---|---|---|
OrganizationId |
OrganizationId |
OrganizationId |
String |
UserId |
UsId |
UsId |
String |
SiteId |
SiteId |
SiteId |
String |
BasketId |
BasketId |
BasketId |
String |
UserLocale |
Locale |
Locale |
String |
DomainURL |
DomainUrl |
DomainUrl |
String |
- Enable prechat values on the embedded service deployment.
- From Setup, in the Quick Find box, search for and select Embedded Service Deployments.
- From the list of deployments, select the one that you want to modify.
- In prechat, click Edit Prechat.
- Enable prechat by checking Activate Pre-chat Feature.
- Select the available Prechat fields to configure and move them to the Selected column.
- Activate and publish your service deployment.
See also: Customize Pre-Chat for Messaging for In-App and Web.
Add the Messaging Components for Enhanced Chat Conversations
Enhanced Chat provides an easy way to engage with customers directly through your website or mobile app. Enhanced Chat integrates with the Commerce Messaging Components (CMC). Commerce Messaging Components transform Enhanced Chat JSON output and add the messaging bubble component to deliver the interactions between shoppers and the agent.
Upload the Commerce Messaging Components to your Salesforce org.
- In GitHub, clone the commerce-on-lightning-components repository.
- Deploy the components into your Salesforce org. See Deploy Lightning Web Components.
- In your Salesforce org, configure Enhanced Chat to use the CMC.
- From Setup, in the Quick Find box, search for and select Embedded Service Deployments.
- From the list of deployments, select the one that you want to modify.
- In the Custom UI Components tile, click Add Custom Components.
- For Header, select commerceHeader.
- For Text Message Bubble, select dynamicContentRenderer.
- From Setup, in the Quick Find box, search for and select Embedded Service Deployments.
- Save your changes.
- Publish the deployment.
Add an Image to a Welcome Message
Customize the welcome messaging session with your logo or other image. The welcome message is what a shopper sees when they first engage with the Shopping Agent. You can tailor this message and add images.
- From Setup, in the Quick Find box, search for and select Agentforce Agents.
- Select the Guided Shopping Agent, click Open in Builder and deactivate it.
- In the Quick Find box, search for and select Messaging Settings, select the agent's Enhanced Chat channel, and deactivate it.
- In the Quick Find box, search for and select Static Resources.
- Click New.
- Add a welcome image.
- Enter a name, for example WelcomeImage.
- Click Choose File and upload the image.
- For Cache Control, select Public.
- Save your work.
- Enter a name, for example WelcomeImage.

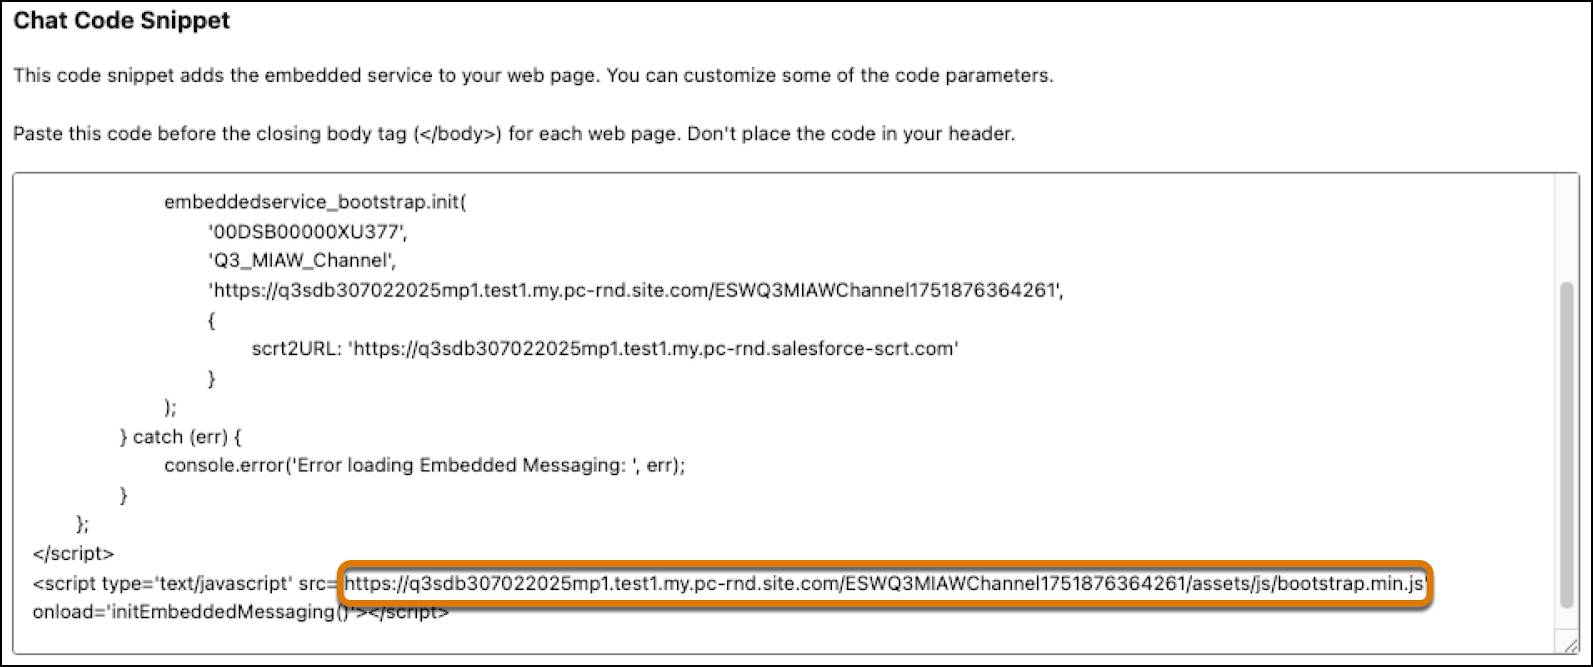
Get the Domain URL and Site Path fo the Welcome Message
Locate the domain URL and site path for your Enhanced Chat deployment so you can connect it to the agent's welcome message.
- From Setup, search for and select Sites and Domains, then select Sites.
- Copy the Site URL for the embedded service deployment.
- In the Quick Find box, search for and select Embedded Service Deployments.
- Select the name of your Enhanced Chat deployment.
- In the Code Snippet tile, click Install Code Snippet.
- In the chat code snippet box, locate the URL with the domain name URL and site path. An example is highlighted.
- Copy this text. You use it to configure your agent’s welcome message.
Edit the Enhanced Chat Welcome Message Settings
After you create an embedded service, a site is also created to host resources for Enhanced Chat. Use that same site to host the welcome image and make it publicly available.
- From Setup, in the Quick Find box, search for and select Agentforce Agents.
- Click Edit next to your Guided Shopping agent.
- Select the System Messages tab, and edit the welcome message settings using these values.
- Replace domainName and sitePath with your Enhanced Chat deployment domain name and site path. The resulting welcome message URL is similar to this, https://b2c-guided-shopping.my.site.com/ESWB2CGuidedShopping1754852777714vforces/resource/WelcomeImage.
- Replace imageName with the static resource name for the image. For example, WelcomeImage.
- Replace brandName with your brand name.
- (Optional) Update the standard agent greeting to match your store's style and branding.
- Replace domainName and sitePath with your Enhanced Chat deployment domain name and site path. The resulting welcome message URL is similar to this, https://b2c-guided-shopping.my.site.com/ESWB2CGuidedShopping1754852777714vforces/resource/WelcomeImage.

- (Optional) Customize the error message.
- Save your work.
Test Your Guided Shopping Agent for Agentforce Commerce for B2C
After you’ve set up your agent, test it to ensure that it works correctly. To do that, you need to locate the Store ID and Org ID in Business Manager.
- In Business Manager, click the App Launcher, and then select Administration | Site Development | Salesforce Commerce API Settings.
- Copy the Organization ID and the short code to use for testing.
Test Your Guided Shopping Agent
- From Setup, in the Quick Find box, search for and select Agentforce Agents.
- Select the Guided Shopping Agent.
- On the Agent Details page, click Open in Builder.
- Test the agent actions within the subagents:
- In the Conversation Preview window, enter some text in natural language.
Suggested prompt: “I’m looking for {a product that would be in your store}.
- Follow the prompts from Einstein as you fine-tune your request.
- Review the actions taken to get the response.
- In the Conversation Preview window, enter some text in natural language.
- When you’re ready, click Activate to make your agent live.
Test from the Storefront with the Enhanced Chat Channel
From your B2C storefront, test the messaging session fields to ensure that it’s properly configured.
- From Setup, in the Quick Find box, search for and select Embedded Service Deployments.
- To the right of your deployment, click the down arrow and select View.
- On the Test Messaging card, click Test Messaging.
- Click to open the messaging conversation window and initiate a messaging session as a customer.
- If set up properly, you can request a chat and complete the form. The pre-chat information is also sent to the service rep before the conversation begins.
Sum It Up
In this unit, you learned how to set up Enhanced Chat and an Omni-Channel flow to make your Guided Shopping Agent available to shoppers on your mobile apps and website. You also learned how to create a custom prechat to help your agent personalize conversations. Additionally you learned how to set up and test your agent.
You now have the skills to set up and deploy a Guided Shopping Agent for your B2C storefronts. Powered by Agentforce, the Guided Shopping Agent gives your shoppers timely assistance and ensures connected interactions throughout their customer journey on your B2C Storefront.
Resources
- Salesforce Help: Set Up Omni-Channel
- Salesforce Help: Create an Omni-Channel Flow
- Salesforce Help: Get Started with Messaging in Service Cloud
- Salesforce Help: Set Up Routing for Messaging Channels in Service Cloud
- Salesforce Help: Add Flexibility and Power with Enhanced Chat
- Salesforce Help: Configure an Enhanced In-App Chat Deployment