Navigate the Portal
Learning Objectives
After completing this unit, you’ll be able to:
- Work with your Salesforce admin to configure the Home, Registration, Login, and Funding Program pages of the portal.
- Explain how to limit what users see by registration and funding program status.
- Send invitations to specific contacts to apply for funding programs.
Get Ready to Collaborate
Much of how Michon, a program coordinator at the (fictional) Six Sides Fund, works with the grantseekers at the (fictional) nonprofit No More Homelessness (NMH) is through the foundation’s portal. The portal is a Grants Management feature that helps you collaborate with applicants, grantees, and external reviewers to meet your shared goals.
In this unit we examine the parts of the grantee portal from the grantmaker’s perspective, and then explore the grantseeker’s process in the next unit.
Understand the Portal
The portal is a Salesforce Experience Builder site that uses the site template. The template gives you a starting point to build a site for grantseekers to learn about your organization, view and apply to funding programs, and manage their applications. The portal is also where assigned reviewers from outside of your organization can submit their feedback on funding requests.
You can customize and configure your portal using clicks, not code to make sure the site fits your organization’s branding.
Let’s examine the key pages.
The Home page allows you to introduce your organization and guide applicants to funding programs. You can update your logo, change the default navigation, and customize the layout in the template.
The Six Sides Fund kept its layout close to the default, but you can work with your Salesforce admin to change it however you like. (If you’re just getting started, your admin will probably use the Grants Management and Build Community installer. Guide them to the Customize the Theme of Your Experience Builder Site link in Resources.)

The Funding Programs page is where you list programs open for application. The default setting is for these pages to be visible only to registered users. You can change the setting to make programs visible to unregistered users or only specific users who you would like to apply. Work with your admin to set your permissions.
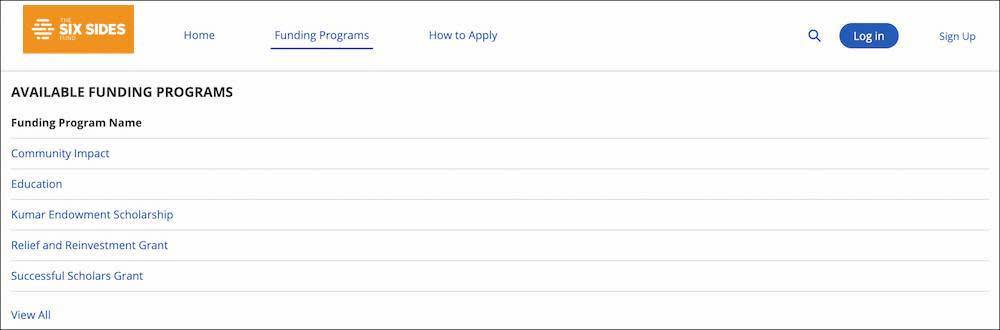
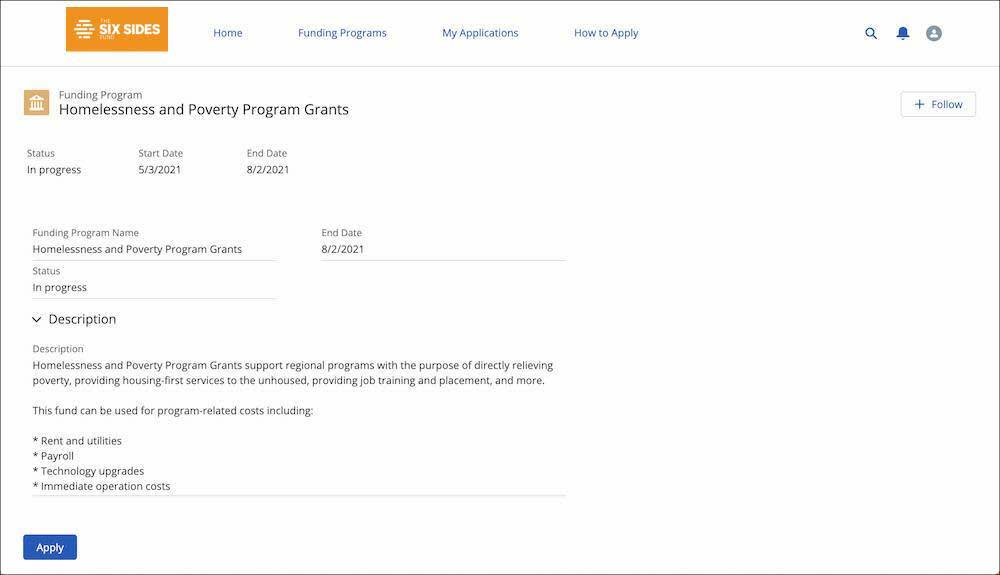
An individual Funding Program page is where you describe a funding program in detail and is also where grantseekers can find the link to the application form. Remember, you can create different application forms for different types of funding programs with the help of your admin.
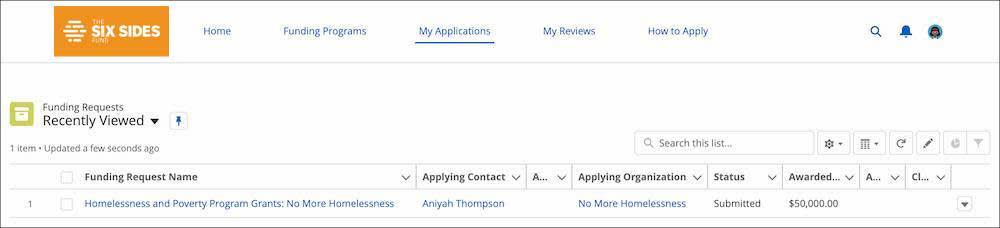
After a grantseeker applies, they can find their applications by navigating to My Applications. On each individual application, they can respond to comments, fulfill requirements, view disbursements, and more.
If an external user is also a reviewer—such as a subject-matter expert who doesn't work directly for your organization—they can navigate to My Reviews for a list of all of their in-progress and submitted reviews. When they select a review, they can see all of the information included in the Review Workspace, add their comments, and submit the review.

The Registration page includes a ready-made self-registration interface, and you can work with your admin to personalize it. To start, add your logo, change your welcome message, and update the background color.
By default, the Registration page asks for a user’s first name, last name, and email address—which is their username for the portal. When they register, the system sends them an email asking them to set a password. You can also configure the page to allow users to set their password in the registration form. Check out the Configure Self-Registration link in Resources for details.

The Login page is similar in design to the registration page with many of the same branding options.

Registration and login can make a significant difference in what users can see in the portal. Let’s check it out.
Decide What Guests and Registered Users Can Access
By default, users who aren’t registered or logged in have limited access to what they have access to in the portal. They can’t browse funding programs, for example.
Registered users who log in, however, can access funding programs and apply. With additional configuration, you can give some users the ability to submit reviews through the portal, which is helpful if you have external experts share their thoughts on applications.
If you’d like to change what different types of users can access, work with your Salesforce admin to change settings on the preconfigured profiles for each. We’ve included links to documentation about these settings in the Resources section.
Additionally, you likely don’t want even registered users to access every funding program. Some programs are in planning, some have ended, and others could be open to application only from invited grantseekers (more on invites in the next section).
Work with your admin to set visibility for funding programs through Funding Program sharing rules. For example, you can set a rule that only funding programs with an In Progress status are shown, or exclude Top Level programs if you only use them for tracking.
Manage Invitation-Only Programs
Not every funding program is open to all applicants. In those situations, Grants Management allows you to send a direct invitation to an individual contact.
Let’s follow Michon as he sends an invitation to his contact at NMH for a relief and reinvestment grant.
- Start by creating a funding request. Click New on the Funding Request related list on a funding program record.
- Fill in the details on the funding request and click Save.
- Open the new Funding Request and make sure you complete the Apply Contact lookup field with the applicant's contact record, which must have a valid email address. If your applicant doesn’t have a contact record you have to create one, but they don’t have to be a registered portal user. Michon finds and selects Aniyah Thompson, Development Director at NMH.
- On the funding request record, click the Invite Applicant button on the Details tab.

- A Send Invitation interface appears with the details of the invitation, including the Applying Contact, the Funding Request Name, and your Reply To address. Michon uses the Applicant Invitation Email Template, which was customized by the Six Sides Fund’s Salesforce admin.

- Click Send Invitation.
This single click creates a grantee portal registration if the contact doesn’t exist as a user. They’re sent a welcome email and become the owner of the funding request for record visibility and editing.
Only the invitee can see the funding request record in the grantee portal, which they can access through the email and the My Applications page.

Now you understand the portal from the grantmaker’s perspective. Let’s explore what the experience is like from the grantee’s perspective by following the entire grant lifecycle using Salesforce Grants Management.
In the next unit, we follow the staff at NMH as they submit an application, respond to requirements from Michon, and manage their part of the process in Grants Management.
Resources
- Salesforce Help: Configure the Home Page
- Salesforce Help: Customize the Theme of Your Experience Builder Site
- Salesforce Help: Configure the Registration and Login Pages
- Salesforce Help: Configure Self-Registration
- Salesforce Help: Set Funding Program Visibility
- Salesforce Help: Create and Customize Reviews
- Salesforce Help: Configure Portal for External Reviews
- Salesforce Help: Sharing Rules
- Salesforce Help: Invite a Grantseeker to Apply