Manage Funding Programs and Funding Requests
Learning Objectives
After completing this unit, you’ll be able to:
- Create funding program records and post them to the portal.
- Understand the elements of a funding request record.

Before You Start
Before you start this module, consider completing the following recommended content.
Let’s Get to Work
In this module we follow the Six Sides Fund, a (fictional) grantmaker looking to standardize and simplify how it works with grantseekers and disburses money.
Six Sides provides funding for community impact programs, strategic nonprofit development work, and scholarships. The foundation recently installed Grants Management in Salesforce to streamline its workflows. Michon Levitt, a program coordinator at Six Sides, couldn’t be happier. He’s ready to dive in to improve processes at the foundation and for the grantseekers he works with.

In this unit, we follow along with Michon as he works in Grants Management to create his funding programs and then process funding requests. Your organization’s funding programs are likely different from the example organization’s, and your admin may have customized your Salesforce fields and picklists. But the principles covered in this badge give you the general understanding you need to get started in Grants Management.
Create Funding Programs
Everything in Grants Management starts with the Funding Program object. The Six Sides Fund already created its top-level (or parent) funding programs, and now it's time for Michon to create a second-level (or child) funding program.
- Go to the App Launcher (
 ) and find and select Funding Programs.
- On the Funding Programs page, click New.
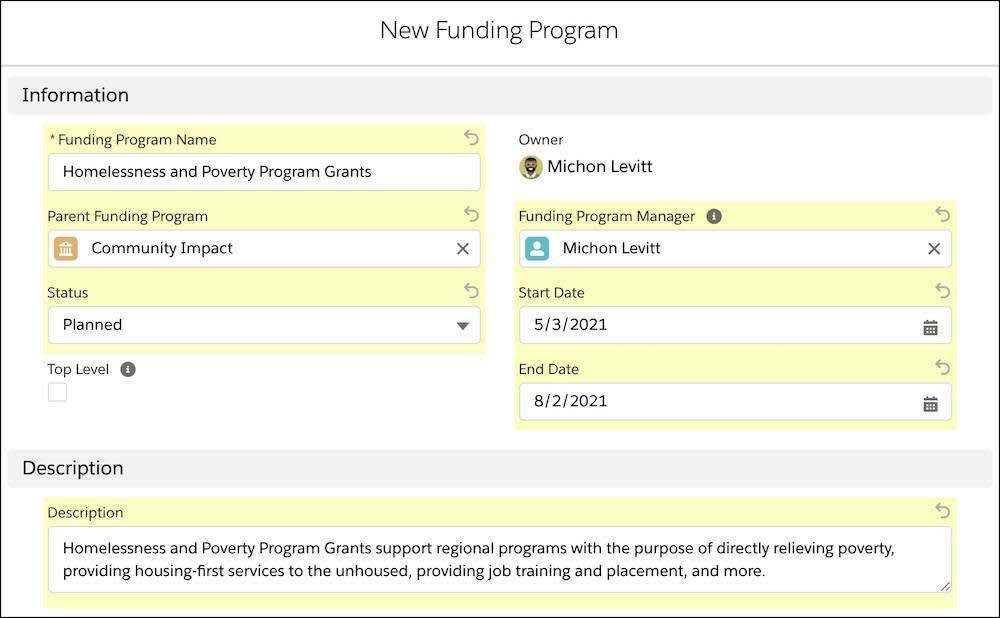
- Enter a Funding Program Name. Michon enters
Homelessness and Poverty Program Grants.
- Find and select a Parent Funding Program. Michon selects the Community Impact funding program, which was already created with the Top Level field selected. Top Level programs are often used to create a hierarchy.
- Find and select a Funding Program Manager. Michon searches for and selects himself since he manages this program.
- Select a Status. Michon selects Planned. The Six Sides Fund configured rules that only funding programs with the status of In Progress appear in the grantee portal, and he doesn’t want this funding program to appear publicly yet. (Talk to your admin about which statuses appear in your grantee portal.)
- Choose a Start Date and End Date. Michon sets a 3-month window for requests for funding.
- Enter a Description. Michon enters a few words about the program and what it funds.
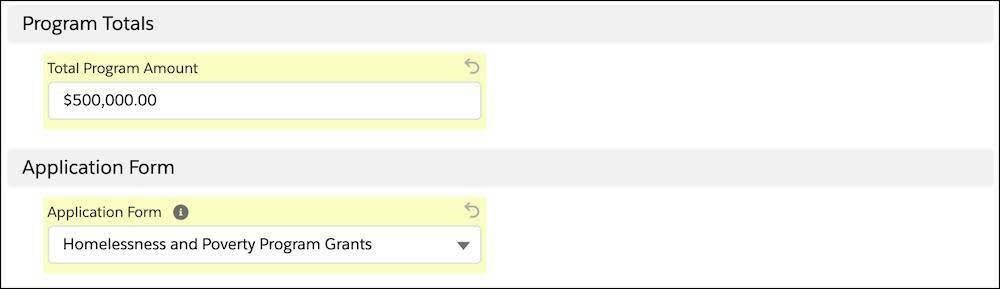
- Enter a Total Program Amount. The budget for this program is $
500,000.
- Select an Application Form from the picklist. This field allows you to use the best form for each program. Your Salesforce admin can create application flows and add them to this list as needed. (Check out the Create or Modify a Flow link in Resources.) Michon selects his Homelessness and Poverty Program Grants application form. We come back to the form in a later unit.
- Click Save.
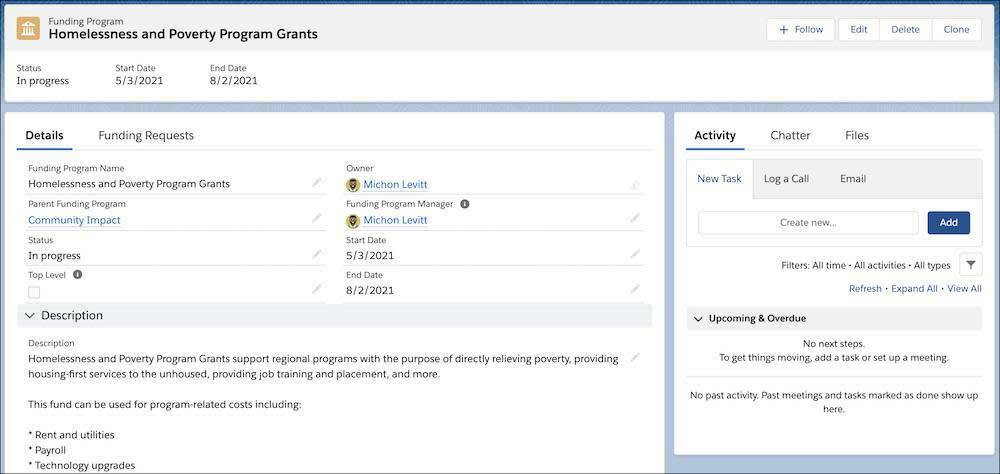
The new funding program record is created.
Understand Funding Requests
Let’s fast-forward to when the program is active. Michon set his funding program to In Progress and a few funding requests came in through the portal. Michon goes to his funding program and navigates to the Funding Requests tab to see all related requests.
One funding request is from an organization that hasn’t applied for a grant from the Six Sides Fund before, the (fictional) nonprofit No More Homelessness (NMH).
Let’s check out the record.
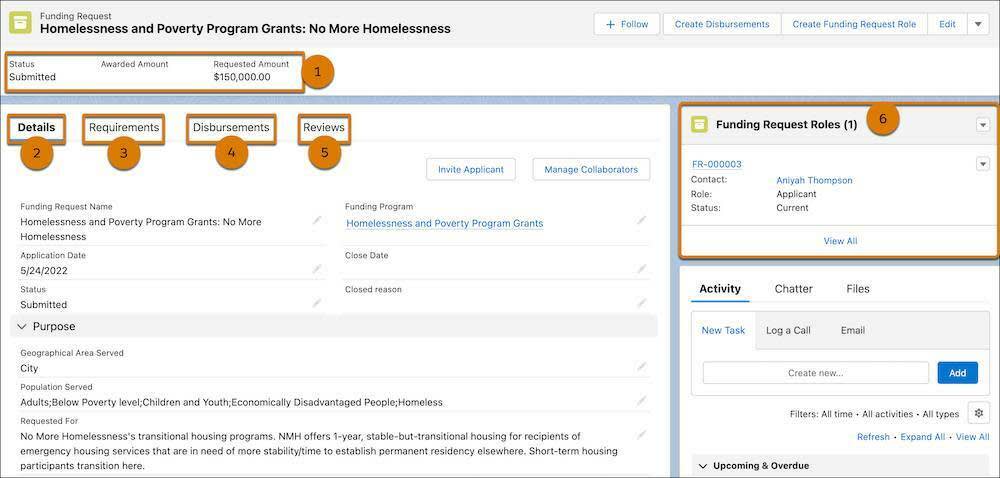
- The status bar (1) displays where the application is in the process and some other basic information. Your admin can customize your process as needed.
- The Details tab (2) contains important information about a request, including the funding program, the application date, the applicant, and more.
- The Requirements tab (3) is where you can find everything you’re requesting the grantseeker provide during the review process. More on requirements in the next unit.
- The Disbursements tab (4) is where you can find related payments if the grant is awarded.
- The Reviews tab (5) is where you can create and find review records, which you can assign to internal and external reviewers.
- The Funding Request Roles area (6) is where you track the key players related to the request. Those contacts could be at either the grantseeking or grantmaking organization, including the applicant, grant manager, financial manager, or executive director.
Michon thinks NMH’s proposal is interesting and wants to move forward, but he first must make sure the organization is eligible for funding. He sets the funding request record’s status to In Review then gets to work on due diligence—the topic of our next unit.
Resources
- Salesforce Help: Manage Funding Programs
- Salesforce Help: Create or Modify a Flow
- Salesforce Help: Manage Funding Requests