Handle In-Day Changes
Learning Objectives
After completing this unit, you’ll be able to:
- Describe how to optimize your schedule during the day.
- Optimize a mobile worker’s schedule.
- Optimize a territory’s schedule.
- Set up a scheduling recipe to deal with common scheduling problems.
Each Day Brings New Challenges
Ursa Major uses global optimization every night, so each morning everything is in place for a speedy and productive day. All the service team has to do is stick to the schedule.
But then the day unfolds. Mobile workers get sick. Heavy traffic causes delays. Customers reschedule appointments. The result? Appointments get added, removed, and moved around. And then the day’s schedule isn’t so optimal anymore. Luckily, there’s an optimization for every occasion. Here are ways you can reoptimize a schedule gone awry.
Type of Optimization |
Example |
How to Use |
|---|---|---|
In-Day Optimization. Optimizes your schedule for one or more territories on the day of service |
Traffic is worse than usual in Los Angeles today and all their appointments are running late. Many appointments in the Los Angeles territory overlap. |
Set up the scheduling policy to use in-day optimization. In the list of service appointments, select Optimize. |
Resource Schedule Optimization (RSO). Optimizes one mobile worker’s day |
A mobile worker’s first job ran late, another one canceled, and a new high-priority job arrived. |
Select the mobile worker on the Gantt and choose Resource Schedule Optimization. For our example, RSO moves the second job later to account for the late-running job. Since the worker has a gap in their schedule, it assigns them the high-priority job. |
Reshuffle. Moves appointments to schedule a high priority appointment |
A new high-priority job arrives and must be completed right away. |
Select the high priority appointment on the Gantt or in the appointment list and choose Reshuffle. The optimizer schedules the new appointment in place of a lower priority appointment and moves other appointments around as needed. |
Fix Your Schedule with In-Day Optimization
Los Angeles is having a bad day. A herd of emus escaped from an emu ranch and ran across the 101! Before they were caught, traffic backed up everywhere, so Ursa Major’s mobile workers are running late. Luckily, in-day optimization can easily fix this.
First, Maria sets up in-day optimization.
- In the Field Service Settings pane, click Go to Guided Setup.
- Click Scheduling Policies.
- Select your scheduling policy. Maria selects Customer First.
- Toggle In-Day Optimization.
Back in the dispatcher console, Jacinta optimizes today’s schedule.
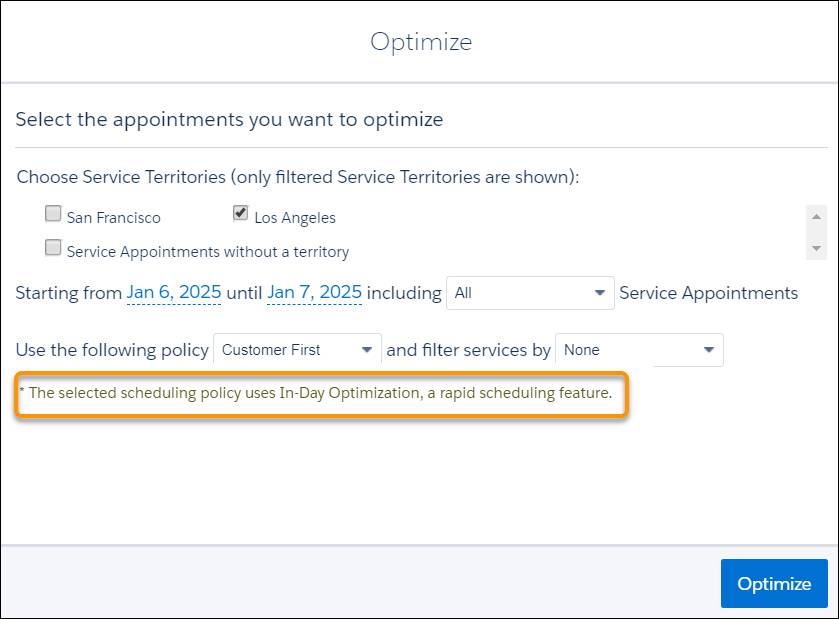
- In the list of service appointments, select Optimize.
- Select the optimization options. Jacinta selects the following values.
- Service territory: Los Angeles
- Service appointment to include: All
- Scheduling policy: Customer First
- Jacinta also notes a message informing her that she's using in-day optimization. This is just what she wants to see.

- Click Optimize.
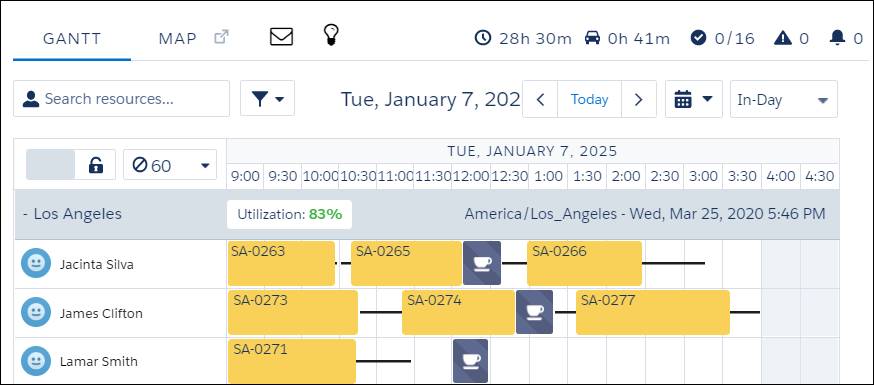
Jacinta’s daily schedule reoptimizes. Appointments are shifted as needed until everything is back on track. Everyone breathes a sigh of relief and goes back to their day.
Fix the Schedule for a Mobile Worker
Jacinta notices that Lamar Smith has a gap in his schedule because a customer rescheduled their appointment to another day. He won’t have any appointments after lunch if she doesn’t help.

Jacinta can’t let that happen. She optimizes his schedule.
- Hover over the mobile worker’s name in the Gantt, click the three dots, and choose Resource Schedule Optimization.
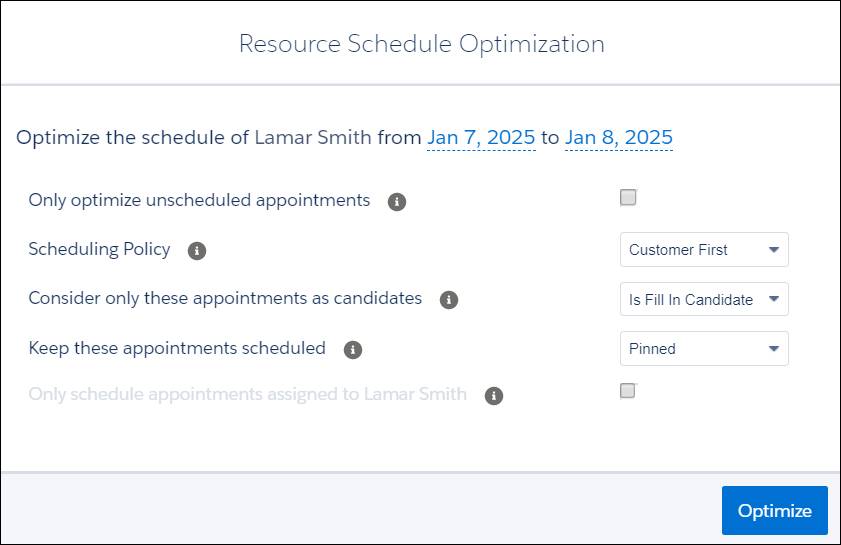
- Enter the values in the dialog. Maria enters the following.
- Time Horizon: Jan 7, 2025 to Jan 8, 2025
- Scheduling policy: Customer First
- Consider only these appointments as candidates: Is Fill In Candidate
- Keep these appointments scheduled: Pinned
- Only schedule appointments assigned to Lamar Smith: Cleared

- Click Optimize.
The schedule optimizer starts looking for the perfect job to fill up the empty time slot. It looks for a job that Lamar is qualified for, that can be scheduled during that time, and that best meets Ursa Major’s business priorities.
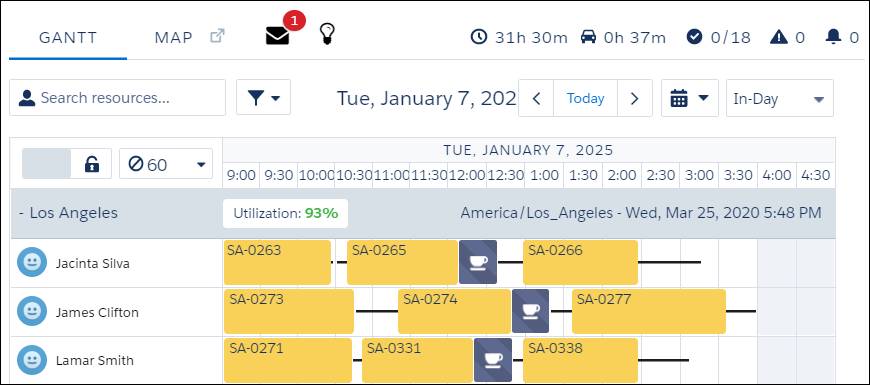
Presto! A new job appears on Lamar’s schedule. No more gaps in his day.

Jacinta’s happy that her schedule is full again. Lamar’s happy to have the work. And the customer whose job got moved into Lamar’s slot is happy to have their job completed sooner. RSO created a lot of happiness at Ursa Major.
Automate Scheduling Challenges with Scheduling Recipes
Jacinta is great at seeing problems in her team’s schedule and taking steps to fix them. But sometimes there’s so much going on that it’s difficult to resolve every problem. She wants to automate how Field Service handles common situations that cause gaps or overlaps in her schedule, like the following.
- An appointment is canceled
- A mobile worker finishes early
- A mobile worker finishes late and has overlapping appointments
- An emergency causes appointments to overlap
Jacinta goes to Maria to see if she can help. Maria tells her that she needs scheduling recipes. Scheduling recipes tell Field Service what to do when a certain event occurs, such an appointment ending early. To start, Jacinta asks for a scheduling recipe for appointments that end early.
Certain conditions trigger a scheduling recipe. Maria asks Jacinta some questions to find out more. First, she’d like to know the least amount of time that a mobile worker requires to get work done. She knows it’s more than five minutes and less than five hours. Jacinta laughs and says at least half an hour. Time increments smaller than that won’t be enough.
Next, Maria asks for a list of appointment statuses that can trigger the scheduling recipe. Jacinta says that appointments that finish early have the following statuses.
-
Complete. For example, if the mobile worker was speedy.
-
Cannot Complete. For example, when a part is missing or faulty.
-
Cancel. For example, when the customer cancels or reschedules the appointment.
Finally, Maria asks who can start this recipe. Jacinta says mobile workers, dispatchers, and agents.
With all this information, Maria creates a recipe.
- In the Field Service Settings pane, click Automated Scheduling, then Scheduling Recipes.
- Click New Recipe and select the event to automate. Maria selects Shortened Appointment.
- Enter the recipe name and description. Maria names her recipe: Appointment ends early. Then she enters the description:
Keep existing appointments as scheduled, and fill in gaps with other appointments.
- Toggle Active.
- Enter the values for your scheduling recipe. Maria selects the following.
- Choose what to do with the available time in the schedule when an appointment ends early: Preserve Current Schedule & Fill Gaps
- Minimum schedule space created for recipe to apply (minutes): 30
- Leave service territories and work types as the default, All
- Status categories: Cannot Complete, Completed, and Canceled
- Initiating User Permission Set: Resource, Dispatcher, and Agent
- Maria skips custom criteria logic.
- Optimize with Scheduling Policy: Ursa Major Customer First
- Change scheduled appointments’ status: Scheduled
- Click Save.
The new scheduling recipe is ready to go.
In this unit, Jacinta discovered how to optimize her schedule when things go wrong during the day. She filled gaps in a mobile worker's schedule and reshuffled the appointments in a territory. Then, she reoptimized the schedule after the great emu escape. Finally, she created scheduling recipes to automate scheduling problems.
Resources
- Video: RSO (Resource Schedule Optimization) - Field Service
- Salesforce Help: Optimize Today’s Schedule
- Salesforce Help: Optimize a Single Resource’s Schedule
- Salesforce Help: Create Scheduling Recipes for Common Events