Interactuar con vistas publicadas
Objetivos de aprendizaje
Después de completar esta unidad, podrá:
- Modificar una vista publicada.
- Filtrar datos en una vista.
- Personalizar una vista.
- Guardar una vista.
Además de crear vistas desde cero, mucho de lo se hace en Tableau Cloud involucra modificar vistas ya publicadas e interactuar con ellas. Por ejemplo, imagine que parte de su trabajo de análisis incluye consultar vistas existentes y modificarlas para que respondan a las preguntas que realiza su gerente. Veamos cómo hacerlo.
Modificar una vista
Si se muestra el botón Edit (Modificar) en la barra de herramientas cuando consulta una vista de Tableau, esto significa que puede realizar modificaciones en esta. Como aprendió en Fundamentos de Tableau Cloud, con el rol Creator o Explorer (puede publicar) puede hacer lo siguiente:
- Crear y modificar un libro de trabajo nuevo en función de una fuente de datos publicada.
- Modificar un libro de trabajo publicado existente.
Cuando crea un libro de trabajo nuevo o modifica uno existente, puede agregar hojas para vistas, dashboards e historias.
Para modificar una vista publicada, ábrala y haga clic en el botón Edit (Modificar) en la barra de herramientas. Cuando haga clic en Edit (Modificar), se abrirá la vista en el modo de creación web.

Puede realizar modificaciones a una vista en el modo de edición, como agregarle campos y otros detalles. Con el rol Creator o Explorer (puede publicar) del sitio, puede modificar el libro de trabajo y guardar los cambios.
En el modo de edición, también puede interactuar con la información de la vista, lo que incluye visualizar los datos subyacentes, filtrarlos y clasificarlos, y acercar o alejar el zoom en las regiones.
Filtrar datos en una vista
Puede que desee mostrar solo ciertos datos de su vista. Puede filtrar sus datos de diversas maneras, incluidas las siguientes:
- Puede arrastrar un campo de dimensión, medida o fecha al estante Filters (Filtros). Puede seleccionar elementos que desea incluir o excluir de la vista, o seleccionar un rango de valores.

- También puede interactuar con una vista publicada si selecciona una sola marca (punto de datos) o si hace clic y arrastra elementos en la vista para seleccionar varias marcas. En la descripción emergente que aparece, puede seleccionar Keep Only (Conservar solo) para mantener solo las marcas seleccionadas en la vista o seleccionar Exclude (Excluir) para quitarlas.

Existen varias formas en que puede interactuar con los datos de una vista de Tableau Cloud. Mire el video para conocer la más común.

En el video, observó interacciones comunes que puede realizar sin modificar ni cambiar la vista, que incluyen colocar el cursor sobre marcas para ver más información en la descripción emergente; ampliar y contraer jerarquías; seleccionar y conservar solo las marcas de interés; y utilizar filtros para dividir los datos de distintas formas.
Guardar una vista personalizada
Si debe modificar una vista cada vez que la abre, considere guardar los cambios como una vista personalizada. Por ejemplo, si aplica un filtro para incluir solo los datos que le son relevantes o si desea ordenarlos de una manera específica, puede guardar distintas vistas personalizadas para cada escenario.
Una vista personalizada no modifica la original, pero permanece relacionada con esta. Si la vista original se actualiza o se la vuelve a publicar (con filtros diferentes, por ejemplo), la vista personalizada también se actualizará. Del mismo modo, si la vista original se elimina del servidor, también se eliminará la vista personalizada.
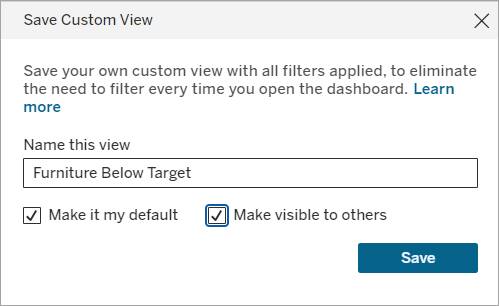
Para crear una vista personalizada, abra la vista individual que desea personalizar, filtre los datos, modifique el orden, seleccione marcas específicas, aleje o acerque el zoom, o realice cualquier otra modificación. Luego, seleccione Save Custom View (Guardar vista personalizada) en la barra de herramientas.

Después de ingresar un nombre para la vista personalizada, puede elegir si desea que sea la predeterminada y si debería ser pública y visible para terceros. Si selecciona Make it my default (Convertirla en predeterminada) y, luego, Save (Guardar), la vista personalizada se mostrará de forma predeterminada cada vez que abra el libro de trabajo.

Puede cambiar a la vista original o a otra personalizada, y administrar las vistas personalizadas desde la barra de herramientas.

Si filtra y clasifica datos, y decide no crear una nueva vista personalizada, puede regresar con facilidad a los datos previos a las modificaciones que realizó si hace clic en el botón Reset view (Restablecer vista) en la barra de herramientas.

Hasta ahora, aprendió cómo crear sus propias vistas en Tableau Cloud, además de cómo personalizar algunas ya existentes. El próximo paso es compartir estas vistas con su gerente y sus colegas.
Recursos
- Ayuda de Tableau: Explorar e inspeccionar datos en una vista
- Ayuda de Tableau: Crear gráficos y analizar datos
