Create OmniScripts for Quoting
Learning Objectives
After completing this unit, you’ll be able to:
- List the steps to create an OmniScript.
- Explain how to use a provided Lightning web component.
- Describe the troubleshooting tools available in preview mode.
Before You Start
Before you start this module, make sure you complete the following content. The work you do here builds on the concepts and work you do in that content.
Also, consider completing the following recommended content.

Build a Guided Quoting Experience
In Product Modeling for Insurance Quoting, you learn how Justus Pardo, an ace solution architect at Cumulus Insurance, models and implements a variety of insurance products. In Rating Procedures for Insurance Quoting, you learn how he sets up rating procedures to calculate the pricing for such products. Finally, in this module, follow along as he sets up an OmniScript that guides users through creating a quote.

This guided flow involves three main steps.

-
Capture user input: The user enters details about who and what to insure.
-
Retrieve products and set rates: Based on the user inputs, the OmniScript returns eligible products. Users can further select desired coverages and policy terms with automatic rate adjustments.
-
Create quote: Users confirm product selection to create a new quote.
Justus configures elements and calls services to make this guided experience as intuitive as possible. In this unit, learn about the tools he uses.
Create an OmniScript
Justus starts by creating his OmniScript.
The Type, SubType, and Language serve as the unique identifiers for the OmniScript. The new OmniScript gets labeled Version 1 with the provided name. You can create more versions as needed. After building, use Activate Version to make it active. Only one version is active at a time.
Existing OmniScripts are listed by their Type or SubType nodes, with named versions under each. There’s an Active column with check marks indicating which OmniScripts are active and which is the active version.

Here, three versions are available for a small business quote, but only the first version is active. The OmniScript is active, as is the first version.
Before starting a new OmniScript from nothing, find out if there’s a similar existing OmniScript you can use as a starting point. Click New Version from that existing OmniScript. Edit the new version, set a different Type, Subtype, or Language, and just like that, you have a new OmniScript at the Version 1 spot.
OmniScript Designer Interface
After creating an OmniScript, it’s time to build.
Build the OmniScript by adding elements and putting them in the desired order for execution. During execution, data is in JSON format and updates as each element executes.

Elements show in the navigation panel (1) and the canvas (2). To build, drag components from the Build panel (3). Configure the selected element in the Properties panel (4). The Setup panel (5) shows the general properties of the OmniScript.
The Build panel organizes available components by the type of functionality they perform.
To learn more about the different element types, check out Omniscript Element Reference.
Show Rated Products
A big part of building OmniScripts for quoting is using provided insurance services and Lightning web components. They save time by handling standard processes such as retrieving and showing rated products.
Some elements are great for using these resources: Remote Action to call a service directly and custom Lightning web component to use a Lightning web component. The provided Lightning web components often use the services, too.
Later units cover specific services and Lightning web components. For now, explore their configuration more generally.
Service Call Signature
To call a service, you must know specific details about it.
You identify services by their method name, such as getRatedProducts. However, the complete reference includes class and method, as in InsProductService:getRatedProducts.
All of the provided Insurance services have the same call signature. The class name and method name define the call along with:
-
Input JSON: The data the service acts on.
-
Output JSON: Where the service stores its results.
-
Options JSON: Optional and required data to carry out the task or alter the behavior.
Remote Action Element
Call a service directly with the Remote Action element. The OmniScript’s Data JSON serves as input to the service.
Justus calls a getQuoteDetail service that retrieves information about an existing quote.

He enters the service’s class, method, and options into their corresponding fields. Notice he enters the service name, getQuoteDetail, as the Remote Method and specifies the Key-Value pairs under Remote Options.
Custom Lightning Web Component Element
Use Lightning web components to work with the services and format raw JSON data for display and interaction. They’re customizable and available for standard processes.
Justus adds a Lightning web component to show multiple Cumulus health plans for review and selection.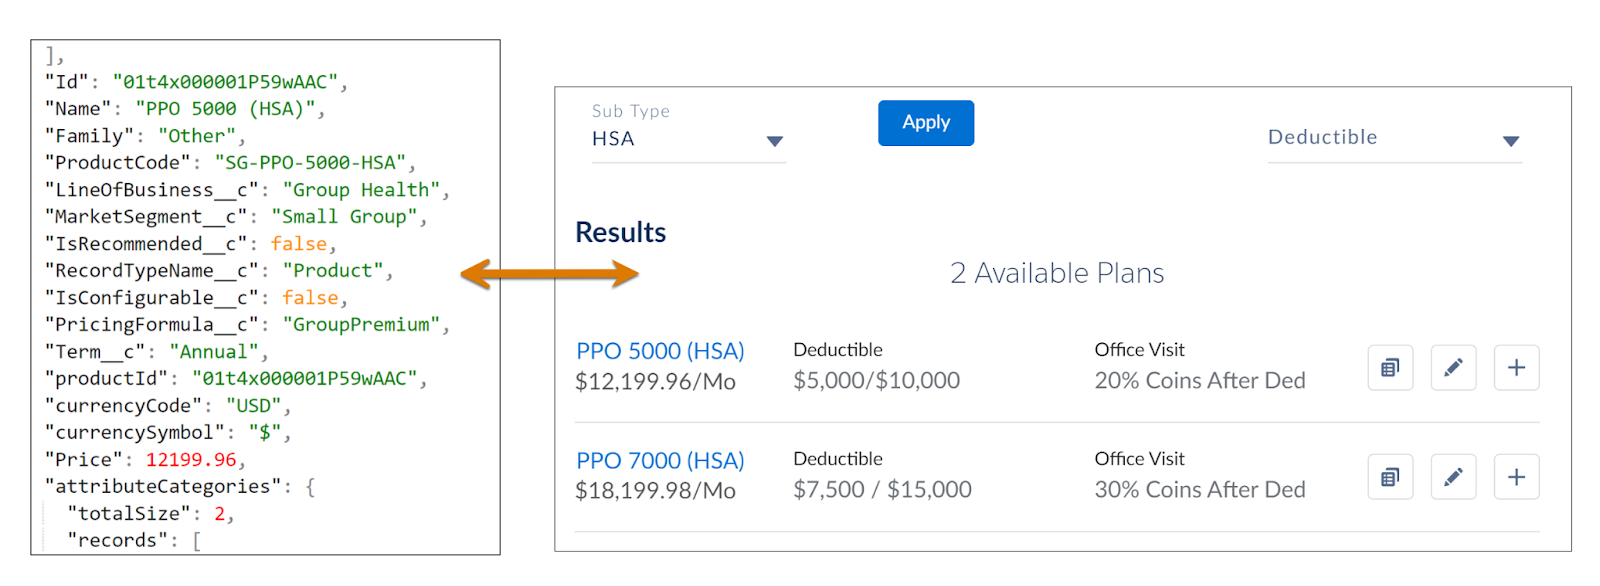
Instead of raw JSON data, the Lightning web component shows a user-friendly interface, including premiums and the option to filter the plans.
To learn more about adding Lightning Web Components to an OmniScript, check out Add Custom Lightning Web Components to an OmniScript.
Justus adds the Lightning web component insOsGridProductSelection, which helps users select, compare, and add products to the cart for final purchase.

He specifies the component name and a property named census-json. This component can call specific services in the JSON. Here, it’s a call to the getRatedProducts method.
Troubleshoot Your OmniScript
Use Preview mode to test your OmniScript, verify everything’s working, and troubleshoot any issues.
Sometimes errors appear in a dialog box due to typos or other small issues. Thanks to Preview mode, resolving these errors doesn’t involve complicated detective work.
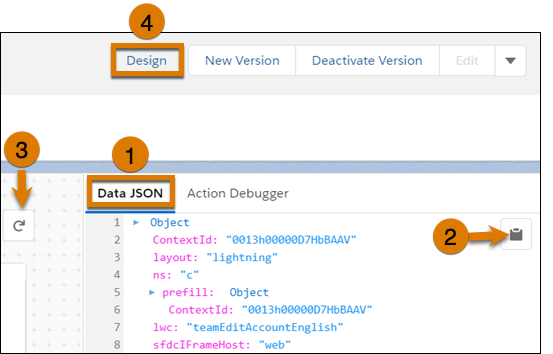
In Preview mode, use the Data JSON tab (1) to view the data structure formed by the JSON code. As you build and preview your OmniScript, confirm that this panel contains the expected and necessary information at each step. You can Copy (2) the Data JSON to an external JSON editor for easier viewing and searching.
Use Reload (3) to rerun the preview with new values. Return to Design mode (4) to check the properties of the current and previous elements.
In Preview mode, these additional options help you troubleshoot.
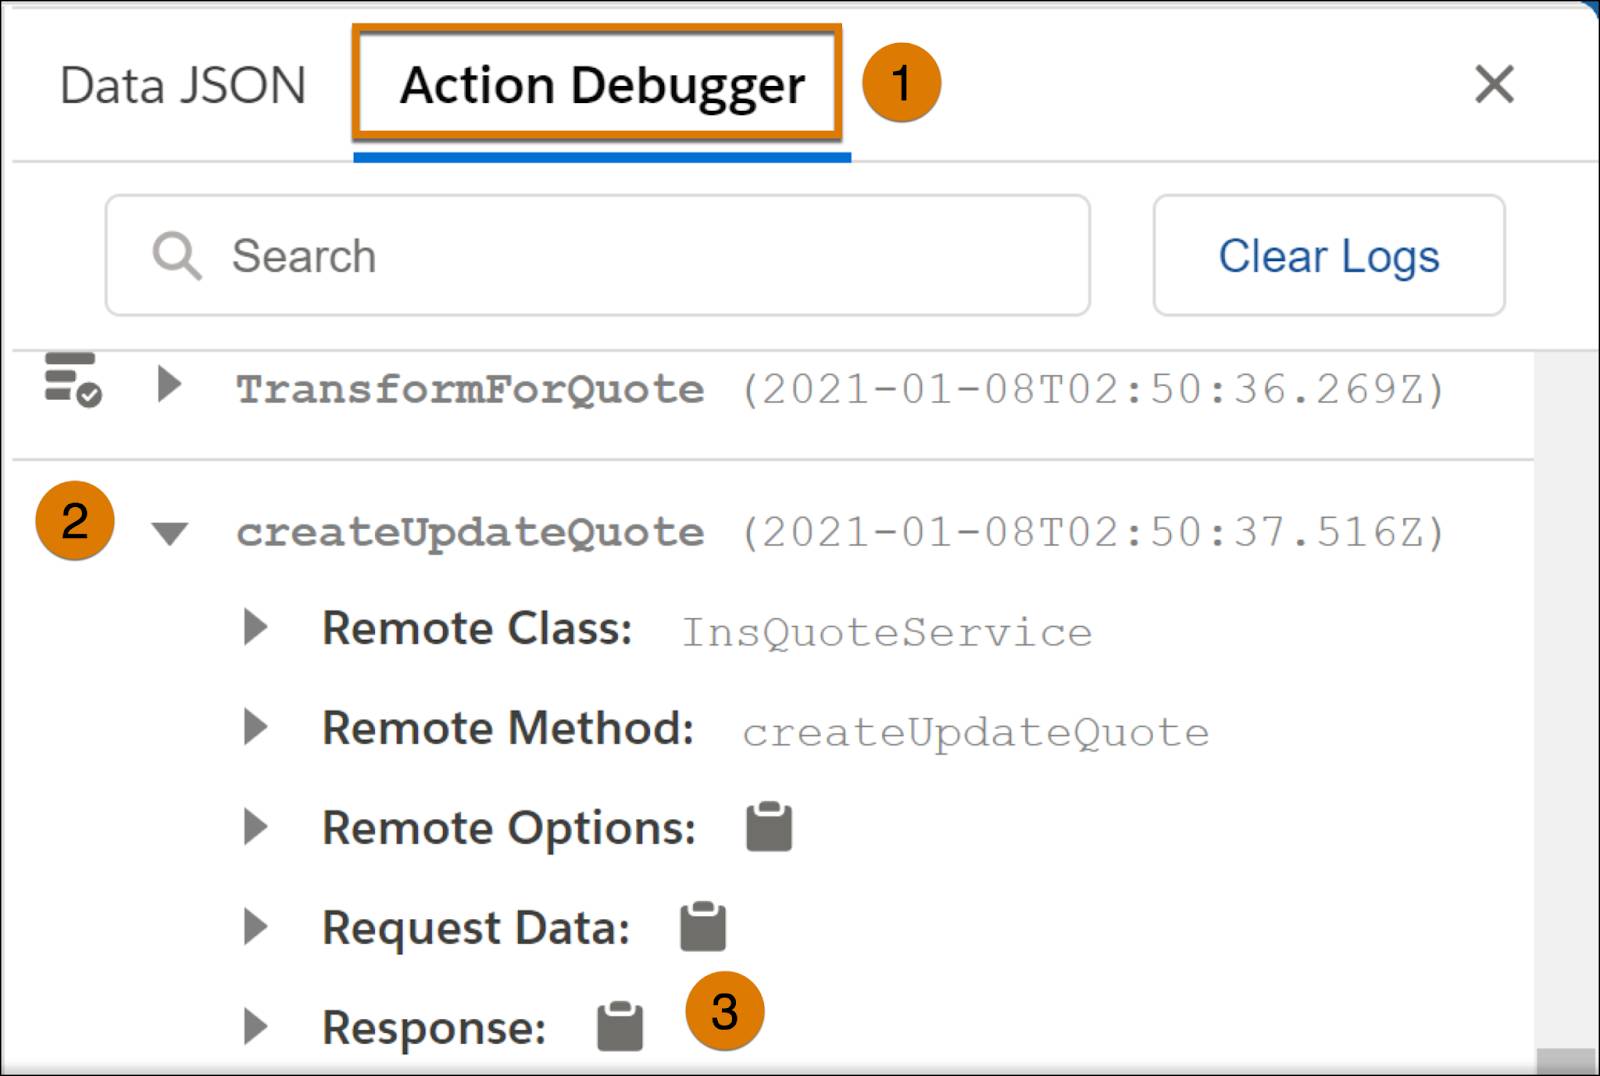
Every service call is logged in the Action Debugger (1) in real time. Check the debugger to see if calls receive the correct data and to confirm the results are as expected.
When you Expand (2) an action, you typically see five nodes. Expand each node to see the associated JSON. Click to copy (3) the JSON. Options JSON shows the values sent to the service. If an option dynamically gets a value, such as %quoteId%, use the debugger to confirm the value sent with the service call.

So far, you've learned how to create OmniScripts for quoting. Next, learn how data collection works in quoting, so keep reading!