Set Up Billing Basics
Learning Objectives
After completing this unit, you’ll be able to:
- Sign up for a Salesforce Developer Edition org with Agentforce Revenue Management.
- Define legal entities for different business segments.
- Set Billing’s default legal entity for accounting and tax purposes.
Before You Start
Before you start this module, make sure you complete this content. The work you do here builds on the concepts and work you do in that content.
-
Agentforce Revenue Management Foundations
-
Agentforce Revenue Management Design
-
Billing Basics in Agentforce Revenue Management

Practice Billing Basics
In the Billing Basics in Agentforce Revenue Management module, you learned how Billing does more than just send invoices. It anchors the final stage of your revenue lifecycle with a connected, intelligent billing engine that’s designed to grow with your business. Billing works hand-in-hand with your sales and service processes in Agentforce Revenue Management to help your team complete their quote to cash journey, collaborate easily, respond faster to changes, and reduce manual cleanup.
But before you can use it, you must complete some setup as an admin. You turn Billing on, assign permission sets, and add billing fields to page layouts. See Set Up Billing and Set Up Additional Billing Features in Salesforce Help for details. And you customize the Billing Operations Console, which helps you monitor invoices, credit memos, and invoice schedules.
In this module, we cover the part of the setup that comes after. You practice with the Billing objects and tools that manage your organization’s invoicing process. You set up records to help your team monetize any sales model they can dream up, then generate billing schedules and invoices from a quote and related order.
A Business Scenario
With the groundwork in place, meet Hannah Rodriguez, billing admin at InfinitraBytes, an electronic products and solutions company.

InfinitraBytes boasts an extensive catalog of over 5,000 items, ranging from laptops and accessories to services like antivirus software and warranty plans. InfinitraBytes bills in multiple ways such as in advance for goods, in arrears for subscription and some services, and milestones for implementations. Billing can handle all of it. Hannah owns the initial setup and ongoing configuration for Billing in Agentforce Revenue Management.
Follow along with Hannah to set up the records InfinitraBytes needs to use Billing, growing your skills by completing real-world challenges. You’ll set up a common scenario: advance invoicing for goods that are purchased one time, such as a computer.
But, first, set yourself up with a Salesforce org with Agentforce Revenue Management.
Sign Up for a Developer Edition Org with Agentforce Revenue Management
To complete this module, you need a special Developer Edition org that contains Agentforce Revenue Management and our sample data. Get this free Developer Edition and connect it to Trailhead now so you can complete the challenges in this module. Note that this Developer Edition is designed to work with the challenges in this badge, and may not work for other badges. Always check that you’re using the Trailhead Playground or special Developer Edition org that we recommend. When you’re finished completing the step-by-step instructions in each unit, make sure you check the challenge.
- Sign up for this free Developer Edition org with Agentforce Revenue Management.
- Fill out the form:
- For Email, enter an active email address.
- For Username, enter a username that looks like an email address and is unique, but it doesn't need to be a valid email account (for example, yourname@example.com).
- For Email, enter an active email address.
- After you fill out the form, click Sign me up. A confirmation message appears.
- When you receive the activation email (this might take a few minutes), open it and click Verify Account.
- Complete your registration by setting your password and challenge question.
Tip: Save your username, password, and login URL in a secure place—such as a password manager—for easy access later.
- You are logged in to your Developer Edition.
Now connect your new Developer Edition org to Trailhead.
- Make sure you're logged in to your Trailhead account.
- In the Challenge section at the bottom of this page, click the org name and then click Connect Org.
- On the login screen, enter the username and password for the Developer Edition you just set up.
- On the Allow Access? screen, click Allow.
- On the Want to connect this org for hands-on challenges? screen, click Yes! Save it. You are redirected back to the challenge page and ready to use your new Developer Edition to earn this badge.
Your org is connected, but let’s take a few more steps to make sure it’s ready to use: Index your products, sync pricing data, and refresh decision tables to make sure everything works correctly in this new org.
Build the Product Index
Rebuild the Product Catalog Management index.
- From the App Launcher (
 ), find and select Product Catalog Management.
- On the Product Catalog Management home page, click Index and Search Configuration.
An error message may appear, because the system is trying to fetch the latest index snapshot details. An index build doesn’t exist yet though, because your Developer Edition is a brand new org. In a real-world implementation, your system would have a snapshot of details to gather. So for the purposes of this challenge, just close the banner and go to the next step.
- Click Create Full Index. If you don’t see Create Full Index, click Rebuild Index, and select Full Index Rebuild, then select Rebuild.
The index build takes a few minutes to complete. Refresh the page and confirm the status is Completed before proceeding.
Sync Pricing Data
Now sync the org’s pricing data.
- From Setup, in the Quick Find box, search for and select Salesforce Pricing Setup.
- In the Sync Pricing Data section, click Sync.

- Confirm that you want to sync your org.
The pricing data sync takes a few minutes to complete, but you can proceed to the next step while the sync runs.
Refresh the Decision Tables
Next, refresh the Product Qualification and Product Disqualification decision tables in your org.
- From Setup, in the Quick Find box, search for and select Decision Tables.
- Select Product Disqualification from the list.
- Click Refresh.
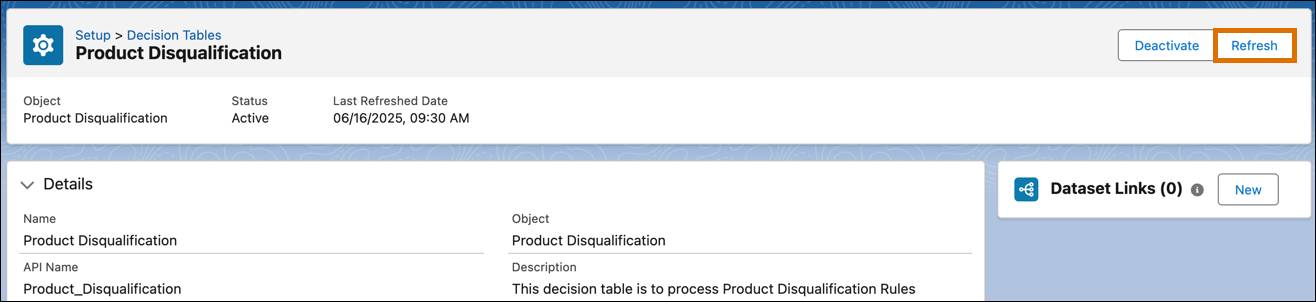
- Repeat these steps to refresh the Product Qualification decision table.
You’re all set to start using your Developer Edition org and work with billing.
Set Up a Legal Entity
In Billing, all transactions relate to legal entity records that define how an organization is structured. You can create multiple legal entities, which define billing, tax, and accounting information for an order product. This is helpful if you have customers or business segments in different tax locations, such as different countries.
InfinitraBytes, for example, has customers and subsidiaries in several countries. The company is based in the United States, however, and the largest share of its revenue comes from that country.
Hannah starts by setting up the first legal entity record for InfinitraBytes in the US. Follow along in your org.
- From the App Launcher (
 ), find and select Billing.
- From the App Launcher (
 ), find and select Legal Entities.
- Click New.
- Specify these details.
- Legal Entity Name:
USA Business - Status: Active
- Legal Entity Name:
- Save your work.
You can also add an address, company name, and description on a legal entity.
Before you move on, know that legal entities are also critical records for all of Billing’s accounting features. Legal entities make sure all billing transactions are correctly related to accounting periods and general ledger accounts. With proper configuration, Billing can even automatically create dual transaction journals for your accounting system. We don’t explore those features in this module, but you can read Manage Financial Accounting in Agentforce Revenue Management in Salesforce Help for details.
Set Your Default Legal Entity
Now that you have your first legal entity, it’s time to set it as the default for your org. The default legal entity comes into play when a billing transaction doesn’t specify a legal entity. Follow along.
- In Setup, enter
Billing Settingsin the Quick Find box, then select it.
- In the Billing Defaults section, select USA Business in the Legal Entity field.
This ensures every billing transaction is tagged to a legal entity and reported as a receivable for an accounting period during subledgering.
You’ve set up the Developer Edition org and legal entity; move on to the next unit to set up billing policies and treatments. But, first, make sure to check the challenge.
Resources
- Trailhead: Agentforce Revenue Management Foundations
- Trailhead: Agentforce Revenue Management Design
- Trailhead: Billing Basics in Agentforce Revenue Management
- Salesforce Help: Manage Billing in Agentforce Revenue Management
- Salesforce Help: Set Up Billing
- Salesforce Help: Create Legal Entities in Agentforce Revenue Management