Configure Locales
Learning Objectives
After completing this unit, you’ll be able to:
- List the settings you need to configure to localize a Salesforce B2C Commerce implementation.
- Explain how to configure time zones.
- Explain how to configure a regional currency format.
- Describe how to access geolocation data.
Configure Settings
A locale represents a specific geographic, political, or cultural region. B2C Commerce supports both country-specific and language-specific locales in the Business Manager user interface and in storefront data.
B2C Commerce is structured as an organization that contains one or more sites (storefronts). Brandon Wilson, Cloud Kicks merchandiser, uses Business Manager to define locale settings at both the organization and the site level.
Here’s what he can configure.
Organization (Global) |
Site (Storefront) |
|---|---|
|
|
He can also configure:
- Preferred locales for underlying B2C Commerce data, such as these.
- Products
- Content
- Orders
- Customers
- Taxation jurisdiction and rates
- System objects
- Locale-specific URLs
- Preferred locales by user for the Business Manager user interface
Configure Organization Settings
Brandon starts by defining localization settings for his organization and sites. Alternatively, he can ask his admin, Linda Rosenberg, to add new data locales and then transfer, add, delete, and update regional settings using site import and export capabilities. In this unit, he configures locale settings manually.
Configure organization (global) settings first. That means configuring the default locale and activating site locales so they appear on the site.
Configure the Default Locale
The default locale, set at the organization level, provides the foundation for B2C Commerce locale processing. Having a default is mandatory and it can’t be deactivated. Here’s how Brandon configures the organization’s default language.
- In Business Manager, click App Launcher, and then select Administration | Organization | Organization Profile.
- Select the default UI language: English
- Select the default data language: English
- Click Apply.
Add a New Locale
Here’s how he adds a new locale to a site.
- In Business Manager, click App Launcher, and then select Administration | Global Preferences | Locales.
- Click New.
- Enter an ISO 639 alpha-2 language code:
zh - Enter an ISO 3166 alpha-2 country code:
CN - Click Apply.
- On the Locales page, click a Locale ID: zh_CN
- Select the fallback locale: Chinese (zh)
This is the language locale that’s used if the assigned country locale isn’t available.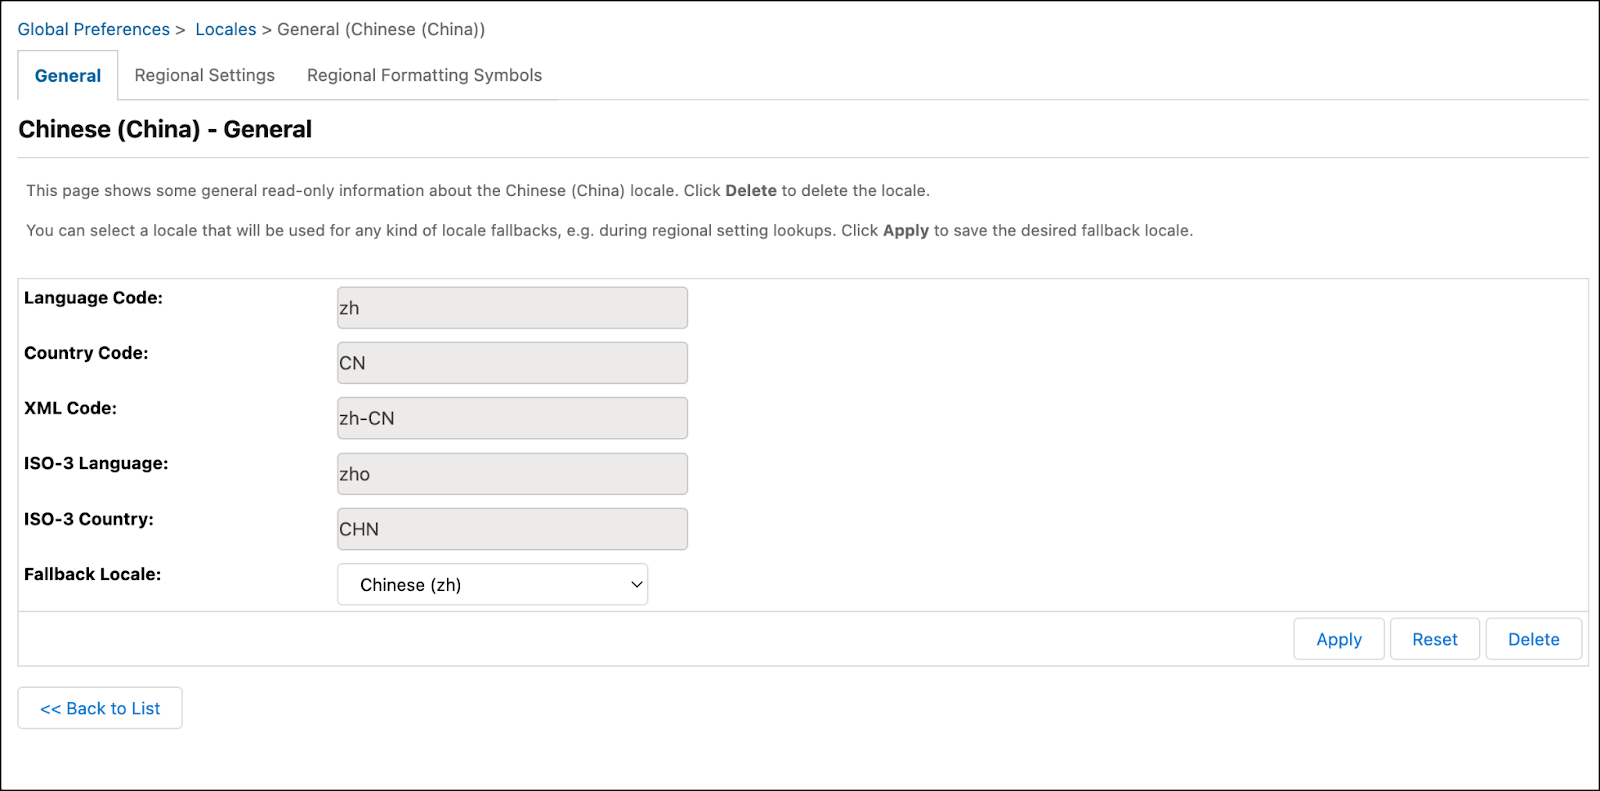

Configure Site Settings
Once Brandon configures the organization settings, he’s ready to configure site locales. Once locales are activated at the organization and site levels, B2C Commerce can use them in the storefront and in language select boxes within Business Manager.
Here’s how he configures site locales.
- Add currencies to the site.
- In Business Manager, click App Launcher , and then select Merchant Tools | Site | Site Preferences | Currencies.
- Click Add to add a new currency.
- In Business Manager, click App Launcher , and then select Merchant Tools | Site | Site Preferences | Currencies.
- Configure locales for the site.
- In Business Manager, click App Launcher , and then select Merchant Tools | Site | Site Preferences | Locales.
- Select which active locales are allowed on a site.
- Mark one locale as the default.
- Click Add to add a new locale.
- In Business Manager, click App Launcher , and then select Merchant Tools | Site | Site Preferences | Locales.
- Add custom site preferences.
- In Business Manager, click App Launcher , and then select Merchant Tools | Site | Site Preferences | Custom Preferences.
- Configure the default country code.
- Configure the store lookup unit (kilometers [km] or miles [mi]).
- In Business Manager, click App Launcher , and then select Merchant Tools | Site | Site Preferences | Custom Preferences.
Configure Time Zones
Brandon uses Business Manager to set the per-site time zone for interactions with users, which affects functionality defined with time periods, such as promotions or A/B testing. He also uses it to set the per-instance time zone for tasks that aren’t site-specific, such as for scheduled and automated jobs.
Per Site
Site timezone is a mandatory setting when creating a site. It’s automatically set to UTC when creating a site via the site import and export functionality, without a time zone specified.
Here’s how to set the per-site time zone.
- In Business Manager, click App Launcher, and then select Administration | Sites | Manage Sites > site.
- Select the site time zone: Etc/UTC
- Click Apply.
Per Instance
Here’s how to set the per-instance time zone.
- In Business Manager, click App Launcher, and then select Administration | Global Preferences | Instance Time Zone.
- Select the continent or ocean for the geographical area (for the available instance time zones): US
- Select the time zone: US/Eastern
- Click Apply.
Configure Currency
B2C Commerce comes with current world currency data. There’s no need for Brandon to add, edit, or remove currencies through Business Manager. He can, however, configure the currencies he wants to allow and define how they look for a locale. For example, B2C Commerce defines the default locale’s decimal positive pattern as #,##0.00.
The appropriate currency is automatically selected in the storefront based on the selected locale. The currency assigned to the default locale is the primary B2C Commerce locale.
B2C Commerce uses the $ for United States dollar (USD). For other currencies, the $ symbol is prefixed with letters based on common convention. For example, A$ denotes the Australian dollar.
Here’s how to configure the currencies that are allowed for your site.
- In Business Manager, click App Launcher , and then select Merchant Tools | Site Preferences | Currencies.
The allowed currencies appear in a list. You can’t delete the default currency.
- Select one or more currencies and sort them using the arrows on the right.
- On the Allowed Currencies page, click Add.
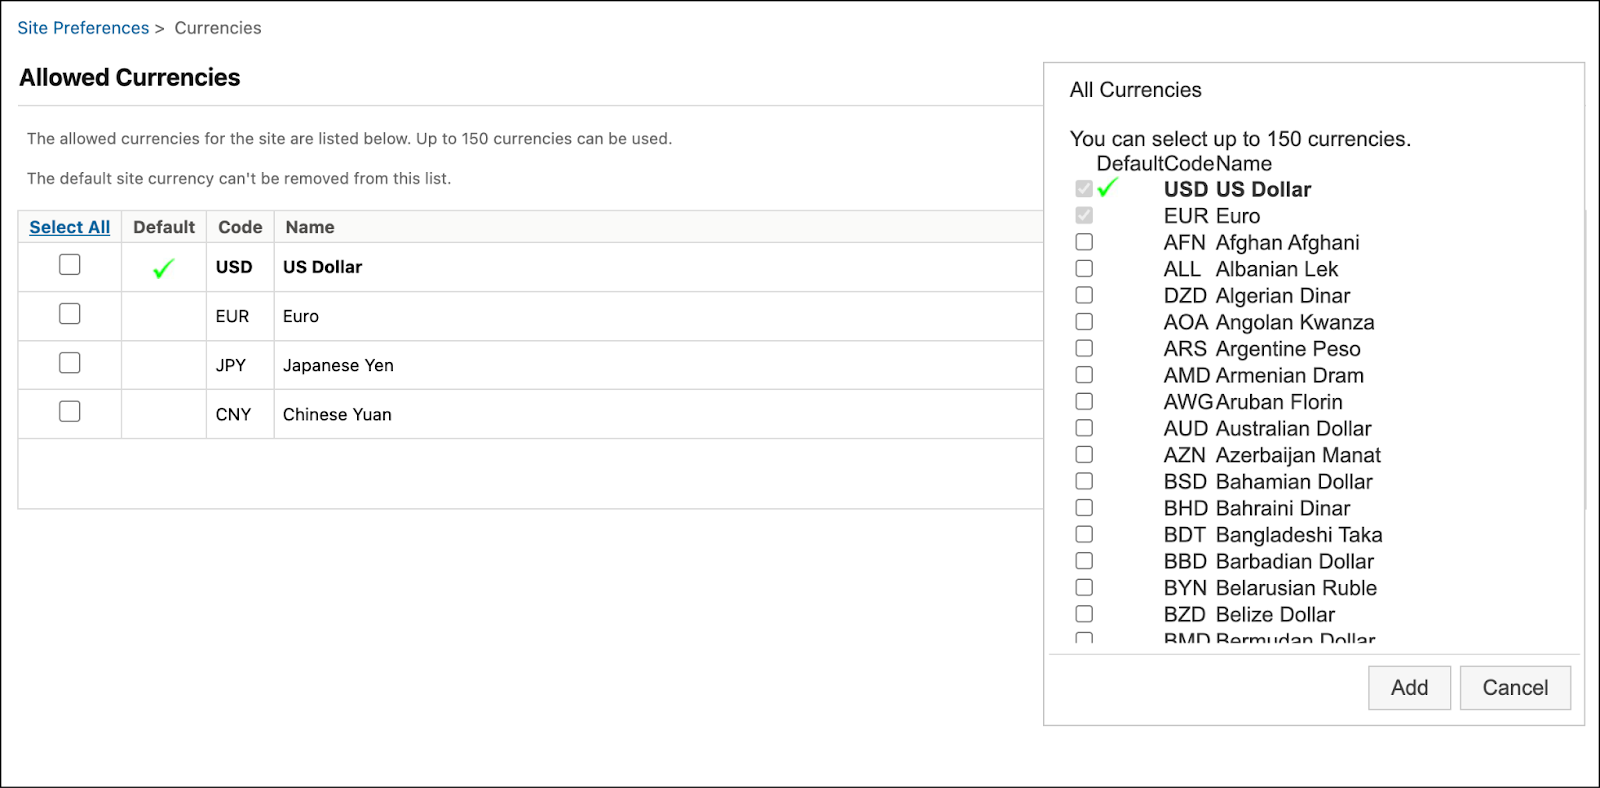
- Select currencies you want to add.
- Click Add.
Specify Currency Details
Brandon configures how currency appears on the storefront for each locale by editing the locale’s regional settings, which are globally defined (not site-specific). Regional settings provide format patterns for locale-sensitive operations, such as:
- Date/time
- Number format
- Currency format
B2C Commerce is predefined with default regional settings for a subset of the locales. Brandon can change regional settings for each locale. The formatting follows these conventions.
Operation |
Format |
Reference |
|---|---|---|
Numbers |
Java DecimalFormat |
https://docs.oracle.com/javase/8/docs/api/java/text/DecimalFormat.html
|
Date and Time |
Java SimpleDateFormat |
https://docs.oracle.com/javase/8/docs/api/java/text/SimpleDateFormat.html
|
Here are some tips.
- Use these characters to define currency number, separator, and currency symbol placement: (# , . *).
- Use the * symbol to specify where the currency symbol ($, ₤, or €) is placed. For example, look at the Long Currency Positive Pattern field for en_US. The * character indicates where the dollar symbol is placed.
- If you want to use a space for any of the grouping characters, use the _ character, which displays as a space in the storefront.
- The
Fallback Localedoesn't affect regional settings. If you don't define the regional settings, B2C Commerce uses a system-defined default.
Here’s how to activate and deactivate the locales available in the instance.
- In Business Manager, click App Launcher, and then select Administration | Global Preferences | Locales.
- Click a Locale ID.
- Click the Regional Settings tab.
You can also copy regional settings from one locale to another, saving time.
- In Business Manager, click App Launcher, and then select Administration | Global Preferences | Locales.
- Select a Locale ID.
- Click the Regional Settings tab.
- Click Prefill.
- Click Apply.
Configure a Regional Currency Format
Brandon wants to define how currency appears on the storefront for certain locales. He does this with regional settings, which are globally defined (not site-specific). Regional settings provide format patterns for locale-sensitive operations such as:
- Date/time
- Number format
- Currency format
Use DecimalFormat for numbers, SimpleDateFormat for date and time, and these characters to define currency number, separator, and currency symbol placement: (# , . *).
Use the * symbol to specify where the currency symbol ($, ₤, or €) is placed. For example, within the Long Currency Positive Pattern field for en_US. The * character indicates where the dollar symbol is placed for a positive number.
Here’s how you specify currency.
- In Business Manager, click App Launcher, and then select Administration | Global Preferences | Locales.
- Click a Locale ID
- Click the Regional Settings tab.
- Specify the currency format.
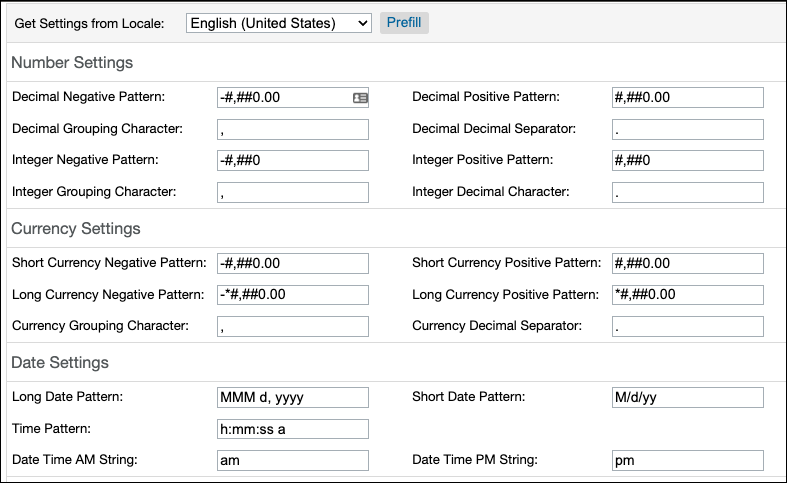
You can prefill the fields, then modify them to meet locale requirements. For example, you can reverse the commas and periods for the Euro: #.##0,00
Access Geolocation Data
B2C Commerce comes with US and German geolocation data that’s preloaded at the database level. This data is only for testing. Brandon needs to purchase and upload his own database for the implementation.
He can also ask a developer to expand the storefront application with basic storefront user account validation via access to an external ZIP code database. Because the geolocation information becomes less accurate over time, Salesforce recommends that you regularly import updated geolocation data.
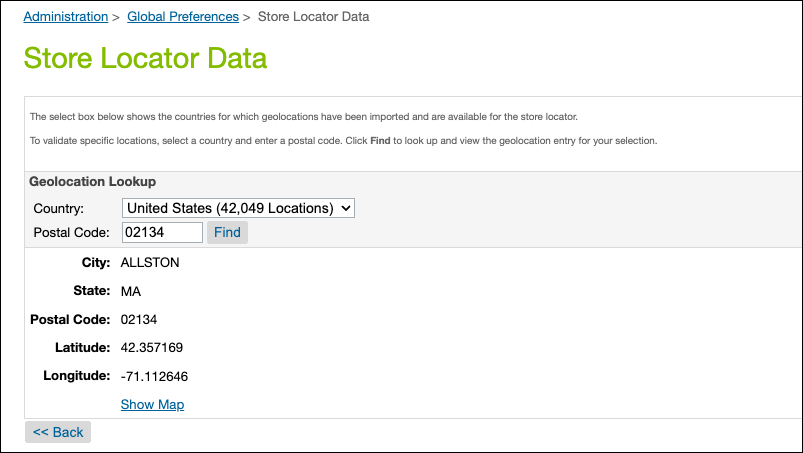
Here’s how you can look up an imported geolocation record.
- In Business Manager, click App Launcher, and then select Administration | Global Preferences | Store Locator Data.
- Enter a country selection: United States (42,049 Locations)
- Enter a ZIP code or a postal code:
02134The result is City, State/Province, Postal Code, Latitude, and Longitude.
Next Steps
In this unit, you learned about how B2C Commerce localization fallback processing works and how to configure Business Manager to support locales. Next, explore the types of storefront data you can localize, and how to structure localized data for storefront locale selection.
Resources
- Salesforce Help: Configure Organization Locales for B2C Commerce
- Salesforce Help: Import Localization in B2C Commerce
- Salesforce Release Note: Localization
- Salesforce Help:Export Elements for Bulk Localization for Page Designer
- Salesforce Help: Currency Precision
- External Link: Oracle: DecimalFormat
- External Link: Oracle: SimpleDataFormat