Configurar el Asistente de servicio
Objetivos de aprendizaje
Después de completar esta unidad, podrá:
- Describir el proceso de configuración del Asistente de servicio.
- Crear un agente de Asistente de servicio, y un subagente e instrucciones para el agente.

Registrarse para una zona de pruebas personalizada con Data 360
Para completar esta unidad, necesitará una zona de pruebas personalizada que contenga Data 360 y nuestros datos de muestra. Si aún no hizo clic en el botón Create Playground (Crear zona de pruebas) en la parte superior de esta página, hágalo ahora y siga los pasos para crear una zona de pruebas personalizada y conectarla a Trailhead. A continuación, complete las instrucciones paso a paso de esta unidad. Cuando haya terminado, haga clic en Check Challenge to Earn 500 Points (Comprobar el reto para obtener 500 puntos) en la parte inferior de la página.
Activar funciones de Agentforce
Configurar el Asistente de servicio es bastante sencillo, gracias a la página exclusiva Service Assistant Setup (Configuración del Asistente de servicio). El gerente de operaciones de servicio John sabe que esta es su opción de confianza para una experiencia de configuración rápida.
El primer paso para crear un agente de Asistente de servicio es activar las funciones de Agentforce que lo impulsan. Tenga en cuenta que Data 360 es obligatorio, pero ya está activado en su zona de pruebas.
Además, no olvide que la página Setup (Configuración) tiene secciones adicionales para funciones que no se prueban en esta unidad, como Set Up Quick Actions (Configurar acciones rápidas) y Set Up Similar Cases (Configurar casos similares), que son opcionales. No se pierda las novedades, próximamente se agregará Quick Actions (Acciones rápidas) a este módulo de Trailhead.
- Haga clic en
 y seleccione Configuración.
- En Setup Quick Find (Búsqueda rápida de configuración), busque y seleccione Service Assistant (Asistente de servicio).
- En la página Service Assistant Setup (Configuración del Asistente de servicio), en la sección Turn on Einstein Generative AI (Activar IA generativa de Einstein), haga clic en Go to Einstein Setup (Ir a configuración de Einstein) y confirme que el botón de alternancia de Einstein esté en On (Activado). De lo contrario, cámbielo a On (Activado).
- Actualice la ventana de su navegador.
- En Setup Quick Find (Búsqueda rápida de configuración), busque y seleccione Salesforce Go.
- En el cuadro de texto Search features... (Buscar funciones...), ingrese y seleccione Agentforce (Default) (Agentforce [Predeterminado]).
![Agentforce (Default) (Agentforce [Predeterminado]) seleccionado.](https://res.cloudinary.com/hy4kyit2a/f_auto/fl_lossy/q_70/learn/modules/agentforce-service-assistant/set-up-service-assistant/images/es-MX/8c633e908d2fd728f1ae0908abb1b047_kix.51or8z8u34cz.png)
- Haga clic en Get Started (Empezar).
- Haga clic en Turn On (Activar).
- Haga clic en Confirm (Confirmar).
Crear un agente de Asistente de servicio
Una vez activadas las funciones requeridas de la plataforma, estará todo listo para comenzar a crear el agente de Asistente de servicio y agregar subagentes e instrucciones.
- En Setup Quick Find (Búsqueda rápida de configuración), busque y seleccione Agentforce Agents (Agentes de Agentforce).
- En la parte superior de la página Agentforce Agents Setup (Configuración de agentes de Agentforce), haga clic en + New Agent (+ Nuevo agente). Nota: Si el botón New Agent (Nuevo agente) no está presente, actualice la página hasta que aparezca.
Nota: En este momento, el Asistente de servicio no se admite en el nuevo Generador de Agentforce. Asegúrese de abrir únicamente el Generador de Agentforce heredado.
- En Agent Creator (Creador de agentes), en Select an agent (Seleccionar un agente), seleccione Agentforce Service Assistant (Asistente de servicio de Agentforce) y, luego, haga clic en Next (Siguiente). Se abre Agent Creator Guided Setup (Configuración guiada del creador de agentes).
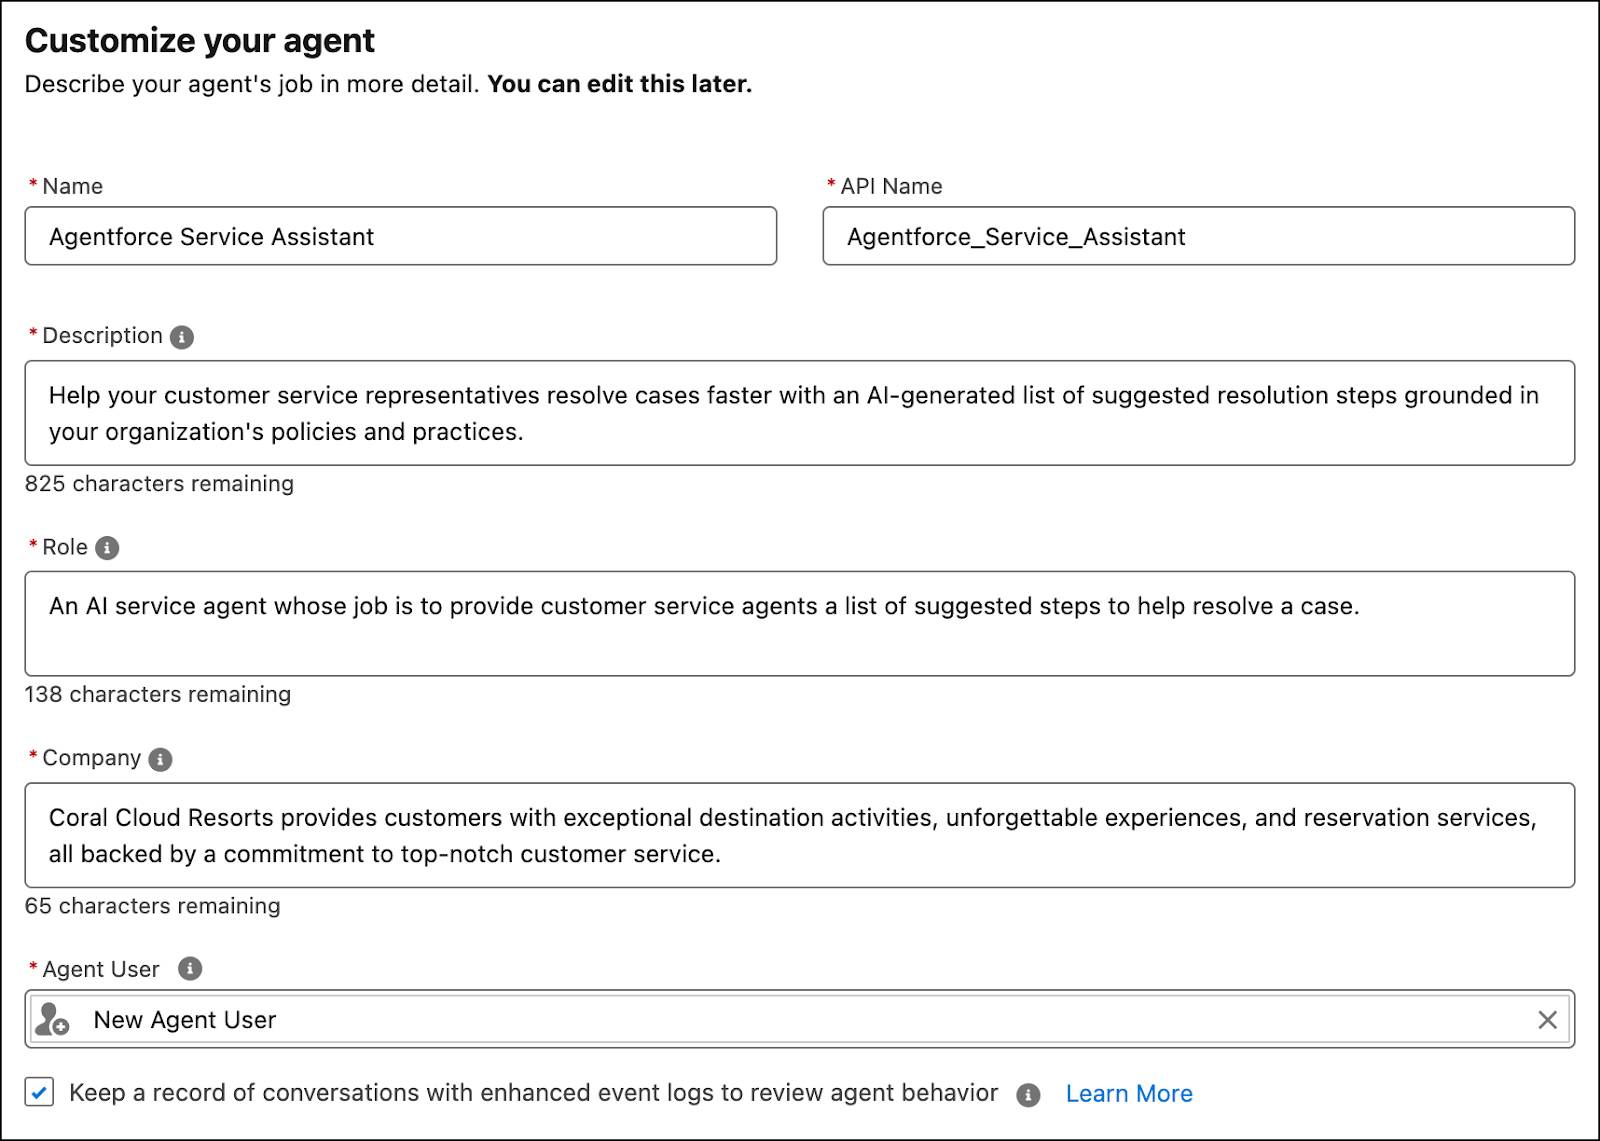
- En Customize your agent (Personalizar su agente), agregue esto al campo Company (Compañía).
Coral Cloud Resorts provides customers with exceptional destination activities, unforgettable experiences, and reservation services, all backed by a commitment to top-notch customer service.(Coral Cloud Resorts brinda a los clientes actividades locales excepcionales, experiencias inolvidables y servicios de reserva, todo respaldado por un compromiso de servicio de atención al cliente de primera clase.) - Marque Keep a record of conversations with Enhanced Event Logs to review agent behavior (Mantenga un registro de las pláticas con registros de eventos mejorados para revisar el comportamiento de los agentes).
Observe que todos los demás campos que no se incluyen aquí, pero que se muestran en la configuración guiada, tienen valores predeterminados. No edite las configuraciones predeterminadas de los campos. Asegúrese de que el campo Agent User (Usuario de agente) esté configurado como New Agent User (Nuevo usuario de agente).
- Haga clic en Crear. Se abre el Generador de Agentforce con la sección Subagents (Subagentes). Permanezca aquí y complete los pasos siguientes.
Crear subagentes
Coral Cloud ya decidió con qué caso desea que el Asistente de servicio lo ayude. John usa el Generador de Agentforce para crear un subagente Travel Documentation Assistance (Asistencia con documentación de viaje) y convertir las reglas de la compañía sobre documentación de viaje en instrucciones.
- En el Generador de Agentforce, en la barra lateral Subagents (Subagentes), haga clic en New (Nuevo) y seleccione + New Subagent (+ Nuevo subagente).
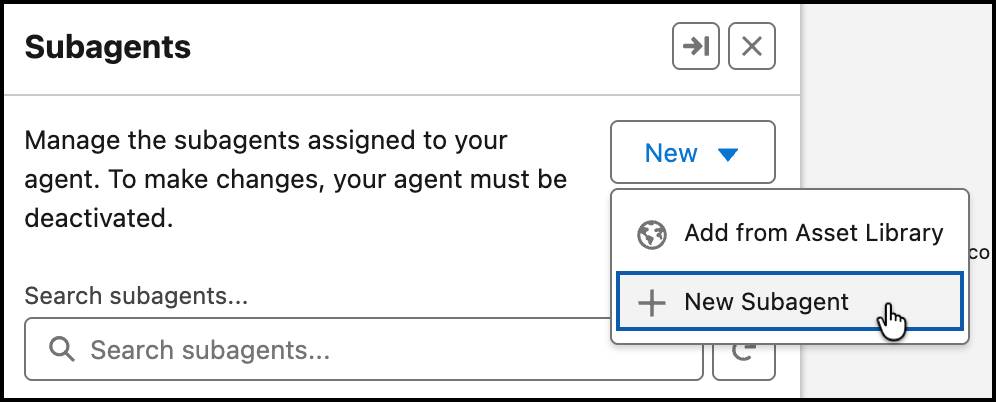
Nota: Si no aparece el botón New Subagent (Nuevo subagente), regrese a la página Agentforce Agents Setup (Configuración de agentes de Agentforce), desactive el botón de alternancia de Agentforce y vuelva a activarlo. Luego, en la lista de agentes, junto al Asistente de servicio de Agentforce, haga clic en el menú desplegable y seleccione Open in Builder (Abrir en generador).

- En la ventana Create a Subagent (Crear un subagente), ingrese este texto en el campo What do you want this subagent to do? (¿Qué quiere que haga este subagente?):
Assist service reps with travel documentation and visa application related cases. Make sure they have all the necessary information to help customers.(Asistir a los representantes de servicio en casos relacionados con la documentación de viaje y la solicitud de visas. Asegurarse de que tengan toda la información necesaria para ayudar a los clientes). - Haga clic en Next (Siguiente).
- En la ventana Create a Subagent (Crear un subagente), complete los campos siguientes, reemplazando el texto autocompletado.
En la descripción de la clasificación, observe cómo se indican algunos tipos de pregunta diferentes. Esto ayuda al asistente de servicio a lidiar de forma efectiva con las distintas formas en que los usuarios pueden consultar sobre la documentación de viaje.
Campo |
Valor |
|---|---|
Nombre |
Travel Documentation (Documentación de viaje) |
Nombre de API |
Travel_Documentation |
Descripción de la clasificación |
Assist service reps in helping customers in navigating the visa application process, including required documents, application procedures, document validity, submission process, processing times, and embassy contact information. Questions are related to visa requirements, which include required documents, application procedures, document validity, submission process, processing times, and embassy contact information. (Asistir a los representantes de servicio para ayudar a los clientes en el proceso de solicitud de visas, incluidos los documentos obligatorios, los procedimientos de solicitud, la validez de los documentos, el proceso de presentación, los tiempos de procesamiento y la información de contacto de las embajadas. Las preguntas se relacionan con requisitos para visas, incluidos los documentos obligatorios, los procedimientos de solicitud, la validez de los documentos, el proceso de presentación, los tiempos de procesamiento y la información de contacto de las embajadas). |
Alcance |
Your job is to assist service reps in providing customers with the visa application process and related travel documents. Make sure they have all the right documents, information, and follow all the rules and procedures. You must not provide legal advice or handle inquiries outside of visa applications. (Tu trabajo es asistir a los representantes de servicio para brindar a los clientes el proceso de solicitud de visas y los documentos de viaje relacionados. Asegúrate de que tengan los documentos y la información correctos, y de que respeten todas las reglas y procedimientos. No debes brindar asesoría legal ni ocuparte de consultas que no estén relacionadas con la solicitud de visas). |
- En la sección Instructions (Instrucciones), reemplace las instrucciones autocompletadas con las siguientes. Haga clic en Add Instructions (Agregar instrucciones) según sea necesario para crear más campos de instrucciones.
Campo |
Valor |
|---|---|
1.ª instrucción |
If the customer has all the required documents, verify their validity and completeness in the verification portal. (Si el cliente tiene todos los documentos necesarios, comprueba su validez e integridad en el portal de verificación). |
2.ª instrucción |
Always check if the customer needs a visa and vaccinations for their destination. (Verifica siempre si el cliente necesita una visa y vacunas para el destino). |
3.ª instrucción |
For questions about the submission process, tell the customer where and how to submit the application both in the company’s travel verification portal and through the destination country’s visa website. Always include a link to the official embassy website for the destination country for detailed information and application procedures. (Por consultas sobre el proceso de presentación, indica al cliente dónde y cómo presentar la solicitud, tanto en el portal de verificación de viaje de la compañía como en el sitio web para visado del país de destino. Incluye siempre un vínculo al sitio web oficial de la embajada del país de destino con información detallada y los procedimientos de solicitud). |
4.ª instrucción |
When you have confirmed the visa requirements, always provide the customer with a checklist of all required documents such as a passport, port entry forms, visa application form, recent passport photos, and proof of travel. (Una vez confirmados los requisitos para la visa, brinda siempre al cliente una lista de comprobación con todos los documentos obligatorios, como el pasaporte, los formularios del puerto de entrada, el formulario de solicitud de visa, fotos recientes tipo pasaporte y comprobantes de viaje). |
5.ª instrucción |
If the destination country requires additional documents such as a letter of invitation or proof of financial means, inform the customer and provide guidance on how to obtain these. (Si el país de destino requiere documentos adicionales, como una carta de invitación o prueba de solvencia económica, infórmaselo al cliente y brinda orientación sobre cómo obtenerlos). |
6.ª instrucción |
After the application is submitted, provide the customer with a follow-up plan, including expected processing times and contact information for the embassy. (Una vez presentada la solicitud, brinda al cliente un plan de seguimiento, que incluya los tiempos de procesamiento previstos y la información de contacto de la embajada). |
7.ª instrucción |
Provide travel tips and advice on what to expect during the visa interview, if required. (Proporciona consejos de viaje y asesoramiento sobre qué esperar durante la entrevista para la visa, en caso de ser necesario). |
8.ª instrucción |
Always be sure to thank the customer for choosing our company and provide a link to our survey on the service to help improve future assistance. (Asegúrate de agradecer siempre al cliente por elegir nuestra compañía y proporciónale un vínculo a la encuesta sobre el servicio para ayudarnos a mejorar nuestra asistencia en el futuro). |
- Haga clic en Next (Siguiente).
- No agregue acciones al subagente y haga clic en Finish (Finalizar).
Nota: Si ve un mensaje que indica una alta similitud de subagentes, desestime el mensaje. Además, recuerde que las acciones de Agentforce no son obligatorias en el Asistente de servicio. El agente de IA no completa ninguna tarea por el cliente ni los representantes de servicio. Todos los pasos que se proporcionan en el plan de servicio los completa el representante de servicio.

- En la esquina superior de la página, haga clic en Activate (Activar). Si aparece el mensaje emergente Configuration Issues Detected (Se detectaron problemas de configuración), haga clic en Ignore & Activate (Ignorar y activar).
- Haga clic en la flecha izquierda de la parte superior de la página para salir del Generador de Agentforce. Regrese a la página Service Assistant Setup (Configuración del Asistente de servicio).
Activar Service AI Grounding (Fundamentación de IA de servicio)
La fundamentación de IA de servicio le permite a Coral Cloud Resorts elegir qué campos del caso se incluyen como una fuente para la fundamentación. Los campos seleccionados le brindan al Asistente de servicio la información que necesita para generar un resumen del caso, categorizar el caso con un subagente y determinar los pasos del plan inicial.
- En Setup Quick Find (Búsqueda rápida de configuración), busque y seleccione Service Assistant (Asistente de servicio), luego, vaya al paso Customize Experience by Object (Personalizar experiencia por objeto).
- En la ficha Case (Caso), en la sección Turn on Service AI Grounding for Cases (Activar fundamentación de IA de servicio para casos), haga clic en Go to Service AI Grounding (Ir a Fundamentación de IA de servicio).
- En la página Service AI Grounding Setup (Configuración de fundamentación de IA de servicio), active la función.
- En Choose Objects and Fields for Grounding (Seleccionar objetos y campos para la fundamentación), seleccione la ficha Case (Caso).
- En Case Fields (Campos del caso), haga clic en Edit (Editar).
- En la sección Required Fields (Campos obligatorios), configure estos ajustes.
- Configure el campo Subject (Asunto) como Subject (Asunto).
- Configure el campo Description (Descripción) como Description (Descripción).
- Nota: No modifique la sección Additional Fields (Campos adicionales).
- Configure el campo Subject (Asunto) como Subject (Asunto).
- En la sección Additional Object Grounding Options (Opciones de fundamentación de objetos adicionales), marque Include Case Emails (Incluir mensajes de email de casos) e Include Case Comments (Incluir comentarios de casos). No se admiten las noticias del caso como fuente de fundamentación.
- Haga clic en Guardar.
- Active Grounding with Cases (Fundamentación con casos).
- Regrese a la página Service Assistant Setup (Configuración del Asistente de servicio).

Definir los criterios de aptitud
En el Asistente de servicio, solo se crea un plan de servicio cuando un caso cumple ciertas reglas. Estas reglas se denominan criterios de aptitud y se definen en un flujo iniciado automáticamente. Siga estos pasos para definir los criterios de aptitud del plan de servicio.
- En el paso Customize Experience by Object (Personalizar experiencia por objeto), en la sección Define Service Plan Eligibility Criteria (Definir criterios de aptitud para plan de servicio), haga clic en Go to Flows (Ir a flujos).
- En All Flows (Todos los flujos), busque y seleccione Check Service Plan Eligibility (Comprobar aptitud para plan de servicio). Flow Builder se abre.
- En el lienzo de Flow Builder, seleccione el elemento de decisión Is Case Eligible for Service Plan? (¿El caso es apto para un plan de servicio?).
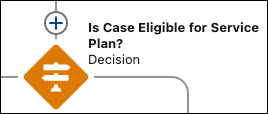
A continuación, configure los criterios en Outcome Details (Detalles de resultados).
- En la ficha Yes (Sí), confirme que Label (Etiqueta) esté configurada como Yes (Sí).
- Confirme que el campo Outcome API Name (Nombre de API del resultado) sea EligibleForServicePlan.
- Confirme que el campo Conditions Requirements to Execute Outcome (Requisitos de condición para ejecutar el resultado) esté configurado como All Conditions Are Met (AND) (Se cumplen todas las condiciones [Y])
- Confirme que el recurso Case from Get Case (Caso de Obtener caso) tenga un operador Is Null (Es nulo) configurado en un valor False (Falso).
- Elimine el recurso ineligibilityReason.
- Confirme que el recurso Priority (Prioridad) tenga un operador Equals (Igual a) configurado en un valor High (Alto).
- Haga clic en + Add Condition (+ Agregar condición).

Ahora configure los ajustes de la condición nueva.
- En el campo Resource (Recurso), desplácese hasta la sección Get Records (Obtener registros) y seleccione Case from Get Case (Caso de Obtener caso).
- Desplácese hasta Record Fields (Campos de registro) y seleccione Case Origin (Origen del caso).
- En el campo Operator (Operador), seleccione Equals (Igual a).
- En el campo Value (Valor), seleccione Email.

Por último, guarde su trabajo.
- Haga clic en Save as New Flow (Guardar como flujo nuevo).
- En la ventana Save As (Guardar como), en Flow Label (Etiqueta de flujo), ingrese Travel Documentation (Documentación de viaje). Se completa automáticamente Flow API Name (Nombre de API del flujo).
- Haga clic en Guardar.
- Haga clic en Activate (Activar).
- Salga de Flow Builder y regrese a la página Service Assistant Setup (Configuración del Asistente de servicio).
- En la sección Add Eligibility Criteria (Agregar criterios de aptitud) del paso de la página de configuración Customize Experience by Object (Personalizar experiencia por objeto), complete estos pasos.
- En el campo Flow Label (Etiqueta de flujo), seleccione Travel Documentation (Documentación de viaje).
- En el campo de variable Case ID Variable (Variable de identificador de caso), seleccione caseId.
- En el campo Eligibility Result Variable (Variable de resultado de aptitud), seleccione meetsEligibility.
- En el campo Ineligibility Reason (Motivo de inaptitud), seleccione ineligibilityReason.
- Haga clic en Guardar.
- En el campo Flow Label (Etiqueta de flujo), seleccione Travel Documentation (Documentación de viaje).

Activar el Asistente de servicio
En la sección Turn On Service Assistant for Cases (Activar Asistente de servicio para casos) de la ficha Case (Caso), cambie el botón de alternancia a On (Activado).

Tiene casi todo listo para comenzar a crear planes de servicio. Solo queda una cosa por hacer: poner el Asistente de servicio en la página Case record (Registro de casos).
Agregar el componente a la página de registro de casos
Complete la configuración agregando el Asistente de servicio a la página Case record (Registro de casos).
- En el Iniciador de aplicación, busque y seleccione Service (Servicio).
- Seleccione la ficha Cases (Casos).
- En la página Cases (Casos), en el menú desplegable de vista de lista, seleccione All Open Cases (Todos los casos abiertos).
- Seleccione el número de caso 00001028, Help with Travel Documentation (Ayuda con documentación de viaje).
- En la página Case record (Registro de casos), haga clic en
 y, luego, seleccione Edit Page (Editar página).

- En el menú Components (Componentes), busque y seleccione Service Assistant (Asistente de servicio) y, luego, agregue el componente en cualquier parte del lienzo. Nota: Si ve los componentes Milestones (Logros) y Related (Relacionado) en la página, elimínelos.

- Haga clic en Save (Guardar) y en Activate (Activar).
- En la ventana Activation: Case Record Page (Activación: página de registro de casos), en Org Default (Predeterminado de la organización), haga clic en Assign as Org Default (Asignar como predeterminado de la organización).
- En la ventana Assign form factor (Asignar factor de forma), seleccione Desktop (Computadora) y, luego, haga clic en Next (Siguiente).
- En la ventana Review Assignment (Revisar asignación), haga clic en Save (Guardar).
- En la ventana Assign form factor (Asignar factor de forma), seleccione Desktop (Computadora) y, luego, haga clic en Next (Siguiente).
- En la parte superior derecha de la página, haga clic en Save (Guardar) y, luego, en Activation… (Activación…).
- En la ventana Activation: Case Record Page (Activación: página de registro de casos), seleccione App Default (Predeterminado de la aplicación) y, luego, haga clic en Assign as App Default (Asignar como predeterminado de la aplicación).
- En la ventana Select Apps (Seleccionar aplicaciones), en App Name (Nombre de aplicación), seleccione Service Console (Consola de servicio) y haga clic en Next (Siguiente).
- En la ventana Select Form Factor (Seleccionar factor de forma), seleccione Desktop (Computadora) y haga clic en Next (Siguiente).
- En la ventana Review Assignments (Revisar asignaciones), haga clic en Save (Guardar).
- En la ventana Select Apps (Seleccionar aplicaciones), en App Name (Nombre de aplicación), seleccione Service Console (Consola de servicio) y haga clic en Next (Siguiente).
- En la parte superior derecha de la página, haga clic en Save (Guardar).
¡Y eso es todo! Configuró el Asistente de servicio. Compruebe la configuración y, luego, continúe a la unidad siguiente para crear un plan de servicio.