Build an Automation for Creating Interviewer Records
Learning Objectives
In this project, you’ll:
- Build automations in an HR recruiting app that streamline workflow for creating interviewer records and approving new positions.
- Create a flow for the app to simplify the process of rating candidates and make the rating process consistent.
Introduction
As AW Computing grows, you continue to look for new talent. You’ve already taken care of a number of requests from Ling Wu, the vice president of Human Resources, to improve her team’s recruiting app. Now she’d like you to add automation to the mix.
Ling would like to automate the creation of interviewer records for hiring managers. She’d like to establish an approval process for new positions. And she wants a more user-friendly process for candidate scoring.

Set Up a Flow
The first thing to tackle is automated interviewer records. To set this up, use Flow Builder, which automates tasks using conditions and actions. With Flow Builder, you establish the criteria that records must meet to trigger the flow.
Once your criteria are in place, immediate or time-dependent actions are set in motion. These actions can include creating a record, updating a record, sending an email, posting to Slack, initiating an action, submitting for approval, or calling an Apex class.
First things first, deactivate a previously created validation rule.
- From Setup, click the Object Manager tab.
- Click Position then click Validation Rules.
- Click Every_Position_Must_Have_a_Hiring_Mgr to open this Validation Rule.
- Click Edit.
- Deselect the Active checkbox, then click Save.
Next, build a flow to create the interviewer record.
- Click the App Launcher (
 ).
).
- In the Search apps and items box, enter
autoand then select Automation.
- In the Flows panel, click New.
- Under Frequently Used, select Record-Triggered Flow.
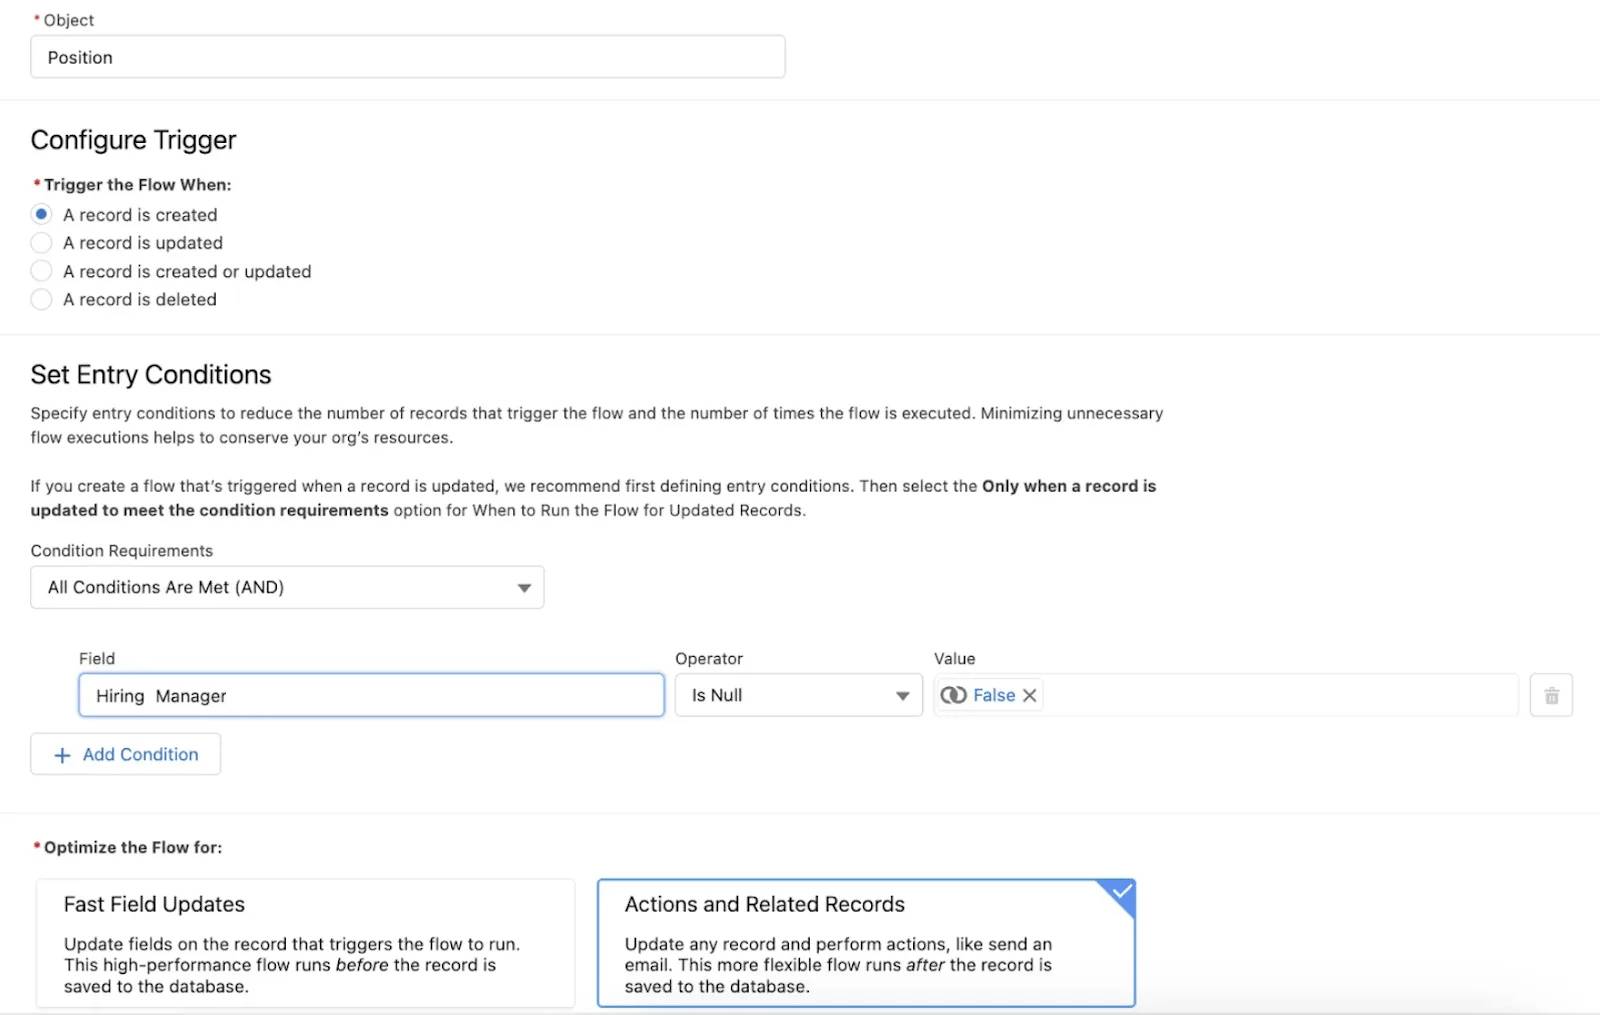
- For Object, select Position.
- In the Configure Trigger section, select A record is created.
- For the Condition Requirements, select All Conditions Are Met (AND).
- Set the conditions.
- Field: Hiring Manager
- Operator: Is Null
- Value: False
- Ensure Actions and Related Records is selected.
- On the flow canvas, click
 to add an element.
- In the Add Element search box, enter
createand select Create Records.
- Fill in these details for the new record.
- Label:
Create Interviewer Record
- How to set record field values: Manually
- In the Create a Record of This Object section, for Object, select Interviewer.
- In the Set Field Values for the Interviewer section, click Add Field to add a second field.
- Fill in these details.
- Field 1: Employee
- Value 1: Triggering Position__c > Hiring Manager
Make sure you select the “Hiring Manager” option that doesn’t have a > at the end of the line.
- Field 2: Position
- Value 2: Triggering Position__c > Record ID

- Click Save.
- For the Flow Label, enter
Create Interviewer Record, then click Save.
- Click Activate.
- Click
 to return to Setup.
Test the Flow
Now that the flow is activated, you can test the automation you just created. But first, add a hiring manager user.
- From Setup, enter
Usersin the Quick Find box and select Users.
- Click New User and fill in the details.
- First Name:
Kathy
- Last Name:
Cooper - Email: Enter your own email
- Username: kcooper@[your initials + your favorite color].com (for example,
kcooper@APyellow.com)
- Nickname:
kcoop - Title:
Customer Support Manager - Role: Customer Support, North America
- User License: Salesforce Platform
- Profile: Standard Platform User
- First Name:
- Deselect Generate new password and notify user immediately.
- Click Save.
Now test the automation you created.
- Click
 to open the App Launcher, then select Recruiting.
- Click the Positions tab, then click New.
- Select the record type Nontechnical Position, then click Next and fill in the details.
- Title:
Super Support Supervisor - Status: New
- Department: Support
- Location: US
- Hiring Manager: Kathy Cooper
- Job Description:
Manage a team that fields inquiries and cases from customers - Pay Grade: S-200
- Title:
- Click Save.
- Click the Related tab.
- From the Interviewers related list, click an Interviewer number and note the values in the Employee and Position fields.
Now that you’ve set up an automation for creating interviewer records, move on to the next step, where you do some necessary prep work before you can set up an approval process for creating positions.