Analyze Your Data Over Time
Learning Objectives
After completing this unit, you’ll be able to:
- Manage date grouping, filtering, and visualization.
- Apply filters correctly by understanding the data.
The Exploration Goal
You’re still enjoying getting to know CRM Analytics and how it can help DTC. Based on your previous data exploration using CRM Analytics, you’re thinking of a bonus contest as a sales incentive. You’re interested to see how your product sales have trended over time. The data is there, and you want to use CRM Analytics to walk through it and ask questions. We'll show you how.
Here’s your goal for this unit: You want to see how your sales have evolved through time for the past few months. You also want to focus on digital media and see how the next few months look to validate the need for a bonus contest. So let’s see what the data tells us.
Group by Date
You want to see how digital media sales evolve over time. So you’ll open and explore the DTC Opportunity dataset, which contains opportunity and product information.
In the default exploration state, as you remember from the previous unit, the query is aggregating on count of rows with no grouping and no filtering. Start a new exploration by going back to the My DTC Sales app and opening the DTC Opportunity dataset. You’re interested in the digital media sales, so complete the following steps.
- Click Count of Rows under Bar Length to change the measure.
- Select Sum in the aggregation functions list.
- Select # (number sign) for the measure to see the number of products in your opportunities.
Next you’ll group the opportunities by month. Grouping by date works a little differently than grouping by regular dimensions.
- Click the plus sign (+) under Bars. You’ll see the Date dimensions at the top of the list.
- Click Close Date.
- Select Year-Month from the picklist.
The Date picklist lets you group by Year, Quarter, Year-Quarter, and so on. Selecting Quarter groups all quarters together across all years. Grouping by Year-Quarter groups first by year and then by quarter for each year. Year-Month groups first by year, then by month.

Relative and Absolute Filters on Date
The close date values go up to last year, but we’re only interested in the last three months and two months ahead from today—for the purposes of our example, December 10, 2020.
There are two ways to filter on dates.
- Relative to now, which allows you to set dynamic filters based on the actual time. You can go from relative years to relative days. It’s a powerful way to get the most up-to-date metrics.
- Absolute date range, which is a fixed date filter. We’re going to go with that.
Add a filter for the close date to show opportunities that closed three months ago to two months ahead. Assuming today is December 10, 2020, we’ll look for opportunities from the beginning of September 10, 2020 until February 10, 2021.
- In the Filters tab, click the plus sign (+) under Filters.
- Select Close Date in the Dates category.
- Select Custom.
- Click the Absolute date range tab.
- Select Between.
- In the From field, click the calendar symbol, find September 10, 2020 , and select it. You can also just type 9/10/2020 in the field.
- In the To field, do the same thing and select February 10, 2021.

- Click Add.
Choose the Right Visualization for Dates
The bar chart is a great tool for comparison, but it’s difficult to show evolution through time. The timeline is helpful when you’re grouping by date.
- Click
 to open the chart gallery.
- Select the Timeline chart.

You’re looking at the evolution of opportunities through time. It might be interesting to see how many opportunities you’ve lost or won. The good news is that you can have another grouping on the timeline.
- In the Data tab, click the plus sign (+) under Lines.
- Select Won.
It looks like closing opportunities might be heading for a dip in the next couple months. Let’s take a closer look to make sure what we’re seeing is accurate before we form any conclusions.
Understand Your Data
Upon closer inspection, you notice something interesting in the chart. You’re seeing opportunities closing after this month (remember, for the purposes of our example, we’re agreeing that today is December 10, 2020). Indeed, Close Date can be in the future, in which case it’s the expected close date. This means you’re seeing all opportunities that have a close date, rather than those that are already closed. We need to refine the query a bit more.
First, let’s explain how closed opportunities are represented in Salesforce. Closed opportunities can be expressed through two dimensions.
- Opportunity Closed—is true when closed or false when open.
- Stage—is Closed Lost or Closed Won when the opportunity is closed.
So let’s use the contains filter to filter by all the stage names that contain closed.
- In the Filters tab, click the plus sign (+) under Filters.
- Select the Stage dimension. You can find it fast by typing Stage in the search field.
- Click Equals to open a drop-down list.
- Select Contains. An input field appears, which will be the search value powering the contains filter.
- Type Closed.
- Click Apply.
Voilà, you have included multiple values with one filter. This kind of filter can be powerful in many situations, so keep it in mind.
Focus Your Lens
Now let’s dig in deeper and examine your digital media numbers more closely.
- Click the plus sign (+) under Filters.
- Select the Product Family dimension.
- Click Equals to open a drop-down list and select Contains.
- Type digital media.
- Click Apply.
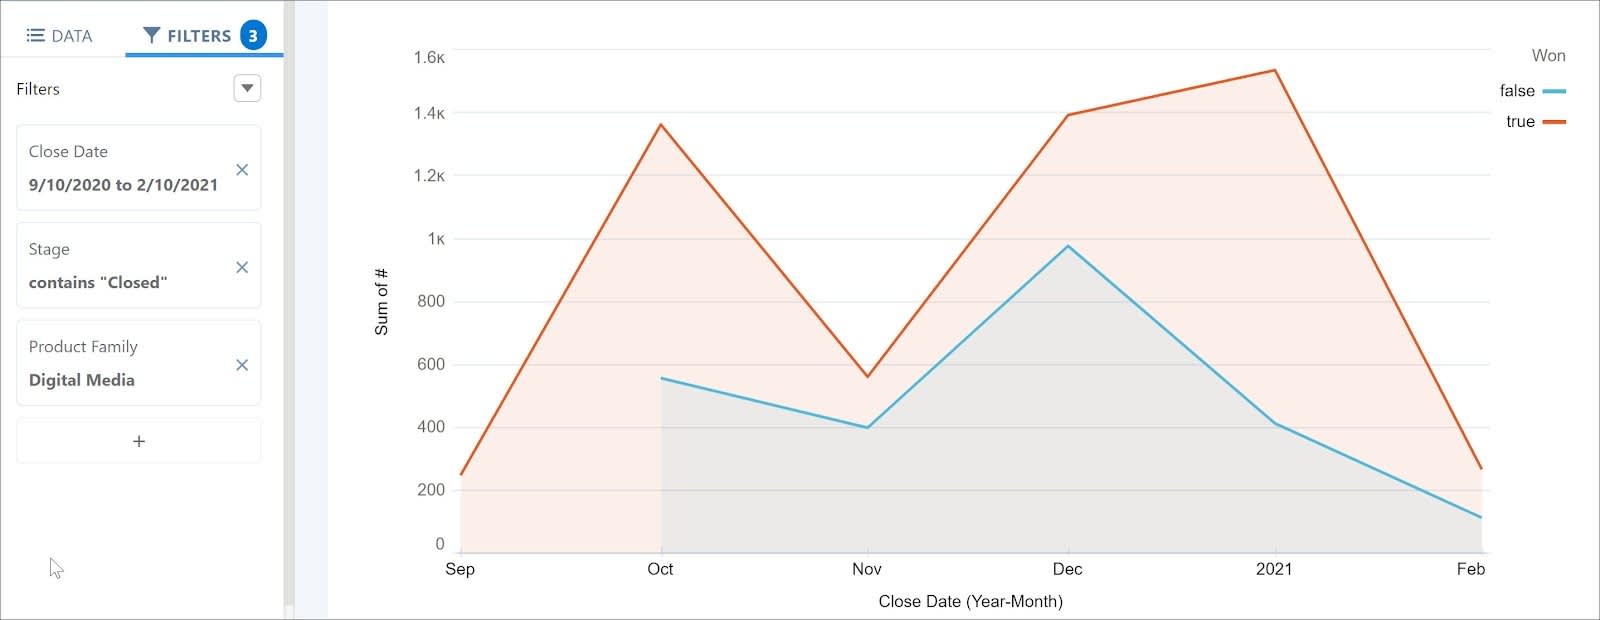 After applying the filters to the timeline, looks like the digital media sales are in for a significant downturn. It’s definitely a good time to start the contest to grow digital media sales!
Save Your Exploration in a Lens
You were interested in how your digital media have been trending over time, and you realized thanks to CRM Analytics that they may be in for a fall! You definitely need to start your digital media sales contest as soon as possible. Save your exploration in a lens so you can share your discovery with coworkers.
- Click Save.
- Enter D02 - Digital Media Opportunities Evolution / Time as the title.
- Select My Exploration.
- Click Save.
Continuing Your Explorations
To sum up, you’ve learned how to accomplish the following tasks.
- Group by date, which is usually done by at least two attributes: Year-Quarter, Year-Month, Year-Week, or Year-Month-Day.
- Filter by date, whether absolute or relative to the time when you’re asking the question.
- Display date grouping properly through a timeline visualization and add a second grouping to it.
- Filter a dimension using the contains filter.
- Narrow the focus of your lens to selected fields in a dimension.
In the next unit, you’ll learn how to use a compare table to do calculations. Excited for your last desktop exploration before you earn your badge?
Resources