Discover Other Ways to Use Selection Rules
Learning Objectives
After completing this unit, you’ll be able to:
- Describe how to use a filter in an action record to affect multiple products.
- Create a selection-type rule that automatically adds products to a quote.
- Describe the role of the Required field in product rules that use Add actions.
- Explain when to use a product rule instead of an option constraint.
- Explain when to use a selection-type rule instead of a validation-type rule.
One Action to Rule Them All
Selection rules use action records to tell CPQ how to change options during a configuration. In the previous unit, each of your rules acted on just one product. But what if you needed to perform the same action on multiple products? For example, imagine you’re a barista and you know that your customer is lactose intolerant (thanks to information on their profile). You would want to disable all dairy options in your coffee bundle so that you can’t accidentally include skim milk, 2% milk, whole milk, or cream.
As you create the selection rule you can create a separate action to disable each product. Unfortunately, later when you get a new dairy product that needs the same treatment, you have to go back to the rule and create another action. Overall, one product per action is not fun to maintain.
Thankfully there’s another option as long as you have a way of identifying which products contain dairy. For example, you can make a checkbox named Dairy__c on the product record, then check each dairy product.
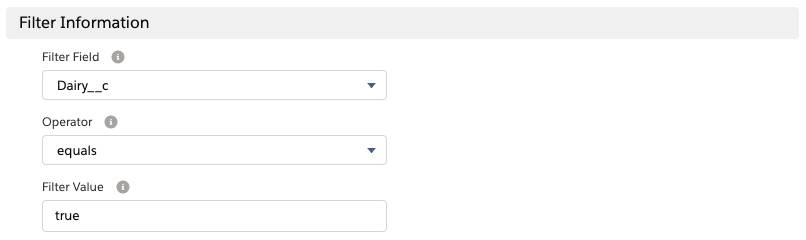
Then, you would create a single action for your rule. Instead of filling in the product lookup, you’d use the fields in the Filter Information section to look for any products where Dairy__c equals true.
That’s all there is to it. No dairy products allowed, no upset tummies for your lactose intolerant customers. Later when you add another dairy option to the bundle, you just need to make sure your Dairy__c flag is properly set on the product, and the existing rule automatically disables it.
In this example your custom Dairy__c field is conveniently in the Filter Field picklist. When you create your own rules that use fields not on the picklist, you need to update the picklist to include the API name of those fields.
Finally, notice that you didn’t use the Product lookup field on the action record. If you use both lookup and filter information, only the lookup product is affected. Just leave it blank if you use a filter.
Add Products to a Quote with Selection Rules
Selection rules are often used to control how bundles are configured, but they have another purpose outside the context of bundles. You can also use a selection rule to add a product directly to the quote. For example, you might want to give customers a free, branded USB thumb drive as a promotional item whenever they buy an expensive monitor. In this example, none of the products are bundles.
There are a few differences between product- and quote-scoped rules, so let’s set up the USB thumb drive rule to see what they are. You start by navigating to the Product Rules tab.
- In the navigation bar, click Product Rules.
- Click New.
- For Product Rule Name, enter
Free USB thumb drive. - For Type, choose Selection.
For Scope, leave it on Quote. This is the first difference. You must tell CPQ the rule should run when returning to the Quote Line Editor. - For Evaluation Event, choose Always.
- Check Active.
- For Conditions Met, choose Any.
You’re going to choose Any so that in the future you can check for other, unrelated conditions that might warrant a free USB drive. For example, when it’s the customer’s birthday. - Click Save.
Good, now you need a condition to check if the product is a monitor.
- In the Error Conditions related list, click New.
- For Tested Object, choose Quote Line.
When you create a quote-scoped rule, you have to make sure to test data that’s available in the quote context (such as Quote Line data). The Product Option object wouldn’t work as a Tested Object in this context since the rule is meant to run outside of product configuration. - For Tested Field, choose SBQQ__ProductCode__c.
- For Operator, choose starts with.
- For Filter Type, choose Value.
- For Filter Value, enter
monitor. - Click Save.
Your rule will now fire if the quote contains a monitor quote line, be it a 1080P monitor or a 4K monitor. Lastly, you need the action to add the USB thumb drive.
- From the Actions related list, click New.
- For Type, choose Add.
- For Product, look up and choose USB Thumb Drive.
- Check Required.
This is a critical step (more about the Required checkbox in a minute). - Click Save.
Fantastic, your rule is ready to test. You can do this by adding a monitor to an existing quote.
- From the navigation bar, click Quotes, then choose the All list view.
- Click Q-00042.
- Click Edit Lines.
- Click Add Products.
- Check 4K Monitor.
- Click Select.
It’s at this very moment that your rule fires, and you should see both products.
Quote-scoped selection rules run every time you return to the Quote Line Editor from the Product Selection page or the Configure Product page. So that means if you delete the USB thumb drive from the quote, then add another product, if the 4K monitor is still on the quote, the thumb drive comes back! However, quote-scoped selection rules don't run if you don't visit the Product Selection or Configure product pages. So you could delete the thumb drive, and it will stay gone as long as you don’t add more products or reconfigure an existing product.
In this example you added a standalone product, but it’s possible to add many if you use the filter fields of an Action, like the Dairy__c example in the beginning of this unit. Also, it’s entirely possible to add a bundle. Just be aware that the bundle gets added without ever passing through the configuration page. You can still use the wrench icon ( ![]() ) to go into the configuration page as long as the bundle allows for reconfiguration.
) to go into the configuration page as long as the bundle allows for reconfiguration.
It’s worth noting that quote-scoped selection rules are great for adding products to a quote, but they can’t do anything else. The other actions such as hide, disable, and remove are not supported.
Finally, in this example you chose “Add” for the Action’s Type field. “Add” is special in that it’s the only type that requires the Required checkbox to be checked. If you had left Required unchecked, the rule wouldn’t have worked. Always check Required when using the “Add” type. That said, never check it for any types that hide, disable, or remove, otherwise the rule won’t work. This goes for both product- and quote-scoped rules. The Required checkbox is a quirk from the early days of CPQ, and we must abide by its quirky nature.
Selection Rules Versus Option Constraints
An option constraint is a simple tool that behaves a little like a product rule, used only in the context of bundles. It ties two options together, so that one can only be checked if the other is selected. This is a little like a selection rule that has an enable action. In the screenshot, you see WiFi Access Point is dependent on the Router using an option constraint.

Option constraints can also tie two options together, making it only possible to choose one or the other. So clicking one disables the other. This is a little like a selection rule that has a disable action.
Option constraints are easier to set up than product rules, but there are a few good reasons to use product rules anyhow.
- A single product rule can be applied to unlimited bundles, whereas an option constraint is specific to a single bundle.
- Product rules can select options with Add actions. Option constraints can only enable an option at best.
- Product rules can have multiple conditions that evaluate information outside the context of the bundle. An option constraint has one simple condition: if option X is selected.
- Product rules can act on multiple options, but an option constraint is limited to just the one.
Selection Rules Versus Validation Rules
There’s often more than one way to keep sales reps on the right path to a properly configured bundle. For example, if your goal is to prevent dairy products from getting to lactose intolerant customers, you have a few choices. One is to create a selection rule to remove the offending products. Or you can create a validation rule that pops up an error message if there’s a dairy product selected when the sales rep clicks Save.
When you design your product rules, consider what kind of experience you want for your sales reps. Then, get their feedback after they pilot the new rules. Being responsive to feedback leads to sales reps adopting CPQ faster, which is a great goal to aim for.
Selection rules are a great way to guide your sales reps to a quote that is complete and correct. In the next unit, you learn how to create a single product rule that uses data in a custom object to drive its behavior.