Understand and Customize Sales Processes and Paths
Learning Objectives
After completing this unit, you’ll be able to:
- Explain sales processes and paths.
- Describe how sales processes and paths are configured in NPSP.
- Customize a sales process and path.

The Opportunity: Your Donation Object
In this unit, we’ll focus on the Opportunity object, a standard Salesforce object used in Nonprofit Success Pack (NPSP) to track your nonprofit’s revenue.
Whether you are raising money through online fundraising, direct mail, grants, major gifts, memberships, merchandise sales, programs, or anything else, the Opportunity object holds the data. As we explore the Opportunity object in this module, we’ll share a lot of examples, but we’ll mostly discuss grants from institutions and donor gifts.
Let’s get right to it!
Guide Users with Stages and Sales Processes
Salesforce was originally created for business-to-business salespeople whose deals typically progress in stages over time. As any deal moves along these stages, the probability of a closed deal increases. Managers use this probability to forecast likelihood of meeting revenue goals, using a percentage of the total value of the deal as the expected, or pipeline, value.
Most nonprofits don’t focus on selling the way for-profit businesses do. However, nonprofits solicit donations, request grant funding, and sell tickets—all of which follow their own processes. To that end, NPSP is pre-configured with four custom opportunity sales processes, including donation, grant, in-kind, and major gift.

The Stage field on an opportunity record describes where you are in the process. The sales process determines which stage values are available for each type of opportunity.
Let’s see how this works by taking a closer look at the default grant sales process. If a user selects the Grant record type when creating a new opportunity record, the values below (and only these values) will be available in the Stage field picklist.
| Opportunity Stage | What It Means |
|---|---|
|
Prospecting (Open, 10% pipeline value) |
Your organization is exploring a program or planning to submit an application or letter of intent. |
|
LOI Submitted (Open, 20% pipeline value) |
Your organization submitted a letter of intent, a common first step in the application process for some grantmakers. |
|
Application Submitted (Open, 30% pipeline value) |
You submitted your grant application but have yet to hear back. |
|
Withdrawn (Closed/Lost, 0% pipeline value) |
You withdrew your application. This opportunity is marked Closed/Lost and will be omitted from pipeline reports. |
|
Declined (Closed/Lost, 0% pipeline value) |
Despite your best efforts, the grantmaker rejected your application. This opportunity is marked Closed/Lost and will be omitted from pipeline reports. |
|
Awarded (Closed/Won, 100% pipeline value) |
The grant is awarded. The opportunity is marked Closed/Won because you have received the commitment from the funder. |
If the probability of a standard stage isn’t accurate for a particular opportunity, you can manually adjust it. For example, during the LOI Submitted stage (20% pipeline value), you may learn from a program officer that you have a much better chance than normal of winning the grant. In this instance, you can increase the pipeline value accordingly, such as to 60%.
Review and Modify Opportunity Sales Processes
As an NPSP admin, your familiarity with each of the four preconfigured sales processes will help you understand the default settings. With this understanding, you can work with your colleagues to determine if the default settings meet your requirements or need to be modified.
To review or modify NPSP sales processes, follow these steps.
- Click the Setup icon (
 ) and select Setup.
 - Find and select Sales Processes. It’s easiest to enter
Sales Processesin the Quick Find box and click the link that appears.
- Click the Sales Process you want to view. Let’s click Grant in this example.

- In this view, you can add opportunity stages that already exist or remove stages included in this configuration. (Removing a stage from the picklist does not remove it from any existing records.)
- Click Save to record your changes.
Now you know how to review and modify opportunity sales processes. But you’re not done yet! Remember to bring together your key stakeholders (directors of development, major-gift fundraisers, grant managers, etc.) to review the stages and map your current processes before making any changes.
It’s also important to make it an annual practice to revisit your sales processes and ensure your stages are still relevant.
Let’s see what that looks like in practice.
Customize Opportunity Sales Processes
Gorav Patel, the Salesforce Admin at the (fictional) nonprofit No More Homelessness (NMH), just met with his Development team to review the opportunity sales processes in NPSP. The team requested a new stage to record when a grantmaker requests a site visit.
Let’s follow Gorav as he sets up the new stage.
- Click the Setup icon () and select Setup.
- Click the Object Manager tab.
- Click the Opportunity object.
- Click Fields & Relationships.
- Find and select the Stage field.
- Scroll down to the Opportunity Stages Picklist Values section and click New.
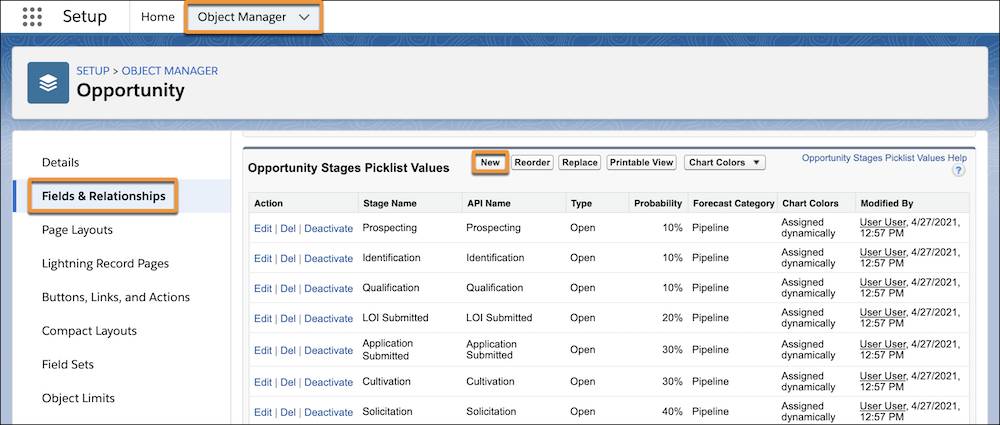
- Add a new value in the Stage picklist. In this example, Gorav adds these details:
- Stage Name:
Site Visit Requested. - Stage Type: Open, because this stage is prior to approval or rejection of a request.
- Description:
Foundation funder has requested a site visit at our facilities. - Probability:
50%. This is higher than that of other stages, since the request shows serious interest from the grantmaker. - Forecast Category: Pipeline. Salesforce enables advanced forecasting using other categories, but we won’t cover that here.
- Gorav adds this stage to the Grant Sales Process by selecting the checkbox next to Grant.

- Stage Name:
- Click Save.
Gorav successfully added a stage to the NMH grant sales process. When we take a look at the sales process again, we see that the NMH process now includes a Site Visit Requested stage.

But Gorav isn’t done yet—he needs to add this stage to a path.
Guide Your Users with Paths
A path guides your users with a visual representation of the stages required for working through a process, such as the grant opportunity we’ve used as an example in this unit. A path helps users stay focused on important tasks. Paths also assist your organization with user adoption and data completeness and integrity.
The paths you create for your teams can include:
- Key fields that users complete before moving to the next stage in a process.
- Best practices and advice.
- Links to relevant files or reminders.
Paths show the steps for each stage and appear immediately below the object summary information. A path can be used on most custom and standard object record detail pages, but we’re going to focus on opportunities here.
Edit a Path
After working with his stakeholders, Gorav wants to add some key fields and instructions for the new Site Visit stage to help guide his users.
Let’s follow Gorav as he customizes this path.
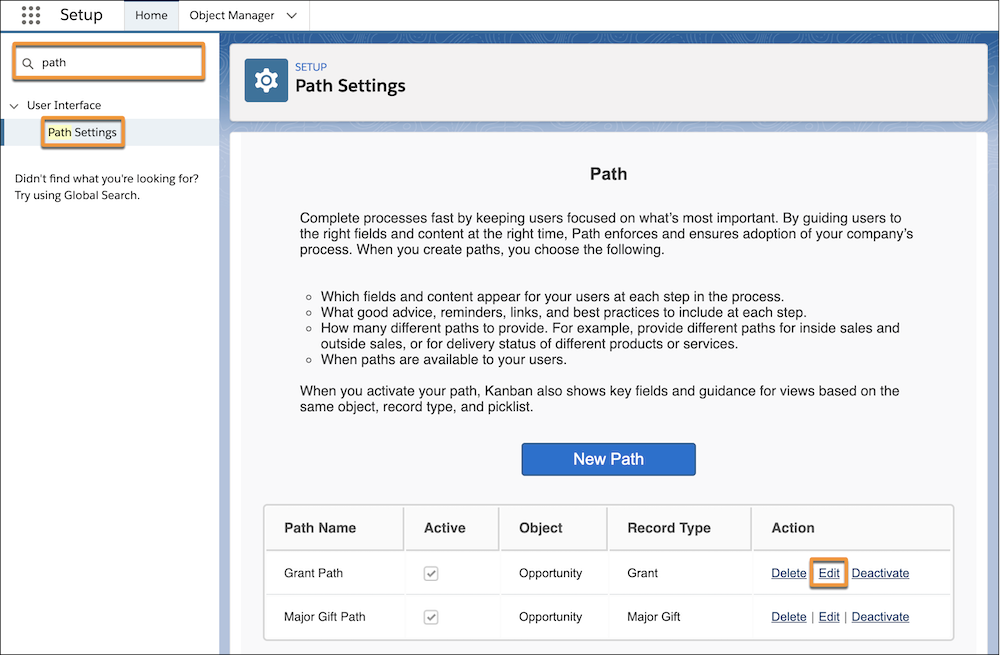
- Click the Setup icon () and select Setup.
- Enter
pathin the Quick Find box and select Path Settings. This is where you can create new paths or edit existing ones. - Click Edit in the Grant Path row.
- The first page in the Path Settings wizard allows you to change the Path Name and fields your path references. We are leaving those settings alone, so click Next.
- On Step 2: Select Fields and Provide Guidance for Each Step in the Path, click the Site Visit Requested stage.
- Click on + Add/Update Fields to add fields to focus on in this stage. Drag and drop Requested Amount, Program Areas, and Close Date into the Selected Fields area, then click Save.
- Enter any helpful instructions, reminders of best practices, and links to documents or resources in the Guidance for Success section.
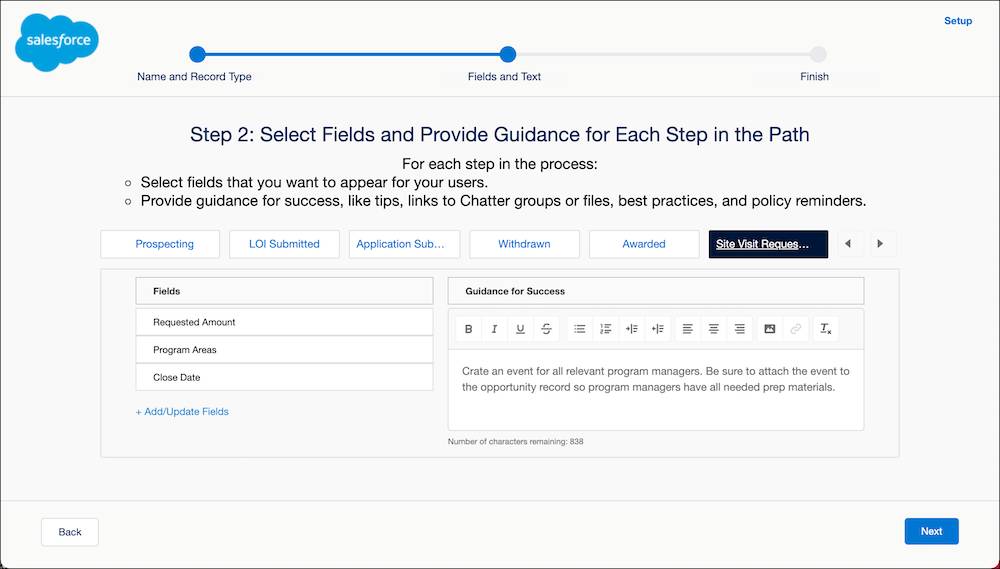
- Click Next.
- Click the toggle in Activate Your Path to make sure it is active. Because we are editing this path, it should already be active.
- Click the toggle to Active or Inactive to set the status of your path.
- Optionally, you can toggle on digital confetti that appears when someone reaches a specific step in the path. (Woo-hoo!) Application Submitted and Awarded are selected for celebration in this example. Because a site visit request is no cause for a party, we’ll leave this alone.

- Click Finish.
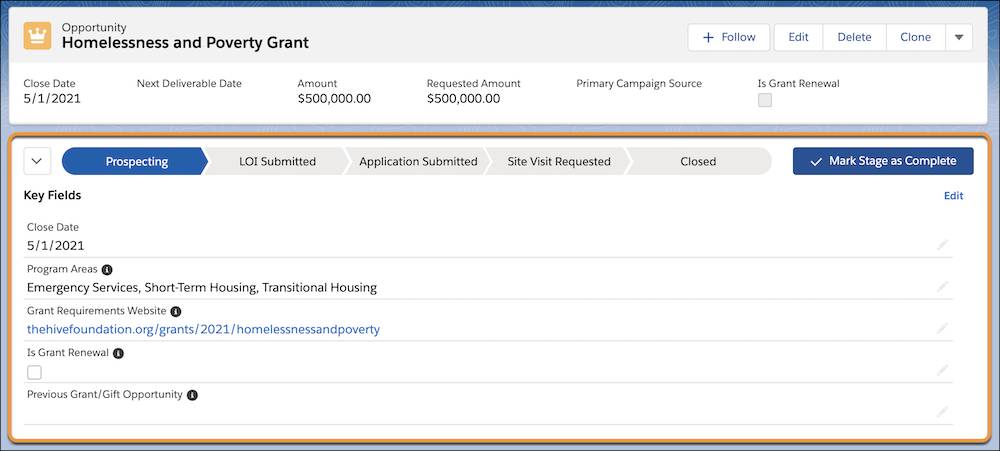
Now let’s check out what the path looks like when an NMH user moves an opportunity into this stage:
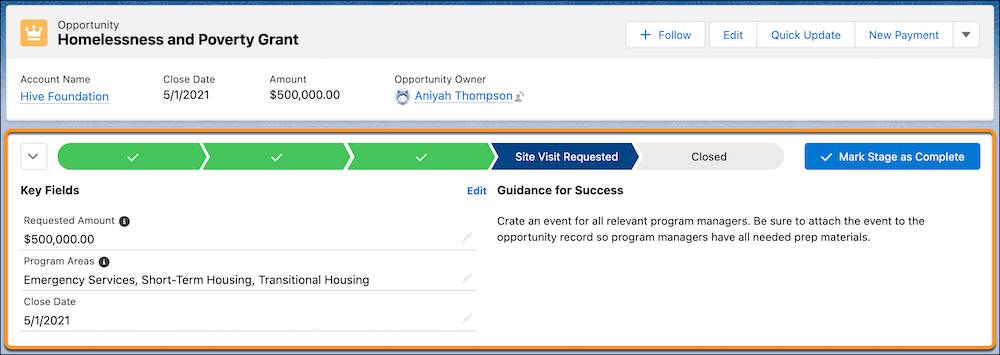
Pretty nifty, right?
In the next unit, we’ll review an important NPSP feature that helps assign credit on Closed/Won opportunities: soft credits.