Import Mobile Contacts
Learning Objectives
After completing this unit, you’ll be able to:
- Import mobile contacts into Marketing Cloud Engagement.
- Create a mobile data extension.
Add Mobile Contacts
We’ve talked about contact keys and counts, and the importance of reaching out to existing customers and gaining new customers. So now let’s now talk about the import process for adding contacts to Marketing Cloud Engagement. Remember Scott’s Restaurant and Bar? Well, the staff used to use paper forms in the restaurant to gain new subscribers. Scott’s new digital manager, Simone Wright, inherited a stack of handwritten forms that included mobile opt-in information. She wants to import those contacts into Marketing Cloud Engagement, and then send a double opt-in campaign to confirm their subscription. Luckily for Simone, subscribers can be added into Marketing Cloud Engagement manually or through an import, as long as the customer has previously opted in to mobile messages (email opt in is not enough). Once Simone has confirmed this, she’s ready to import. But let’s consider a few things before she does.
Import Wisely
Before you start an import, think back to the concept of billable contacts. All Marketing Cloud Engagement contacts are considered billable, even if you’ve never sent that individual a message (and never intend to). So if Simone decides to upload a data extension of gift card purchasers with customer information (email, address, and so forth), those customers count as contacts, even if they had not signed up for email or mobile communications. Which means Scott’s is charged for customers they can’t market to. So if they’re concerned about contact utilization, Simone should carefully consider which data she chooses to import. Here are some tips.
- Only import contacts who you intend to engage with using Marketing Cloud Engagement.
- Delete contacts who are no longer contactable. Contacts who are opted out of messaging are included in utilization counts as they are still able to receive transactional messages. Consider deleting contacts that are no longer used for any messaging (transactional or commercial).

Import Using the Wizard
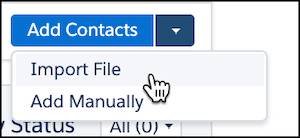
Alright, now for the import process (there are a couple ways to do it). Let’s start by importing from either MobileConnect or MobilePush. You can import contacts from the overview tab by clicking Add Contacts. You can then choose to import a file or add manually.
If you want to import a list, click Import File. From there, select where to store the data: all contacts, an existing list, or a standard list.
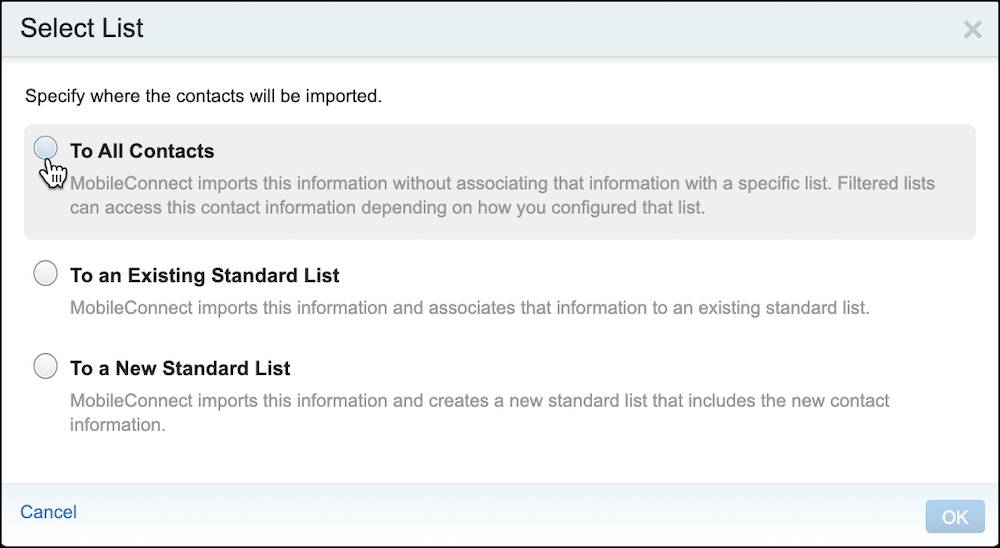
We suggest if you are using this method, that you add To All Contacts. Then click OK. From here you are taken through a wizard where you must verify the opt-in status of your subscribers.
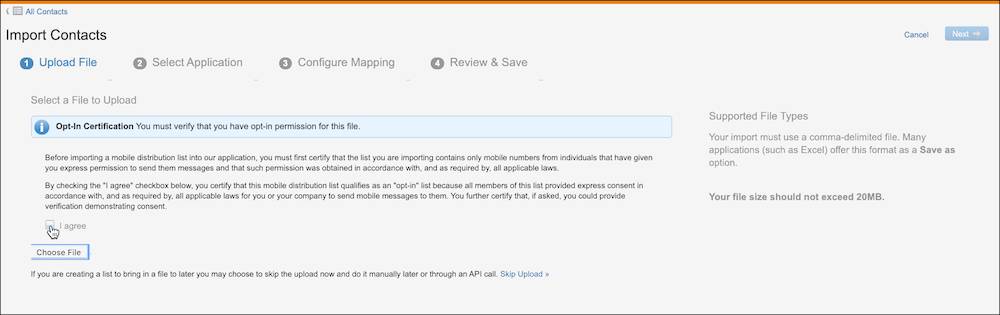
Nothing tricky here. Continue to follow the prompts onscreen to import your file into the proper channel. Next up, you learn how to add contacts using a data extension.
Create a Mobile Data Extension
For a more scalable approach, create or modify data extensions to include mobile contacts. This way you can use the data extensions for advanced segmentation or for Journey Builder campaigns. In order to send mobile messages using a data extension, there are a few requirements, based on which mobile channel you’re using. Let’s review.
|
Data Extension Requirements |
|
|---|---|
|
MobileConnect |
|
|
MobilePush |
|
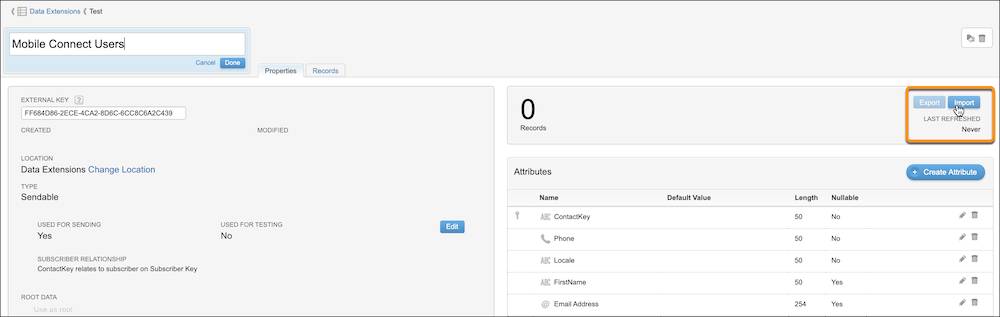
Simone wants to send an opt-in message to the users from her forms, so she decides to import them into a new data extension. Let’s follow along as she creates a new data extension for her list of previously opted-in SMS users.
- First Simone navigates to Contact Builder and the Data Extensions tab.
- From here, she clicks Create.

- Next she enters properties, name, and a description.
- She then confirms Is Sendable? is checked and clicks Next.
- Under the Data Retention Policy tab, she sets a data retention policy and clicks Next.
- Under Attributes, she enters the three required fields for MobileConnect: Contact Key, Phone, and Locale.
- Simone then adds her additional custom fields: first name and email address.
- She also confirms the Send Relationship to tie the Contact Key to the Subscriber Key

- She takes a look and double checks her work. Then she clicks Complete.
Once Simone has created the data extension, she can now import her data into the data extension by clicking the Import button from her newly created data extension.
With that, she has a new data extension to use as an audience for an opt-in campaign. You can learn more about setting up campaigns in Journey Builder in the module Journey Builder Campaigns.
Navigating the world of multi-channel marketing is a mighty task, but you are well on your way. Now that you can create and manage your mobile contacts in Marketing Cloud Engagement, you’ve laid the groundwork for mobile greatness.
Resources
- Salesforce Help: Import and Manage Contacts for MobileConnect
- Salesforce Help: Import Contacts into MobilePush
- Salesforce Help: Add and Manage Contacts Within GroupConnect
- Salesforce Help: Audiences (MobilePush)
- Salesforce Help: Data Extension Sends for SMS (MobileConnect)
- Trailhead: Journey Builder Campaigns
- Trailhead: Contact Deletion in Marketing Cloud Engagement