Create a List of Prospective Students to Recruit
Learning Objectives
After completing this unit, you’ll be able to:
- Organize data for prospective students in EDA.
- Describe how different account record types work in EDA.
- Create a list of prospective students, based on specific parameters.

What Qualifies as a Report in EDA?
A report can be as simple as a list of records that meet criteria you define, but a report can also be much more than that. You can take that list and filter and create data groups, add formulas, and customize the type of chart or graph you want to use to display the data. You can run a report on any object in Education Data Architecture (EDA), including custom objects. Any report, no matter what data it contains and what it looks like, is a powerful way to get the answers you need to your important questions.
In each unit of this module, we show you how to create a report for a different part of your institution: Recruitment and Admissions, Student Experience, K-12 schools, and Advancement.
Want to Get Hands-On with EDA Reports?
In this module, we show you the steps to build out contact records and define constituents in EDA. There aren’t any hands-on challenges in this module, but if you want to practice and try out the steps, you can set up a playground with the Install EDA into a Trailhead Playground module.
The EDA installer is available on the Salesforce AppExchange. You can also find it here.
Reporting for Recruitment and Admissions
It’s application season and high school students from all over the country are beginning to choose which colleges and universities to apply to. College admissions recruiters have one of the toughest jobs around—tracking the hundreds, and often thousands, of students who expressed interest in their higher ed institution.
In this unit, you step into the shoes of one of those admissions recruiters: Marquis Brown, recruiter for Cloudy College. We show you how Marquis uses Salesforce and EDA to turn his daunting job into a process that’s streamlined and efficient. Specifically, we follow Marquis as he tackles one of the most common reporting use cases for admissions recruiters: identifying students from a subset of high schools who expressed interest in academic programs at Cloudy College.
You may be familiar with Marquis and Cloudy College from other Salesforce for Education modules, but here’s a refresher just in case.
-
Marquis Bryant is a recruiter for Cloudy College. He’s responsible for representing Cloudy at college fairs, on-campus events, conferences, and recruitment events both locally and nationally. He supports prospective students with information about the admissions process, including application requirements and deadlines. Marquis assists with the scheduling, planning, and execution of all admission special events, including Student Visit Days, Open Houses, Accepted Student Days, and information sessions.
- Cloudy College is a fictional private, coed liberal arts college in the Northwest. Founded in 1964, Cloudy College recently enrolled more than 3,800 students for their fall semester.
Because Salesforce and EDA are all about data, as a recruiter using Salesforce, Marquis needs to think about his recruiting task in those terms. Here’s what he’s looking for.
- A list of current high school students
- From all the high schools in the geographic region that he covers
- Who expressed interest in an academic program at Cloudy College
If you want to practice creating this report in your EDA org, get ready to use these three criteria to filter your data. But before you start filtering, you need to think about the data architecture itself, because with EDA, that’s where it all begins.
Prospective Students: Organizing the Data
Whether you’re tracking a small set of high school students, or a nationwide sampling of prospects, there are many ways you can organize your data in Salesforce. EDA provides an out-of-the-box organizational data structure you can use as a baseline, so that you don’t have to plan so much on your own. In this section, we offer some best practices advice on how to use EDA to build a streamlined system that gives you the results you need.
Conveniently, EDA comes with Salesforce fields and objects that let you easily set up the data you need to track in an integrated way. Let’s take a look at a prospective high school student Marquis is recruiting, Joseph Halloway.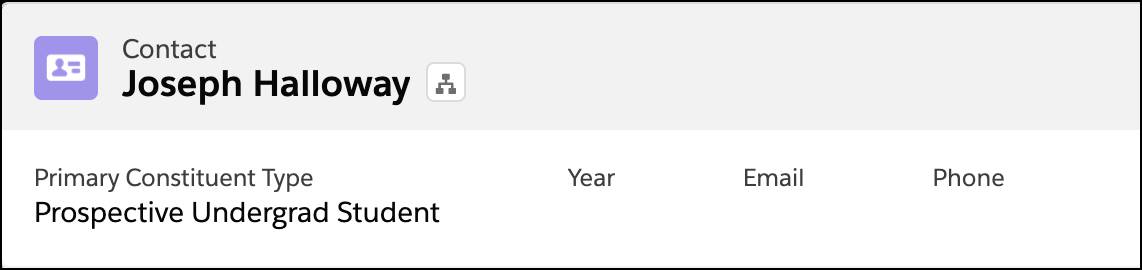
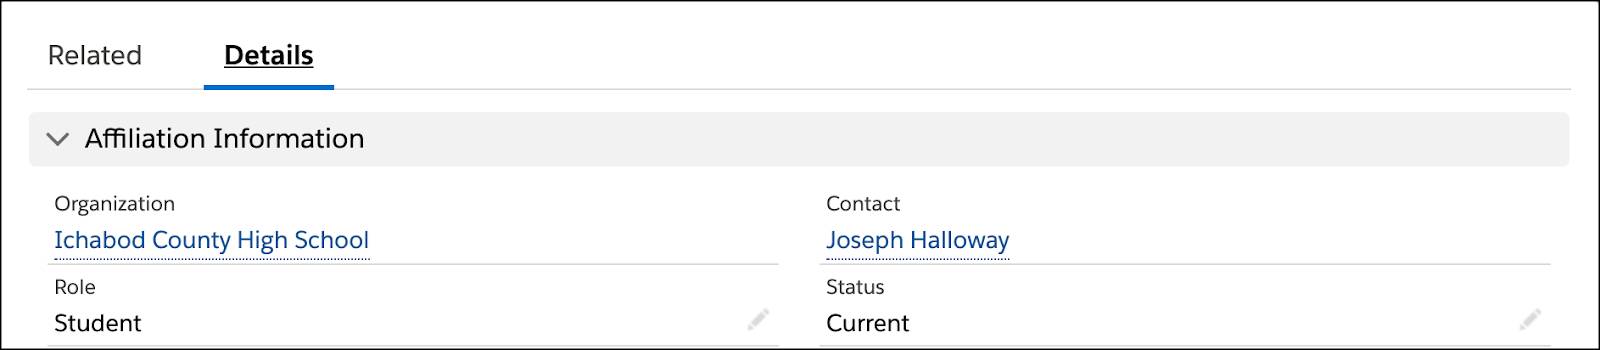
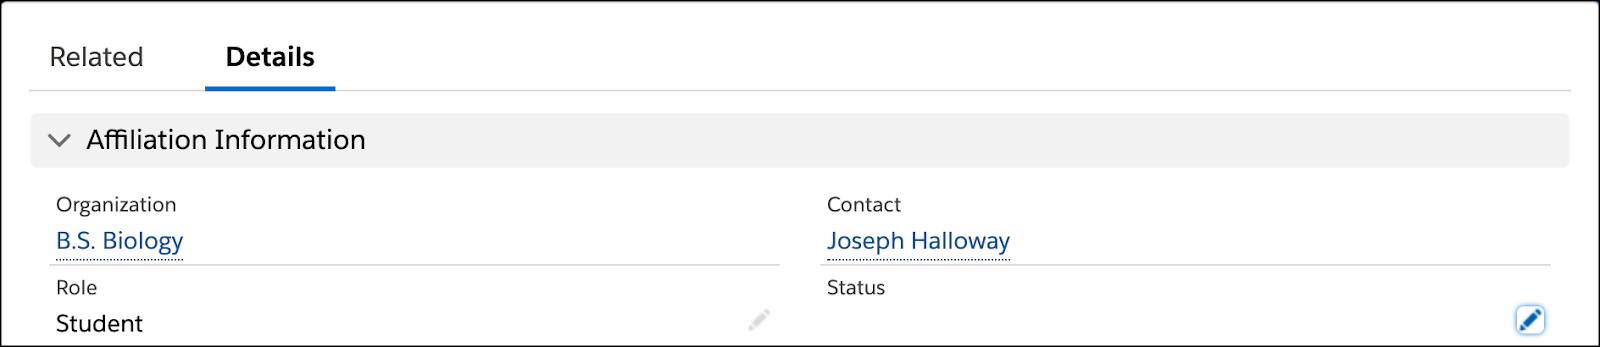
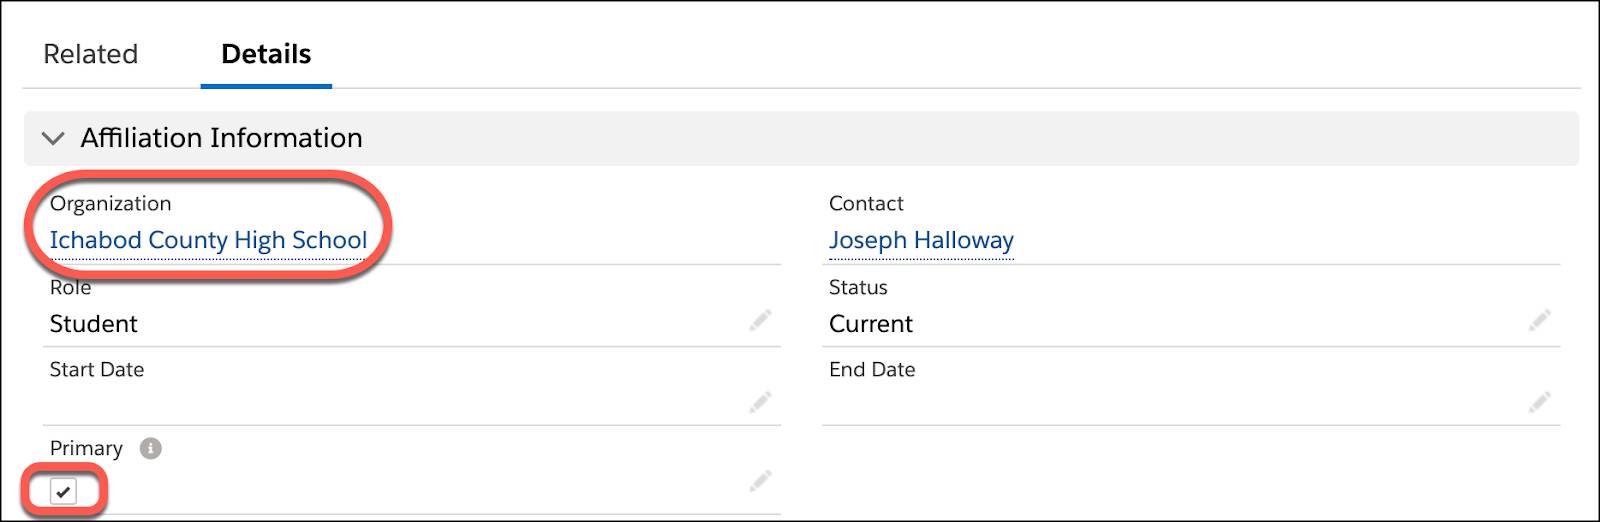
You can see from Joseph’s administrative account record that Marquis is using the EDA Affiliations object to track the main pieces of data he’s interested in. The Affiliations object is a junction object that connects Joseph Halloway to two other accounts—Ichabod County High School, a school in the geographic region Marquis covers, and BS Biology, a premier program at Cloudy College. Marquis set a specific role and status for each of these affiliations: Joseph is a current student at Ichabod County High School and he’s a current prospect for the BS Biology degree. These values are important, and we explain why a little later.
One level deeper, on the account record for each affiliated account, we see what those two affiliated accounts are. The Ichabod County High School record is an account with a record type of Educational Institution. The BS Biology record is an account with a record type of Academic Program.

These record types are important. Remember that in EDA, a contact can have one primary affiliation for each default record type. (See the Constituent Management in EDA module, linked in the Resources section, for a refresher on primary affiliations if you need one.) For Joseph, Marquis set each of these accounts as a primary affiliation to get the reporting results he’s after. If he doesn't do that, the data isn’t available through Joseph’s contact record, which is where Marquis needs to see it if he later wants to include the information in his report.
So there you have it—a simple, elegant way for Marquis to organize his data for prospective students in EDA, using accounts, account record types, affiliations, and primary affiliations. Now that his architecture is in place, and his data is entered, he’s ready to get some results.
In the next sections, we show you how to create useful reports with all the data we just talked about. If you want to follow along in your own EDA org, create some sample data to work with.
- Create contact records for 12 students, all affiliated with particular high schools. (In this example, Marquis is recruiting from four different high schools, with three students at each.) When you create the affiliations, be sure to set the Affiliation Role to Student, and the Affiliation Status to Current.
- Create additional affiliations to various academic programs for eight of those students. When you create these affiliations, be sure to set the Affiliation Role to Prospect, and the Affiliation Status to Current.
Create a Contact & Accounts Report
So how does Marquis get the data he’s after? He’s going to use EDA in conjunction with one of Salesforce’s most powerful features: reports.
- Click the Reports tab. (If you don’t see the Reports tab, click the App Launcher (
 ) then search for and select Reports.)
 - Click New Report.
- Search for and select the Contacts & Accounts report type.
- Click Continue.

Marquis is using the Contacts & Accounts report type in Salesforce because it lets him drill down into those all-important, EDA-specific affiliations.
Create a Cross Filter for Current High School Students
Next, he creates a cross filter so that he can look at data across various, integrated objects.
- In the new, unsaved report, click the Filters dropdown menu, and select Add Cross Filter.

- Set the filter to Contacts with Affiliated Accounts.
- Click Apply.
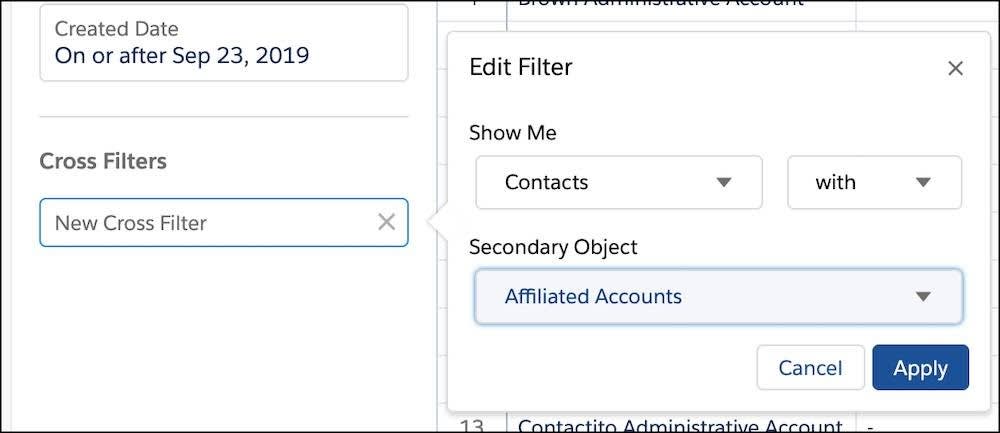
- Click Add Affiliated Accounts Filter, and add the following filters.
- Role equals Student: Search for and select Role. When the filter appears, leave the Operator as equals and select Student as the Value. Click Apply.
- Status equals Current: Search for and select Status. When the filter appears, leave the Operator as equals and select Current as the Value. Click Apply.
- Organization contains school: Search for and select Organization. When the filter appears, change the Operator to contains and enter
schoolas the Value.
(Tip: Don’t use “high school,” because not all the schools you track have “high” in their name.) - Click Apply.

- Make sure that the other fields on the report don’t restrict your data. For example, Marquis verifies that the Show menu is set to All Accounts, and the Date Range is set to All Time. That way, his report includes as many results as possible, regardless of who created the records, or when.
- To run the report, click Save & Run.
- Name the report
Interested High School Students. Click Save.
Marquis sees a list of students from the four high schools in his geographic area. (In this example, there are 12 students.)
These are the students he’s tracked over time, for one reason or another. But not all of them have expressed interest in a particular program at Cloudy College and as you can tell by Marquis's report name, that's the list he wants. Let’s narrow the results by adding another cross filter to the report.
Create a Second Cross Filter for Current Prospects
- Click the Filters dropdown menu, and select Add Cross Filter.
- Set the new filter to Contacts with Affiliated Accounts, just as you did before. Click Apply.
- Click Add Affiliated Accounts Filter, and add the following filters.
- Role equals Prospect
- Status equals Current
- Affiliation Type equals
Academic Program
- To run the report, click Save & Run.
The list of prospective students now includes only those students Marquis designated as “prospects”— that is, students who expressed interest in a particular academic program. (In this example, there are eight students.)
“But wait!” Marquis says—that’s not quite good enough. He wants to know which programs these students are interested in and which high school each student is from. EDA and Salesforce reporting enable him to see that information—as long as he’s set those primary affiliations, which we talked about earlier.
- Locate the collapsed Fields column in the left-hand panel. Click the arrow to expand.
- Search for
primaryto locate the cluster of Primary fields.
- Drag the Primary Educational Institution and the Primary Academic Program fields into the preview pane to add them to the report.
- Click Save & Run.

That’s all Marquis needs to do to build a genuinely useful report with Salesforce and EDA. He can return to this report over and over again, and it updates automatically with data he adds or edits in his org. But remember, your results are only as good as the data you provide, so follow the best practices modeled by Marquis when architecting and entering data into Salesforce.
Ready to see reporting in action on a Student Experience team? Head to the next unit to explore reporting on student attendance using custom report types.