Set Up Data Cloud
Learning Objectives
After completing this unit, you’ll be able to:
- Update the admin user.
- Provision your account.
- Create users and set permissions.
Implementation Steps
Now that you have some awareness of the user interface and roles, let’s review your initial Data Cloud implementation steps as admin. Here’s an overview of the seven steps that we cover in more detail next.
| Step |
What You Do |
Additional Info |
|---|---|---|
|
1 |
Update your admin user. |
An email is sent to admins with account login information. Once you log in for the first time you need to reset your password and add the admin permission set to your user. |
|
2 |
Provision Data Cloud. |
Complete the setup of your account in the Data Cloud Setup page. |
|
3 |
Create profiles, users, and add permission sets. |
Profiles and permission sets help you manage the access users have in Data Cloud. |
|
4 |
Connect to Marketing Cloud Engagement. |
Connect with a Marketing Cloud Engagement account using admin credentials. |
|
5 |
Select appropriate data bundles and business units in Marketing Cloud Engagement. |
Data bundles are pre-modeled standardized data sets. For Marketing Cloud Engagement these are based on email and mobile channels. |
|
6 |
Connect to Sales or Service Cloud. |
Connect your Data Cloud with the account provisioned or with additional Sales and Service Cloud accounts. |
|
7 |
Prepare for ongoing tasks and maintenance. |
Set yourself up for success by establishing auditing and troubleshooting procedures. |
Step-by-Step Instructions
Remember, in this module, we assume you are a Data Cloud admin. If you’re not an admin, that’s OK. Read along to learn how your administrator would take the steps in a production org. Don’t try to follow these steps in your Trailhead Playground. Data Cloud isn’t available in the Trailhead Playground.
Watch this video or follow along with the steps below.
Update Your Admin User
Once you purchase Data Cloud, you receive an admin email with login information from your account team. Follow these steps to set up your user with the proper permissions.

- Log in to your Data Cloud instance with the link provided in your admin email.
- Reset your password when prompted on-screen.
- Navigate to Setup from the dropdown.
- Type
usersinto the Quick Find field.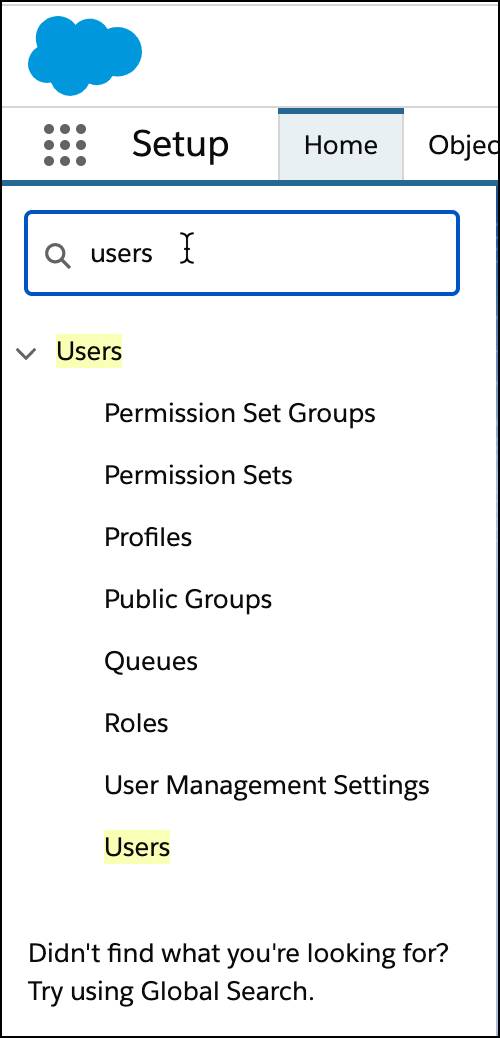
- Click Users.
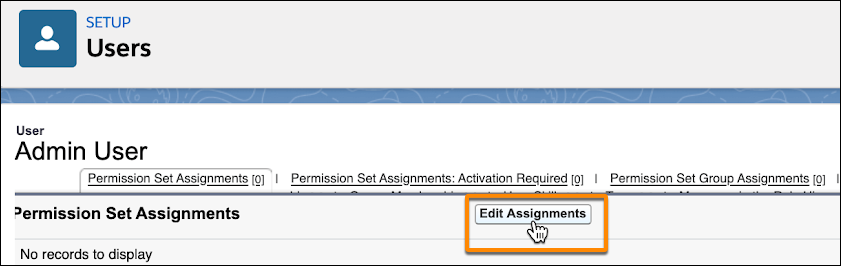
- From the user screen, click your username.
- From your User page, under Permission Set Assignments click Edit Assignments.
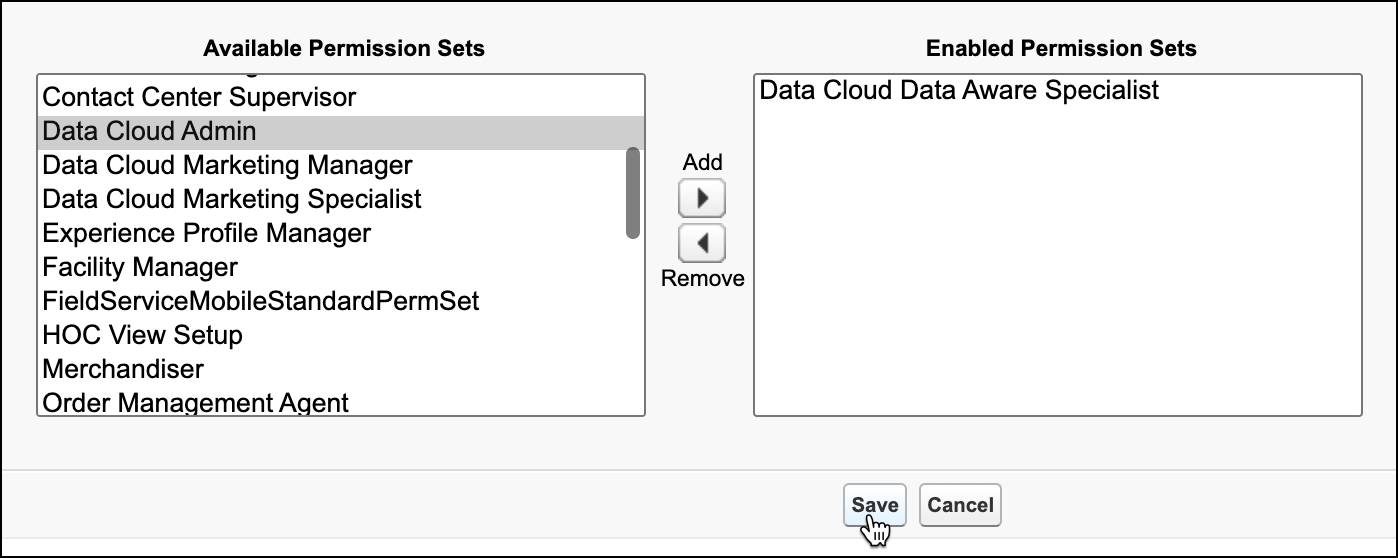
- Select the Data Cloud Admin permission set and click the Add arrow icon.
- Click Save.
You now have access to the Data Cloud Setup page.
Provision Data Platform
Follow these steps to complete the configuration of Data Cloud.
- Navigate back to the Setup gear.
- Click Data Cloud Setup.
- Click the Get Started button.
The setup can take a few minutes to complete, so grab some coffee and keep an eye out for the green success message. Seeing green? High-five! Your Data Cloud instance is successfully set up.
Add Users and Permission Sets
Now let’s get back to setting up your users and assign permission sets. You can do this now or come back to this step later.
Create User
- In Setup, type
usersinto the Quick Find field. - Click Users.
- From the User screen, click New User.
- Fill out the required information for your user.
- General Information
- Last Name
- Alias: This is auto-generated but can be updated.
- Username: Username must be in the form of an email address (for example, john@acme.com).
- Nickname: Display name for users in online communities.
- Role: Select or keep as None Specified
- User License: Salesforce
- Profile: Select Standard User or a custom profile
- Email Encoding: Defaults to Unicode (UTF-8)
- Locale Settings
- Time Zone
- Locale
- Language
- Approver Settings
- Receive Approval Request Emails: Select from displayed options
Review your work and once done, click Save.
Permission Sets
- From the user screen, under Permission Set Assignments click Edit Assignments.
- Assign the appropriate permission set to that user.
- Click Save.
As soon as you complete these steps, your new user receives an email notification with login information, so be sure you communicate with them if the account is truly ready for them to use.
When you're ready, repeat these steps for all your users. Once done, meet us back in the next unit to learn how to connect your Marketing Cloud Engagement and Sales and Service accounts with your Data Cloud instance.