Install and Configure SFRA
Learning Objectives
After completing this unit, you’ll be able to:
- Use Node Package Manager (npm) to install packages.
- Compile the JavaScript, style sheets, and fonts for SFRA.
- Upload the SFRA cartridges.
- Add data to SFRA.
- Index SFRA.
Install and Configure
Vijay Lahiri, Cloud Kicks' developer wants to configure his local machine to test and prototype his team's SFRA customizations. He starts by installing Node.js and SFRA command-line tools, and then moves on to Visual Studio Code and other helpful tools and processes.
Here's how he does it.
- Open a command prompt and navigate to the storefront-reference-architecture directory.
- Install the latest 12.x version of Node.JS from https://nodejs.org/dist/latest-v12.x/
- Test if node is installed by entering:
node -v - If node is already installed, a version number displays. If it's installed, skip to the next step.
- Test if node is installed by entering:
- On a Windows machine, enter this to install the Visual Studio 2015 build tools:
npm install --global --production windows-build-tools --vs2015
- Use npm to install the modules included with SFRA. (This approach is possible only if you're in the storefront-reference-architecture directory and you installed Node.js.) Enter this:
npm install- SFRA depends on modules managed by npm. If you downloaded the repository as a .zip file, these instructions assume that you expanded it.
- Always run this command when you download a new version of SFRA, because the dependencies included with the application sometimes change.
SFRA Command-Line Tools
While packages are easy to install globally on most operating systems, it can be complicated to globally install packages on the Mac OS/X, and might be better to use them locally. We get to that later.
Global Installation
If you're working on a *nix or Windows system, we recommend that you install the command-line build tools for SFRA globally. This approach makes it easy to create custom cartridges with the correct structure anywhere on your development machine.
The Windows Build Tools must be installed globally, so that npm install can use them to compile npm modules into native Windows binary files. When you install sgmf-scripts globally on Windows, you can access them by just typing sgmf-scripts in the command prompt in any folder. Otherwise you have to navigate to the folder they are installed in to use them.
To install globally on either type of machine, Vijay enters this:
npm install -g sgmf-scripts
Now he can use the sgmf-scripts command-line tools in any directory on his machine with a syntax similar to this.
sgmf-scripts --help
If you install on a Mac and get an EACCES error, try Fixing Your Permissions to globally install the node. Adjust your node install if necessary. This process can be time-consuming. A global install isn't required, but it eliminates the install step for a new cartridge.
Local Installation
To install sgmf-scripts locally, Vijay enters this:
npm install sgmf-scripts
After the install, he can use sgmf-scripts in the current folder with a syntax similar to this.
node node_modules/sgmf-scripts --help
Visual Studio Code
Visual Studio Code is a free source-code editor made by Microsoft for Windows, Linux, and macOS. Vijay appreciates features such as support for debugging, syntax highlighting, intelligent code completion, snippets, code refactoring, and embedded Git. You must install Visual Studio Build Tools globally, so the global npm logic can find them.
Here’s how to install it and use it.
- Download Visual Studio Code and follow the install instructions. Visual Studio Code opens automatically.
- In the Extensions area, search for and Install the ESLint extension.
- In Visual Studio Code, open a folder containing your cartridges.

Set Up and Enable Code Upload
To use the upload functionality, Vijay creates a config file called dw.json in the directory that contains his cartridges. It should look like this.
{
"hostname": "<*.demandware.net (without https/http)>",
"username": "<username>",
"password": "<password>",
"cartridge": ["cartridge A", "cartridge B"], //optional
"code-version": "<code-version>"
}
Here’s how to enable the upload functionality.
- Open Visual Studio Code.
- Click Code > Preferences > Settings.
- Search the settings for extension.prophet.upload.enabled.
- Set this setting to true.
- Restart the Visual Studio Code window for the changes to take effect.
Set Up Code Debugging
To use the code debugging functionality, Vijay creates the config file vscode/launch.json in the directory that contains his cartridges (If the vscode directory doesn’t exist, create it). It should look like this:
{
"version": "0.1.0",
"configurations": [
{
"type": "prophet",
"request": "launch",
"name": "<name of config>",
"hostname": "<*.demandware.net (without https/http)>",
"username": "<username>",
"password": "<password>",
"codeversion": "<code-version>",
"cartridgeroot": "<absolute path to directory that contains all cartridges>",
"workspaceroot": "${workspaceFolder}"
}
]
}
JavaScript and Style Sheets
Next, he compiles some of the SFRA code. Here’s how he does it.
- Open the terminal.
- Navigate to the top level of the storefront-reference-architecture repository.
- Enter this command:
npm run compile:js - Enter this command:
npm run compile:scss - Enter this command:
npm run compile:fonts
Cartridges
Vijay's team uses VisualStudio Code and the Visual Studio Prophet Debugger to upload the cartridges to a sandbox. For this configuration, he uses a text editor to create a file (dw.json) that includes information about his sandbox. This file must be at the top level of the storefront-reference-architecture repository, as a sibling of the cartridge directory. The dw.json file must be valid JSON that includes the following information.
{
    "hostname": "dev01-web-company5.cloudkicks.com",
    "username": "admin",
    "password": "passwordjkl",
    "code-version": "version1" }
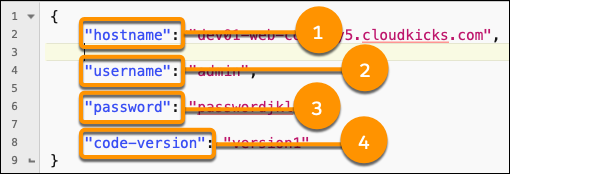
Here’s what he specifies.
- For hostname (1), enter the fully qualified domain name (FQDN) of your sandbox. For example, dev04-web-company5.cloudkicks.com.
- For username (2), enter the name of a user with Site Development rights. For example, admin.
- For password (3), enter the password for the user.
- For code-version (4), enter version1 for a new sandbox.
Vijay needs to upload the SFRA cartridges into the sandbox. Here’s what he does.
- Navigate to the top level of the storefront-reference-architecture repository.
- Enter the following command:
npm run uploadCartridge(The app_storefront_base and modules cartridges are uploaded to the sandbox that he specified in the dw.json file.) - Open Business Manager in your browser.
- Select Administration > Site Development > Code Deployment.
- Click the version of the code you specified in the dw.json file (version1 for a new sandbox). The app_storefront_base and modules cartridges are on the list of cartridges on the Version Summary page.
- Open Visual Studio Code and take a look.
Storefront Data
- Navigate to the top level of the storefrontdata repository.
- If you haven’t already installed all the packages (as described in the last unit), do it now in each folder.
- Enter this command in the terminal to zip up the data so that it can be imported into Business Manager:
npm run zipData. This command creates a zip file in the storefrontdata repository named demo_data_sfra.zip. - Now you can import the data.
This module assumes you are a Salesforce B2C Commerce developer with the proper permissions to perform these tasks. If you’re not a B2C Commerce developer, that’s OK. Read along to learn how your developer would take these steps in a sandbox instance. Don't try to follow our steps in your Trailhead Playground. B2C Commerce isn’t available in the Trailhead Playground.
If you have a sandbox instance of B2C Commerce, you can try out these steps in your sandbox. If you don't have a sandbox and you’re a customer or partner developer, ask your manager if there is a sandbox that you can use. To follow these steps you need site administrator rights in your sandbox. If you’re not a site admin, ask your administrator which login credentials to use to connect to the sandbox.- Open Business Manager.
- Select Administration > Site Development > Site Import & Export.

- In the Import section, select Local (1).
- Click Choose File (2) to navigate to the demo_data_sfra.zip file on your local system.
- Click Open.
- Click Upload. The demo_data_sfra.zip is added to the list of uploaded archives.

- Select (1) the demo_data_sfra.zip file.
- Click Import (2).
- Click OK in response to Are you sure that you want to import the selected archive? When you see the Success status at the bottom of the page, you’re done!
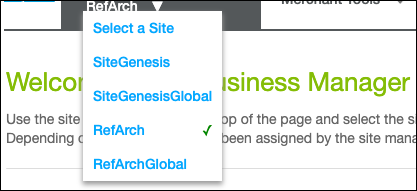
- At the top of the Business Manager page, click Select a Site and you’ll see two new sites available: RefArch and RefArchGlobal. Those are the two SFRA sites. RefArch is a US-only site; RefArchGlobal is set up for use in many different locales.
The Search Index
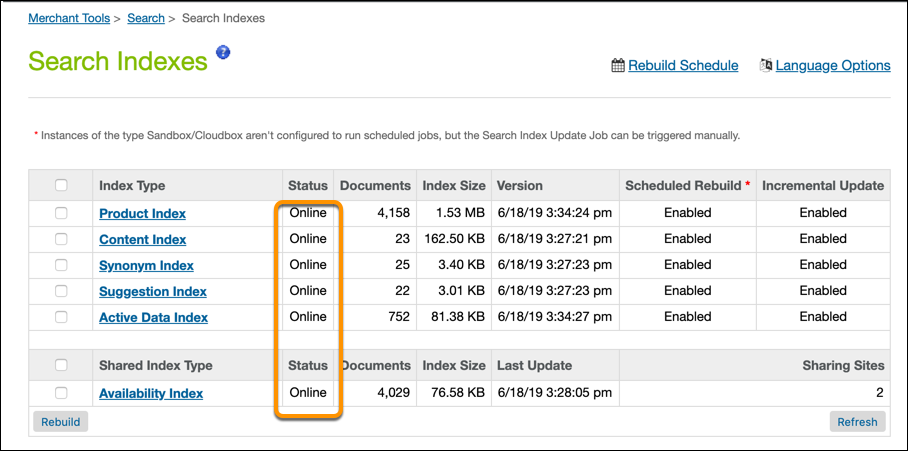
Vijay wants to be able to search the SFRA storefront, so he must generate a search index. Here’s how he does it.
- Make sure you select the RefArch or RefArchGlobal site.
- Select Merchant Tools > Search > Search Indexes.
- Select all of the indexes under Index Type.
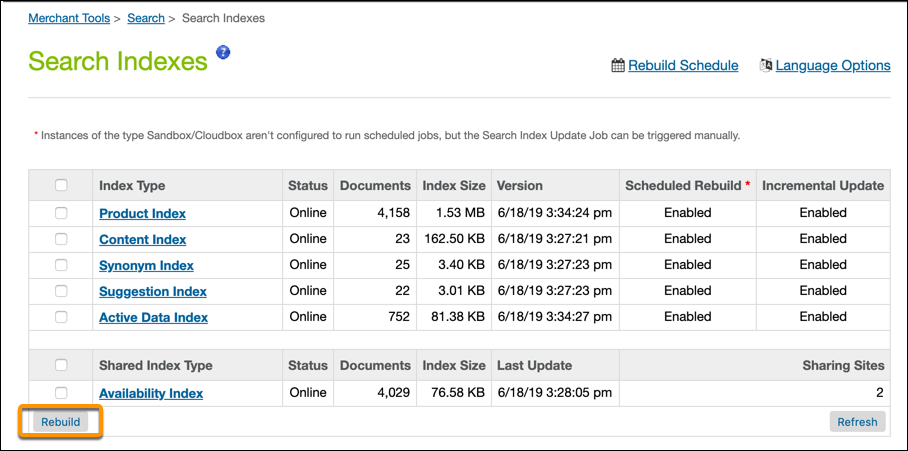
- Click Rebuild.
- When the Status column for all the indexes indicates Online, you’re done!
The Storefront
Vijay did a great job of uploading, compiling, populating with data, and indexing the SFRA storefront. Now he wants to see what it looks like.
Here’s how he takes a look.
- Open Business Manager (if it’s not already open).
- Make sure the RefArch or RefArchGlobal site is selected.
- Click Storefront at the top of the Business Manager.
- If you see a Tracking Consent window, click Yes or No to dismiss it. (You can customize this dialog later.)
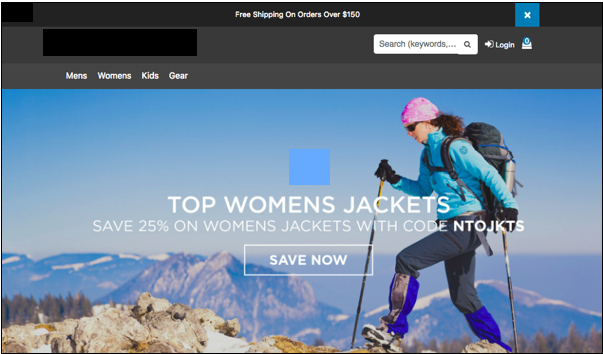
And there it is, the SFRA storefront, all ready for Vijay to start using as a blueprint for his new site.
Wrap It Up
Congratulations! You’re well on your way to developing for B2C Commerce. After following along with Vijay, you know where to find the documentation, the release information, and the developer forums. You know how to install Visual Studio Code, and are ready to customize SFRA into your very own pixel-perfect ecommerce site. Now earn your awesome badge!