Use Collections
Learning Objectives
After completing this unit, you’ll be able to:
- Declare and initialize a list.
- Explain two ways to add items to a list.
Collections
A collection is a type of variable that can store multiple items. In our tea example, we have a sugar bowl with several sugar cubes inside it. The sugar bowl is considered a collection and the sugar cubes are items that are stored in that collection.

Although there are three types of Apex collections (lists, sets, and maps), in this module we focus on lists.
Lists
An Apex list is an ordered group of items of the same type, like a shopping list.
- Tea
- Sugar
- Honey
- Milk
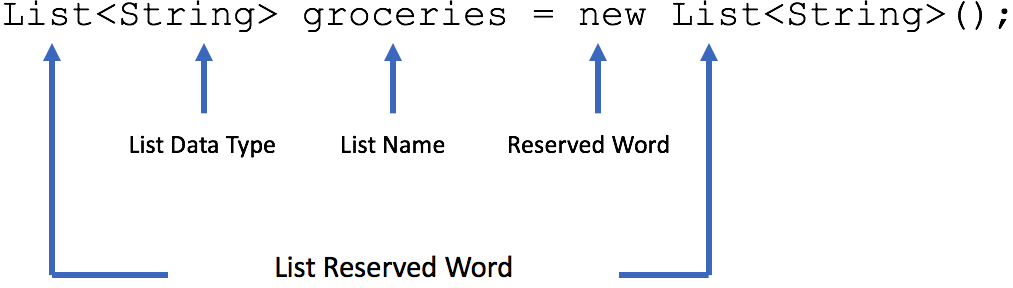
Each item in the shopping list is a string, and each item has a position within the list. To declare a list you need a few things. You will use the list reserved word, the data type (all items must be the same data type) within the <> characters, and the reserved word new. At the end of this statement there are required parentheses.

Declare an Empty List
- In the Developer Console, click Debug | Open Execute Anonymous Window.
- Copy this code and paste it into the Enter Apex Code window.
//Declare the groceries list List<String> groceries = new List<String>(); //The output for this statement is an empty list, (). System.debug('Groceries Value: ' + groceries); - Select the Open log checkbox and then click Execute. The Execution Log opens, displaying the result of running your code.
- Select the Debug Only checkbox at the bottom of the window.
When you ran the code, you probably noticed that the output was (). Because you haven’t added anything to the list, it’s empty. When you declared the groceries list, you created a single empty space, ready for items to be added.

Declare a List with a Set Size
If we know exactly how long our list needs to be, we can set the size when we declare the list. We do this by including the size in brackets, [ ], after the data type, like this:
![]()
This code declares a list of strings called groceries, and sets its size to 4 strings. The empty groceries list looks like this:

An item’s sequential position is a number called its index. The index is how we reference items. You probably learned to count starting with the number one. In many programming languages, however, counting starts with the number zero! So, now our list will look like this when we write our Apex code.
- Tea
- Sugar
- Honey
- Milk
The index that you use to point to a certain item in the list will be index 0 for Tea, index 1 for Sugar, index 2 for Honey, and so on.
You reference a certain item in the list by its index (its position within the list) like this:
![groceries[0];](https://res.cloudinary.com/hy4kyit2a/f_auto,fl_lossy,q_70/learn/modules/apex-basics-for-admins/use-collections/images/655d4b6c181260174af37c5144779026_screen-shot-2019-03-20-at-10-28-29-am.png)
- In the Developer Console, click Debug | Open Execute Anonymous Window.
- Copy this code and paste it into the Enter Apex Code window.
String[] groceries = new String[4]; System.debug('Initialized groceries: ' + groceries); System.debug('Item 0: ' + groceries[0]); - Select the Open log checkbox and then click Execute. The Execution Log opens, displaying the result of running your code.
- Select the Debug Only checkbox at the bottom of the window.
The value of the first item in the list is null. Let’s add a few items to the list.
Initialize a List
Initializing a list is assigning initial values to a list. There are two ways to add items to a list:
- Declare and initialize a list.
//Sets the first item in the list to 'Tea' List<String> groceries = new List<String>{'Tea'}; - Declare an empty list and add values later.
List<String> groceries = new List<String>();
groceries.add('Tea');
Declare and Initialize a List
The syntax for initializing a list with values is similar to declaring an empty list. The difference is that instead of using parenthesis ( ( ) ), you use curly braces ( { } ) to add values.
- In the Developer Console, click Debug | Open Execute Anonymous Window.
- Copy this code and paste it into the Enter Apex Code window.
//Declare the groceries list List<String> groceries = new List<String>{'Tea','Sugar','Honey','Milk'}; //The output for this statement is Tea, Sugar, Honey, Milk System.debug('Groceries: ' + groceries); - Select the Open log checkbox and then click Execute. The Execution Log opens, displaying the result of running your code.
- Select the Debug Only checkbox at the bottom of the window.
Declare an Empty List and Add Values Later
But what if you want to add items later? Apex provides methods that let you work with lists. Let’s use the add method to add grocery items to the groceries list.
- In the Developer Console, click Debug | Open Execute Anonymous Window.
- Copy this code and paste it into the Enter Apex Code window.
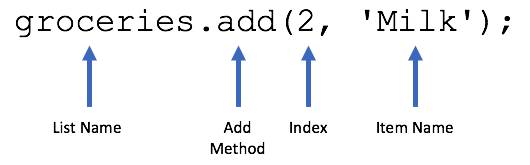
//Create the groceries list List<String> groceries = new List<String>(); //The output for this statement is null System.debug('Groceries: ' + groceries); //Use the add method to add an element to the list groceries.add('Tea'); groceries.add('Sugar'); groceries.add('Honey'); groceries.add(2, 'Milk'); //The output for this statement is Tea, Sugar, Milk, Honey System.debug('Groceries: ' + groceries); - Select the Open log checkbox and then click Execute. The Execution Log opens, displaying the result of running your code.
- Select the Debug Only checkbox at the bottom of the window.

Did you notice the dot (“.”)between groceries and add? Apex uses dot notation. Dot notation has several uses. In line 8, we connect the add method (that Apex provides) to the groceries list with a dot to add an item (Tea) to the list.
Line 11 demonstrates another way to add an item to a list, by inserting the item in a specific index (position):
As you continue to work with Apex code, you learn how to determine which method to use. But the basics that you learn in this unit can help you get started.
Demystifying Lists
Different ways of adding items to a list produce slightly different results; sometimes unexpected results. Try this exercise.
- In the Developer Console, click Debug | Open Execute Anonymous Window.
- Copy this code and paste it into the Enter Apex Code window.
String[] groceries = new String[4]; System.debug('Groceries: ' + groceries); groceries.add('Tea'); groceries.add('Sugar'); System.debug('Added 2 items: ' + groceries); groceries.add(1, 'Honey'); System.debug('Added Honey in index 1: ' + groceries); System.debug('Item 0: ' + groceries[0]); - Select the Open log checkbox and click Execute. The Execution Log opens, displaying the result of running your code.
- Select the Debug Only checkbox at the bottom of the window.
Interesting results:

When we added the two strings in lines 4 and 5, we didn’t specify an index, so Tea and Sugar were added onto the end of the list, increasing the list size from four strings to six strings. In line 8, we explicitly specified index 1 for Honey, so why isn’t Honey first in the list? Remember when programming, we always start counting with 0 instead of 1. In line 11, the first index in the list is 0, which currently contains a null value.
Writing code is very similar to doing math problems. You have one equation, but there are so many ways to do one thing. In this unit, you learned that there is more than one way to work with lists in Apex. Whether you want to declare a list, initialize a list, or refer to a specific value in a list, how you do it is your choice. Too many options? Don’t worry. When you become more comfortable with Apex, try things different ways, and you’ll begin to understand more about which ways work best in which circumstances.