Select and Prioritize Features
Learning Objectives
After completing this unit, you'll be able to:
- Implement new features using change management principles.
- Describe the roles and responsibilities needed to manage releases effectively.
- Incorporate the use of the Release Matrix into release planning.
- Describe how to capture requirements in Salesforce.
Introduction
So, now you know where to learn about what’s new in the release. But how do you decide which new features will be most impactful for your organization?
Keep It Simple
If you have, say, a few dozen users focused on a handful of core use cases, selecting and prioritizing features will be relatively quick.
You can just track user needs in a basic spreadsheet and focus on features that are auto-enabled or can be configured in a few clicks (remember those handy release note filters?). User communication can be a simple email or short video letting your teams know how these features will benefit them, plus highlighting anything impacting the user interface.
Take It Further
If you’re thinking, “The simple approach isn’t going to work for me. I’ve got lots of users, use cases, plus several teams managing Salesforce” then have no fear!
To address more complex situations, focus on three key principles.
- Forward plan
- Define roles, responsibilities, and processes
- Raise your game with advanced tools
To help you understand how each of these works in practice, let’s walk through release management with Barry, the awesome admin at Abacus, a children’s book company.
Abacus initially bought Sales Cloud for a few dozen sales users. To handle rising demand for its books, the company has onboarded another hundred salespeople and now runs its customer service operations on Service Cloud as well.
Barry considers the impact of these changes on release management at Abacus.
On the one hand, an expanded Salesforce team means Abacus now has more capacity to explore new features and gather requirements from end users. On the other hand, more players need to collaborate to connect their Salesforce platform expertise with their knowledge of business processes and pain points.
This is where the three principles above come into play.
Forward Plan: When Do We Do All This?
Start planning early to ensure the technical resources you need are available. A couple of months before the release hits production orgs (for Salesforce core releases this is typically early December, April, and August), Barry gets in touch with Nikita, the IT team lead at Abacus. He also contacts Evelyn and Kathy, sales and customer service team managers respectively, about defining priority user requirements.
Define Roles, Responsibilities, and Processes
With more cooks in the kitchen, it’s important to define who’s doing what. Depending on the size and complexity of the operations you’re running on Salesforce, several individuals or teams may be responsible for each role. One person may also wear multiple hats.
Let's look at each of the key roles.
Product owner/business functional subject matter expert: Has in-depth knowledge of a particular business function or process; leads gathering and prioritizing of business requirements. At Abacus, Evelyn and Kathy handle this role for the sales and service teams.
Salesforce subject matter expert (SME): Has deep knowledge of the Salesforce platform; educates the wider team on Salesforce capabilities. Barry is the star Salesforce SME at Abacus.
Technical expert: Helps evaluate implementation effort from a technology standpoint; defines and implements technical requirements relating to integrations between Salesforce and other systems, as well as any custom code. Nikita enlists the help of one of her developers, Dale, to take the lead on this for Abacus.
Raise Your Game with Advanced Tools
With many use cases and features to evaluate and deliver, a basic spreadsheet list may get a little unwieldy. Luckily for you, there are some handy tools you can use to make things easier.
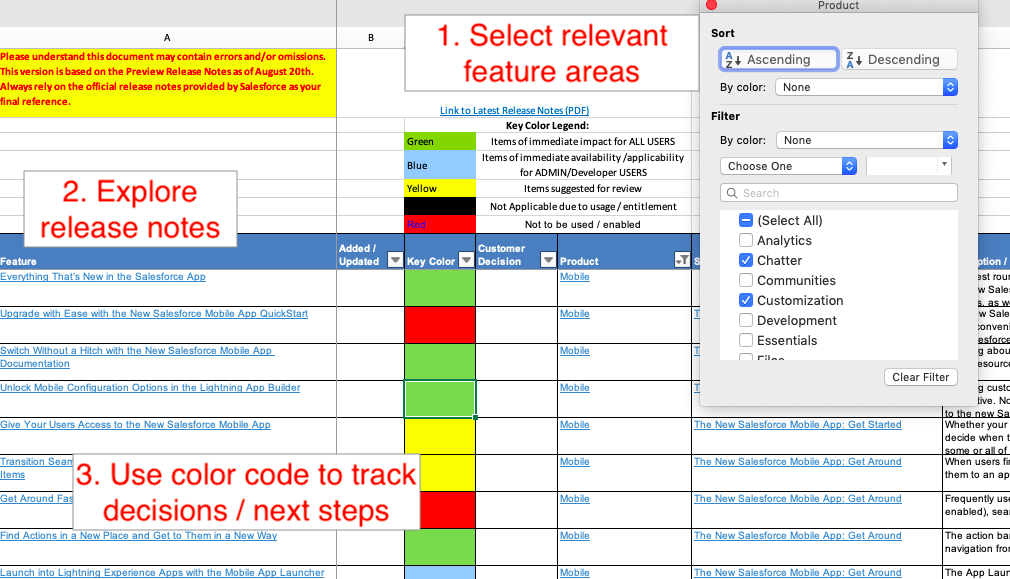
Barry and his team use the Release Matrix to do a first pass at selecting relevant features for Abacus. First they filter relevant areas for the clouds they have, including Sales, Service, Platform and Analytics (1). Then, they read through the new features (2). They color code them to flag if they want to implement a feature in their upcoming release project, exclude it, or dig a bit deeper before making a decision (3).
You can find the release matrix on the Release Readiness Trailblazers Community, where it’s posted about a month ahead of the deployment in production.

To make it easier to collaborate around prioritization and deployment, Barry creates a dedicated release management object.
Create a Release Management Object
Barry creates a new custom object and adds a few simple fields to describe features, business impact, and implementation effort. Here’s how he does it.
- From the Object Manager tab in Setup, click Create and select Custom Object.
- On the New Custom Object page, populate the fields as follows:
- Label:
New Feature - Plural label:
New Features - Description:
Object to track and prioritize new features to be deployed
- Label:
- Check all the boxes under Optional Features.
- Under Search Status, check Allow search.
- Under Object Creation Options (available only when custom object is first created), check all options.
- Click Save.
- On the New Custom Object tab, for Tab Style, select Trophy, and click Next.
- Leave tab visibility as is, and click Next.
- Under Add to Custom Apps, click Save.
Now that Barry has created the custom object, he needs to add the key fields.
- From the New Feature tab in the Object Manager, select Fields & Relationships.
- Click New, and follow the wizard to create fields in the table below.
| Field Name | Field Type | Details |
|---|---|---|
Feature Area |
Picklist | Group features together to make them easier to manage. Examples: Accounts & Contacts, Email, Automation, Case management. |
Business Impact |
Picklist | Rank the feature in terms of high, medium, or low value add for your organization. |
Implementation Effort |
Picklist | Rank the feature in terms of time and resource to implement. |
Decision Status |
Picklist | Track your features from initial proposal through to deployment. |
Target deployment date |
Date | When will this feature be deployed? For high-value but higher implementation effort features, you may want to pencil in deployment in a second phase after you’ve got the low-hanging fruit into your users’ hands. |
After reviewing new features in the Release Matrix, Barry and Dale have identified a few features they think will benefit end users. They create a new record on the release management object for each of the new features.
Quick Wins with Simple Features
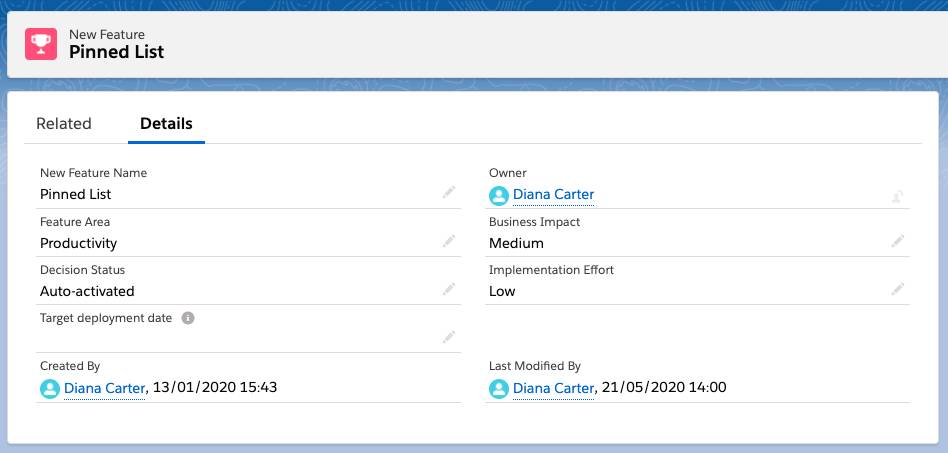
Barry almost cries with joy when he finds out about pinned lists. Users at Abacus had been complaining for ages about being unable to choose the default list view on an object record home. And the best of it is, no setup required! Barry creates a record to track this.
- From the App Launcher, navigate to the New Feature tab. Click New. Fill out the fields as follows:
- Feature Name:
Pinned List - Feature Area: Productivity
- Business Impact: Medium
- Implementation Effort: Low
- Decision status: Auto-activated
- Feature Name:
His record looks like this:
More Advanced New Features with Significant Business Value
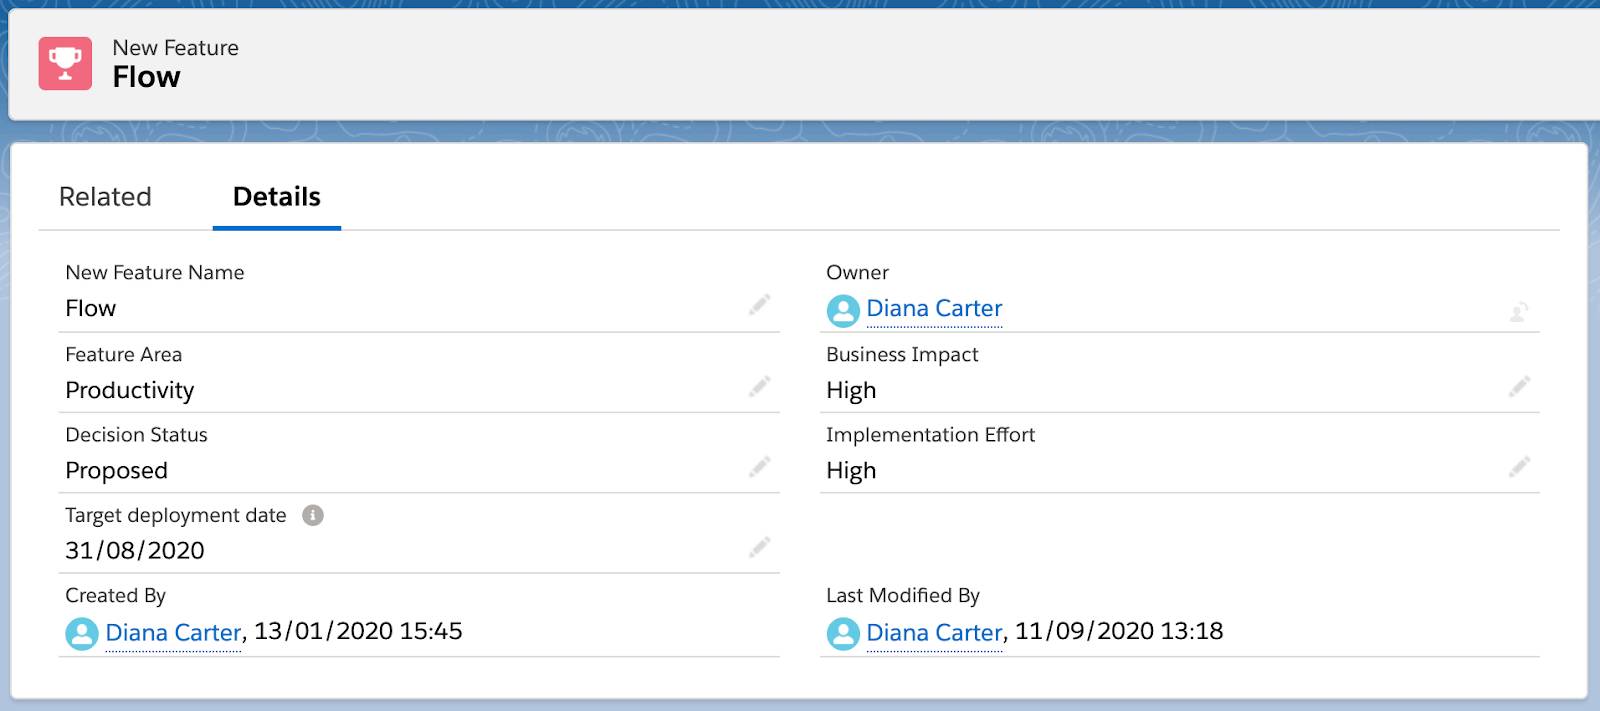
Barry and Dale see that the Flow automation feature has had a real facelift in the last few releases, and can help eliminate some of the more click-heavy processes at Abacus. They need to spend time familiarizing themselves with the feature and defining use cases, so they aim to deploy in a few months’ time. Barry creates a new record in the release management app to track this.
Retire Custom Apps to Reduce Technical Debt
Barry discovers it’s now possible to associate a single Contact record with multiple Account records, so Abacus can retire the custom junction object Barry’s team previously created. This helps remove unnecessary complexity (or “technical debt”) in their org, reducing time to deploy new innovations in future.
Barry also realizes custom currency fields can now be used in forecasting. This was the last blocker to leveraging the Salesforce native forecasting feature. Now, Abacus can retire the third-party tool it was using.
Refine Your Object and Consider Creating an App
Make sure you capture relevant information in your release management object—no more, no less. Barry’s team decides to add fields for the number of users impacted, target deployment date and a link to the relevant Salesforce release note. They also add long text fields to track further details around user requirements and implementation effort.
To consolidate information in one place, consider creating a simple release management app. Add your release management object to the app, plus Reports and Chatter groups. Pin any Chatter groups dedicated to gathering feedback on Salesforce to the navigation bar for quick access. You can learn more about creating custom apps in the Create and Customize Lightning Apps unit of the Lightning Experience Customization module.
Leverage Surveys and User Committees
Surveys are a great tool to gather feedback from a large user population on pain points and potential use cases. Feedback sessions with user committees can then help you get more in-depth context around survey responses.
Evelyn and Kathy work with Barry to create a survey for Abacus. They encourage users to respond and recruit participants for user committee feedback sessions. They facilitate these sessions alongside Barry and Dale who demo proposed new features. These activities are invaluable in guiding Barry’s team as they select and prioritize features to deploy.
Wrap Up
So where does this leave you? After following these steps, you’ll end up with a list of features to deploy, prioritized by business impact and implementation effort. You’ll also have a good idea about use cases and how to articulate the business value of features to your end users. This will be a crucial input to your user communication plan.
Armed with this information, you can move on to planning the deployment process in more detail, including any testing. We tackle key testing considerations in the next unit.