Build Effective Opt-in and Welcome Campaigns
Learning Objectives
After completing this unit, you’ll be able to:
- Use CloudPages to build your data collection.
- Incorporate CloudPages and Journey Builder into your journeys.
- Create an effective opt-in campaign.
- Create an effective welcome campaign.
Capture Information (the Smart Way)
Journey Builder can reach across Marketing Cloud Engagement apps to help you capture information and connect with your customers. In this unit, you learn how CloudPages provides the foundation for your data collection efforts and how to create opt-in and welcome campaigns using those tools.
CloudPages makes delivering web content for your Marketing Cloud Engagement campaigns simple and effective. This app includes tools you can use to build and host landing pages, microsites, and MobilePush pages that your customers see after clicking the links in your messages. Check out this video to see what CloudPages can do for you.
In this module, we assume you are a Marketing Cloud Engagement administrator with the proper permissions to create and test journeys. This next step uses a private domain you purchase or a public domain provided by Marketing Cloud Engagement. This choice depends on your needs. Contact your Marketing Cloud Engagement account executive for more information about acquiring a private domain for your account.
If you’re not an administrator for Marketing Cloud Engagement, that’s OK. Read along to learn how your administrator would take the steps in a production org. Don't try to follow these steps in your Trailhead Playground. Marketing Cloud Engagement isn't available in the Trailhead Playground.
Now, let’s see how CloudPages is used as part of an opt-in campaign. Meet Leung Chan. She’s the marketing manager for Get Cloudy Consulting, and she’s working with an IT services client that wants to get new subscribers to their monthly newsletter. They want to use CloudPages and a Smart Capture form to collect new opt-ins for their newsletter. Leung and the client agree to a goal of 1,000 new subscribers in the next 6 months. This plan includes four pieces of content.
- A landing page and data extension for capturing subscriber information
- A confirmation message
- An alternate confirmation message
- Coupon codes for incentives

Leung and the client follow these steps to gather the information and get the landing page ready.
- In Contact Builder, choose Create from New and name the data extension Form Information.
- Select Is Sendable?.
- Retain the default settings for data retention and click Next.
- Add fields for First Name, Last Name, and Email Address. Change the Email Address data type to EmailAddress and set the field as the primary key.
- Set Send Relationship to Email Address.
Now, Leung and her client are ready to work on the landing page. Let’s follow along.
- In CloudPages, click Create Collection.
- Enter a name and description for your collection.
- Click OK.
- In your collection, click Create, then Landing Page.
- Enter the name and description for your landing page.
- Select HTTPS connections only. This option encrypts connections to the landing page and helps customers feel secure in sharing their information.
- Select Content Builder and click Next.
- Choose a layout and click Create.
- Drag a Smart Capture block to the layout.
- Name your form and select the First Name, Last Name, and Email Address attributes to show in the Form Builder content area.
- Click Save.
Finally, they finish up by adding a CloudPages entry source to their journey in Journey Builder.
- Click the entry event added to the journey and select CloudPagesForm Submit Event.
- Choose the form that you created in CloudPages.
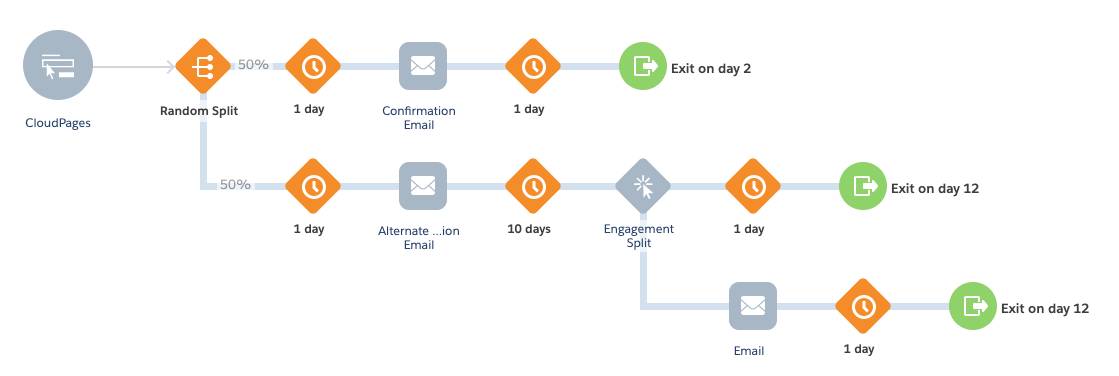
After following these steps, Leung and her client have the first version of their opt-in campaign created. When somebody fills out the form on the CloudPages landing page, this event automatically enters them into a journey. They give this version a little time to work and review their results. Leung recommends adding a random split with two different versions of the email message to see which content gives them better results—either a higher click rate or conversion rate (in other words, getting the subscriber to answer your call to action).
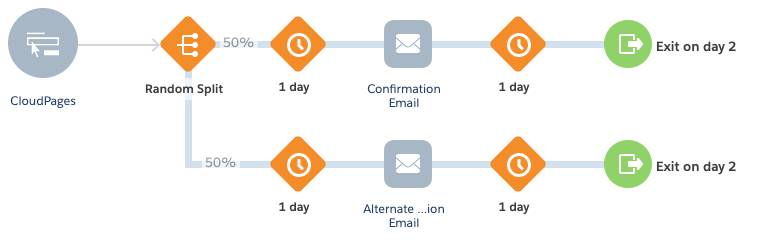
Finally, Leung asks the client to consider adding an incentive to one of the email messages to see if that improves the campaign. This email incentive would be sent to those who didn’t respond 10 days after the initial contact. The client decides to offer a 10-percent-off coupon for customers who received the initial offer, but didn’t accept.
Now that we’ve seen how CloudPages and Journey Builder can work together, it’s time to take your journeys a step further. The next section helps you welcome a customer who just opted in to your messaging activities.
The Welcome Campaign
Leung’s newest client is a pet washing business that wants to use Journey Builder to create a welcome campaign for new customers. Their initial SMART goal is to have 50 new clients sign up for appointments through their mobile app in the next 2 months. Leung has a plan. She proposes a series of three email messages.
- An initial welcome message
- An alternate welcome message
- A reminder message
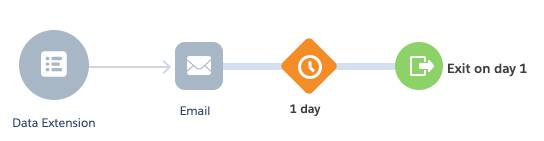
The first journey is simple—it includes an entry point (when a contact actually enters the journey), an email message asking them to set an appointment, and an exit (when the contact stops interacting with the journey). And simple is OK! The first message just helps Leung’s client start collecting data and set a baseline for performance.
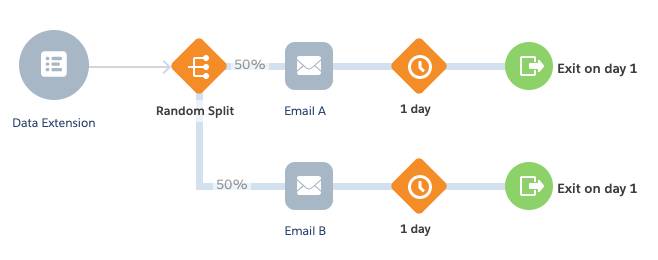
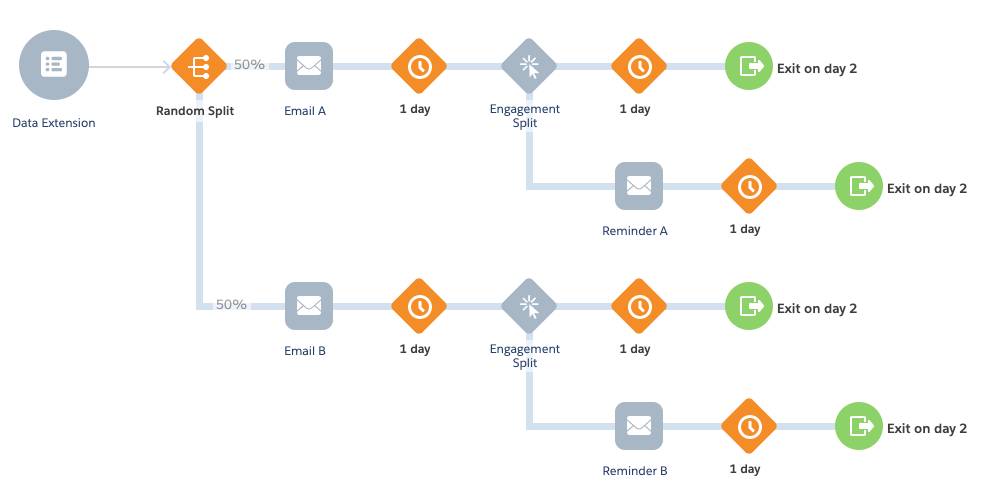
After a few weeks, Leung adds a random split with an A/B test to compare the creative material in the initial message versus the alternate message. Now she can see which message gets more customers to schedule an appointment. Here’s what that journey looks like.
After a few more weeks of insights, Leung adds another event to remind customers that never scheduled an appointment. Because she doesn’t want to bug the customer with too many messages, she makes sure that Journey Builder doesn’t send another message after the reminder. Check it out.
Think of each journey improvement you make as leveling up in a game. Start at level one then keep improving as you go—the possibilities are endless! The pet washing client gets the initial information they need to go forward, then they can test messaging and timing to make sure they reach their customers correctly. Keep this level-up approach in mind as you go through the other units. Next up: keeping your customers engaged with your brand.