Write Your First SOQL Query
Follow Along with Trail Together
Want to follow along with an expert as you work through this step? Take a look at this video, part of the Trail Together series.
(This clip starts at the 2:33 minute mark, in case you want to rewind and watch the beginning of the step again.)
Introduction
In this step you’ll create a simple lightning component and Apex controller. You’ll then update the component to display data, and convert basic SQL to SOQL.
Create a Lightning Component Bundle
Now that you’ve created your org, installed the package, and imported the data, it’s time to create a Lightning Component that displays some simple data from a converted SQL query.
- Open the Developer Console.
- Close any open tabs in the Developer Console and then click File > New > Lightning Component.
- Name the Lightning component
Books4EveryoneHome. - In the component configuration section, select Lightning Page and click Submit.
- Replace the contents of the component with this code.
<aura:component implements="flexipage:availableForAllPageTypes" access="global">
  <aura:attribute name="Books" type="Book__c" />
  <lightning:card title="Books4Everyone Books">
    <aura:set attribute="body">
      TODO: Update this to display data!
    </aura:set>
  </lightning:card>
</aura:component>
The component is pretty simple so far. It has an attribute to store information about books, and displays the data in a Lightning card. You’ll come back to this bundle soon, but first you need to write some Apex to populate it with data.
Create an Apex class
Our next step is to create an Apex controller to get the requested data from Books4Everyone.
- In the Developer Console click File > New > Apex Class.
- Name your new Apex class
Books4EveryoneHomeController. - Replace the body of the Apex class with the following code.
public with sharing class Books4EveryoneHomeController { @AuraEnabled public static List<Book__c> getBooks() { return; //Your query here } } - Let’s do a quick breakdown of the code we just wrote. Our first line is
@AuraEnabled, which allows us to call this function from our Lightning component. Next we have our function definition. This specifies that we’ll be returning a list of Book__c objects. This is important, because queries in SOQL always return lists of sObjects. This code won’t save yet, since you still have to write the SOQL query. Books4Everyone wants to display all the book titles and their descriptions. This is the SQL query to do this:SELECT b.ID, b.Name, b.Description FROM Book b
You can try putting this into our code, but it won’t work. Let’s go over what we know so far: Book is a custom object in Salesforce that was part of the unmanaged package we installed, with the API name Book__c. Because Id and Name are standard fields, their API names are Id and Name, respectively. Description is a custom field, however, so its API name is Description__c. - Now we know enough to update Apex class with our new SOQL query. Replace
return; //Your query herewith:return [SELECT Id,Name,Description__c FROM Book__c];
- Now save your file—you’ve written your first SOQL query!
SQL Is Not SOQL
Now that we’ve converted our first query, here is a chart that goes over some common questions about the differences in SQL and SOQL
| Most SQL Variants |
SOQL |
|---|---|
| Support statements for DML, transaction control, and SELECT statements |
Only supports SELECT statements |
| Support SELECT * (include all columns) |
Does not support SELECT * (specify fields to include OR use FIELDS(ALL), FIELDS(STANDARD), or FIELDS(CUSTOM) in your SELECT statements) |
| Support joins, which are written using “left,” “right,” "inner," "outer" syntax |
Supports “relationship queries,” which are written using parent-child syntax |
| Do not support dot notation syntax to traverse table relationships |
Supports dot notation syntax to traverse table relationships |
| Are not governed by limits |
Is governed by limits (e.g., returned rows, heap, etc.) |
Update Your Lightning Component to Display Data
Now that we have written a query to get our data, we also want to make sure we display that data. We’re going to update our component to do that now.
- In the Developer console, go back to the Books4EveryoneHome Lightning component.
- Update your component to look like this:
<aura:component implements="flexipage:availableForAllPageTypes" access="global" controller="Books4EveryoneHomeController">
  <aura:attribute name="Books" type="Book__c" />
  <aura:handler name="init" action="{!c.doInit}" value="{!this}"/>
  <lightning:card title="Books4Everyone Books">
    <aura:set attribute="body">
      <table class="slds-table slds-table_bordered slds-table_cell-buffer">
        <thead>
          <tr class="slds-text-title_caps">
            <th scope="col">Book Titles</th>
            <th scope="col">Book Descriptions</th>
          </tr>
        </thead>
        <tbody>
          <aura:iteration items="{!v.Books}" var="books">
            <tr scope="row">
              <td> {!books.Name}</td>
              <td> {!books.Description__c}</td>
            </tr>
          </aura:iteration>
        </tbody>
      </table>
    </aura:set>
  </lightning:card>
</aura:component>
This is a bit more complicated than it was before. Our first big change was adding a controller to our component withcontroller=”Books4EveryoneHomeController”. This hooks up our component to our Apex class. The next thing we added was a table to display our data. We give it two columns, Book Titles and Book Descriptions, and then we use anaura:iterationcomponent to display data from the Books. Right now, that attribute is empty, so we need to update our JavaScript controller to put data from the Apex class into the aura attribute. - Click Controller on the right side of the page to create a controller for your Lightning component.
- Update the controller’s JavaScript to the following:
({
  doInit: function(component, event, helper) {
    var action = component.get("c.getBooks");
    action.setCallback(this, function(data) {
      component.set("v.Books", data.getReturnValue());
      console.log(data.getReturnValue());
    });
    $A.enqueueAction(action);
  }
})
Now you’ll have data in your aura attribute! This action calls the Apex functiongetBooksto populate theBooksattribute on theBooks4EveryoneHomecomponent. - Save all of your open tabs.
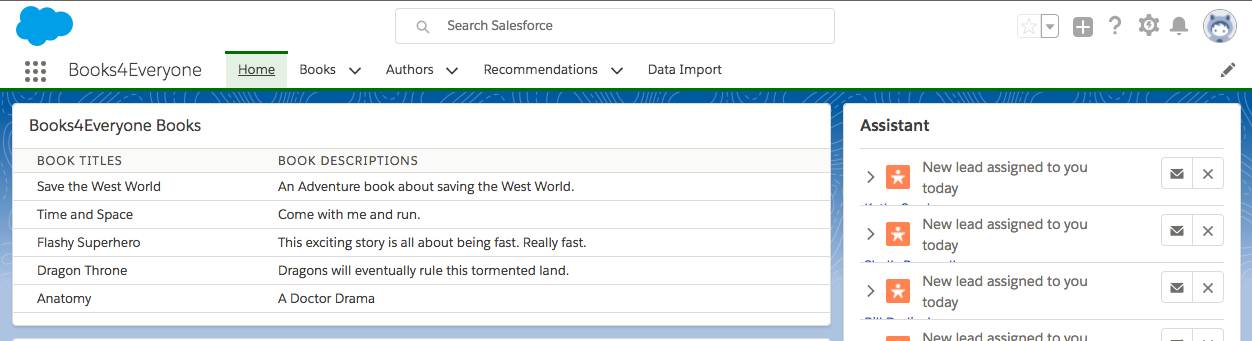
Let’s See This Component in Action!
Our final step to ensuring our query worked as expected is to add our component to our homepage. Let’s do that now.
- In your org, navigate to the Books4Everyone app.
- Click Home.
- In the upper right hand corner, click
 and select Edit Page.
 - On the left side of the Lightning app builder, find Books4EveryoneHome in the list of custom components.
- Drag the component to the left side of the page.
- Click Save, activate the page by clicking Activate and select Assign as Org Default, then click Save.
- Click
 to return to the Home page.
 - The final step is to check out the data on your home page. It should look something like this.