Create a Loyalty Program
Get Started Creating a New Loyalty Program
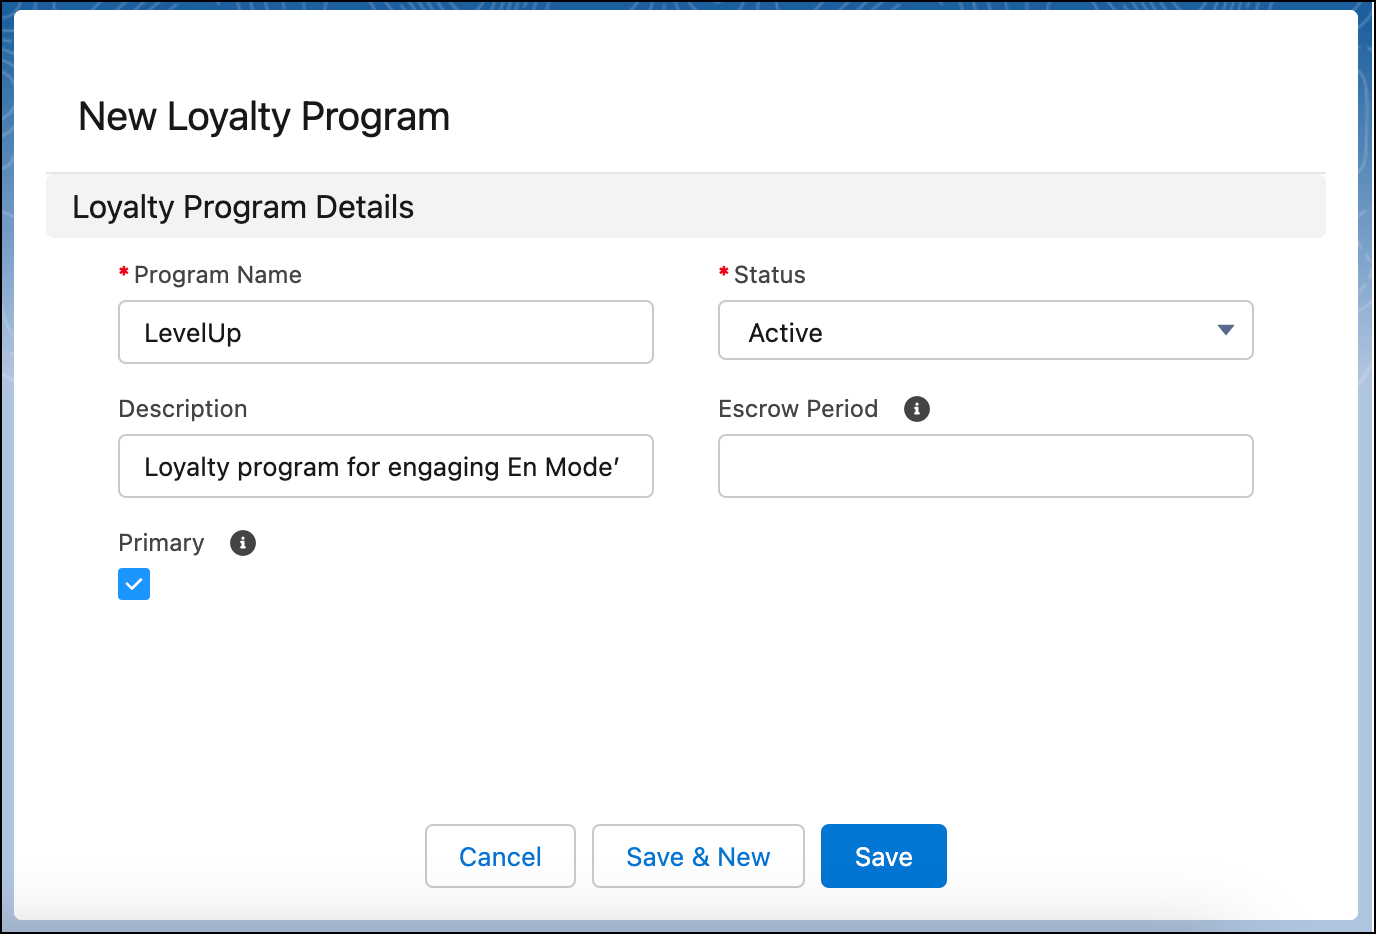
Mary and Jose are ready to get the ball rolling. They’re creating a loyalty program for En Mode called LevelUp. Having established the requirements, Jose creates the program.
Before creating the program, Mary decides if she wants to hold member points in escrow. This enforces a waiting period before points are credited to members after they complete a transaction. The program holds the points in escrow for a specified number of days and automatically releases the points after the escrow period ends. Businesses sometimes use this option to prevent the misuse of points. For the new loyalty program, Mary excludes an escrow period because she thinks crediting points in real-time makes for a better customer experience.
To learn more about the escrow feature, check out the Salesforce Loyalty Management Basics Trailhead module.
Now it’s time for you to do the steps in your Developer Edition org.
- Click
 , and select Loyalty Management.
 - In the Loyalty Programs tab, click New. The example screen below shows the details you need to populate.
- Add these details.
- Program Name:
LevelUp - Description:
Loyalty program for engaging En Mode customers - Status: Active
- Select: Primary
- Program Name:
- Click Save.
To bring the program to life, you add various components to it, such as tiers, points, and rewards.
Set Up Tier Groups
With retailers competing for customers’ attention and loyalty, Mary must ensure the program stands out. She decides to create a tiered system where members enjoy different program benefits depending on their rank.
In a tiered program, members progress to higher tiers based on their engagement with the program. Engagement is measured through activities such as purchases, social media mentions, product reviews, referrals, and so on. Through each engagement activity, members earn points.
- Points that make members eligible for higher tiers are called qualifying points.
- Points that members can redeem to buy products or services are called non-qualifying points.
The program evaluates the points earned during a qualifying period to upgrade a member’s tier. The tier upgrade gives members access to more benefits.

Tier groups help define the hierarchy of tiers. Mary finalizes the tier group details.
- Tier model: This influences the start date of the qualifying period. Mary chooses the anniversary tier model, which means the qualifying period starts on the day the member joins the loyalty program and ends on their enrollment anniversary.
- Tier period: This determines the duration of the tier, which Mary sets to one year. Once a member moves to a new tier, they stay in the tier for at least a year. After one year, on their enrollment anniversary, they become eligible for tier evaluation. At this point, they can move up or down a tier.
- Qualifying period: This determines when a member’s qualifying point balance resets to zero and they start earning qualifying points from scratch. Mary sets the qualifying points to reset after a year.
Here’s how Jose creates the tier group in the Loyalty Management app. Use your Developer Edition org to complete these steps.
- In the LevelUp program record, ensure the Setup tab is displayed.
- In the Loyalty Tier Groups related list, click New.

- Add these details.
- Tier Group Name:
LevelUp Tier Group - Select Active
- Description:
Tier group based on annual spend - Tier Model: Anniversary
- Period Quantity:
1 - Period Duration Type: Years
- Extend Expiration: Member Enrollment Anniversary
- Qualifying Points Reset Frequency:
1 - Qualifying Points Reset Period: Years
- Tier Group Name:
- Click Save. The new tier group is created.
Add Tiers to Tier Groups
Mary wants to give the program three tiers.
- Silver: The default, base tier. Silver-tier members are promoted to Gold when they earn enough points.
- Gold: The middle tier. Gold-tier members move to Platinum once they earn enough points
- Platinum: The top tier, where members enjoy exclusive benefits.
Add the tiers to the tier group you just created.
- In the LevelUp program record, ensure the Setup tab is displayed.
- In the Loyalty Tier Groups related list, click LevelUp Tier Group.
- In the Loyalty Tiers related list, click New.
- Add these details.
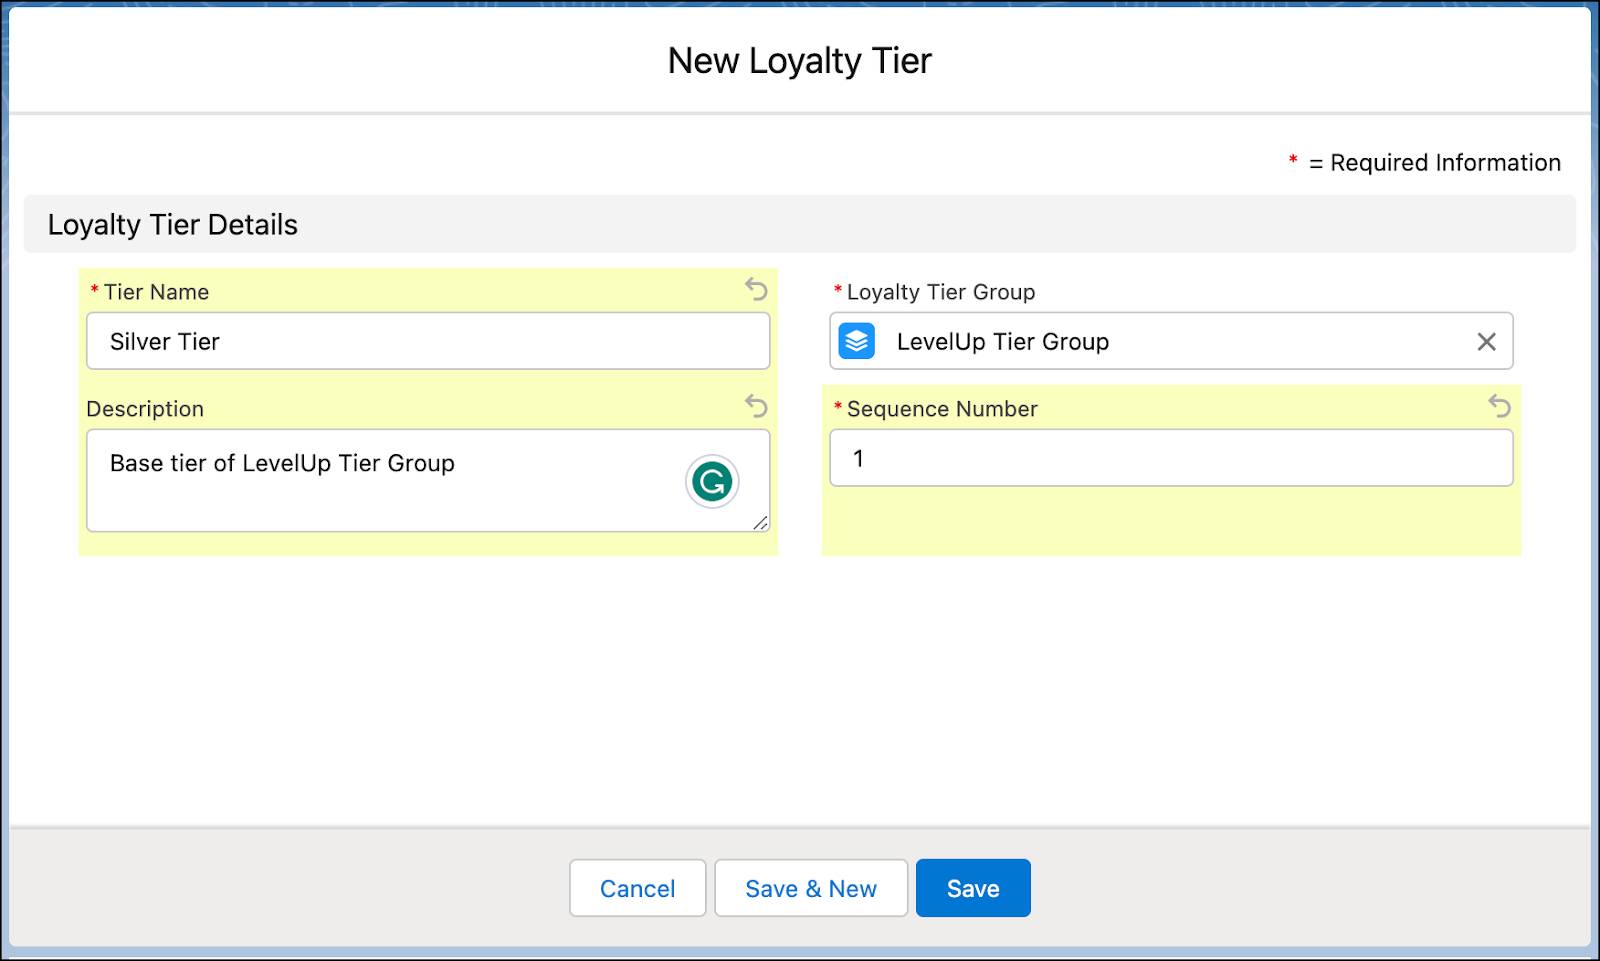
- Tier Name:
Silver Tier - Description:
Base tier of LevelUp Tier Group - Sequence Number:
1
The sequence number indicates the tier's ranking. The tier with the highest sequence number is the top tier.
- Tier Name:
- Click Save.
- Repeat these steps to add the Gold Tier with sequence number 2 and Platinum Tier with sequence number 3.
Good job. You’ve set up the tier group for the loyalty program with three tiers. Let’s look at how Jose sets up the points system in Loyalty Management.
Create Program Currency
According to the program requirements Mary laid out, members earn points when they engage with the brand and the program. In Loyalty Management, points are also known as currency. For each dollar a member spends on an En Mode product, they get one qualifying point and one non-qualifying point.
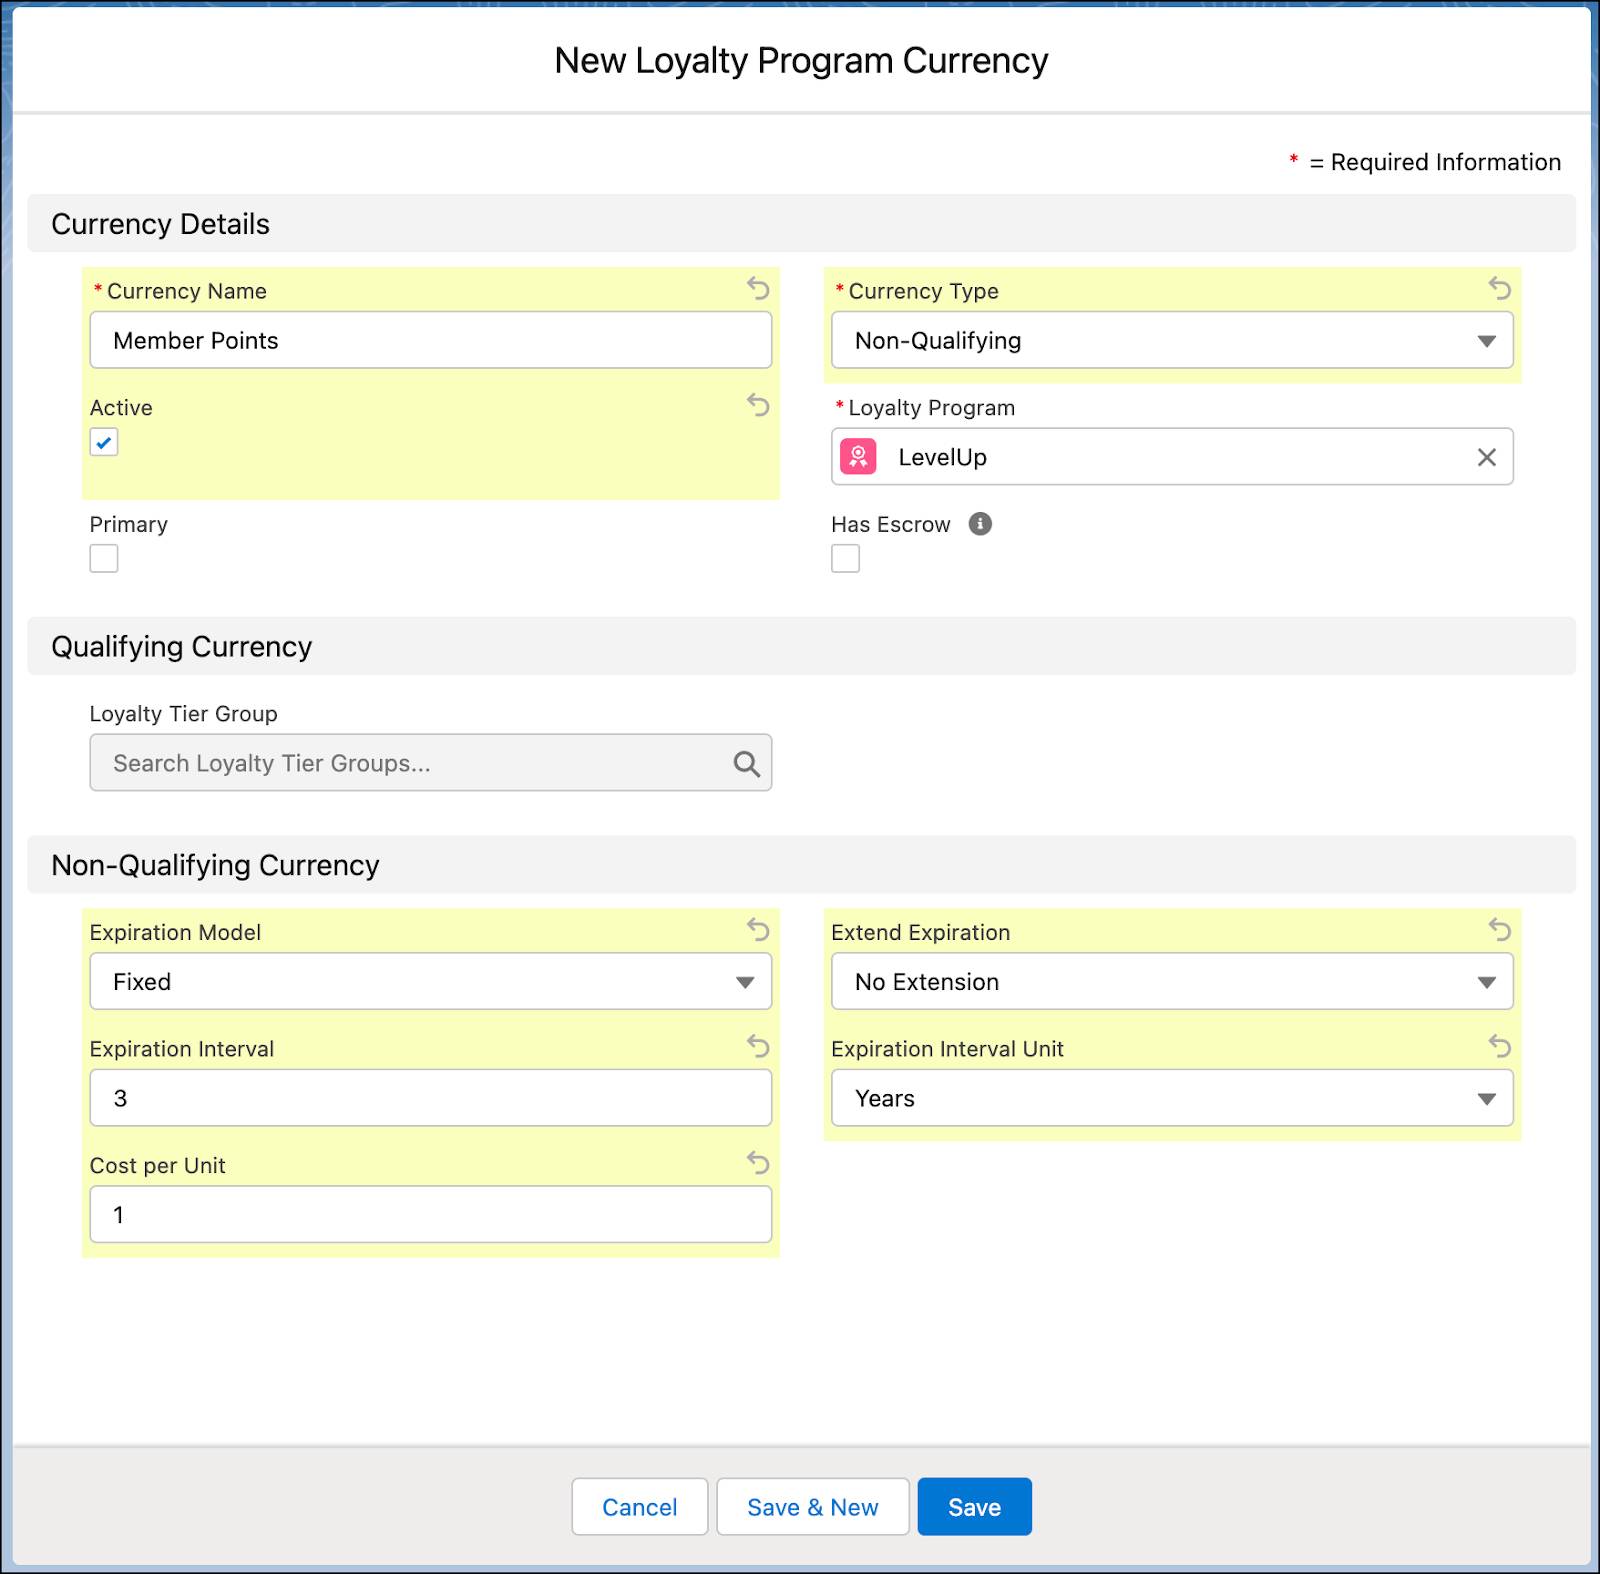
First, set up a non-qualifying currency called Member Points, with an expiration period of three years from the date of accrual.
- In the LevelUp program record, ensure the Setup tab is displayed.
- In the Loyalty Program Currencies related list, click New.
- Add these details.
- Currency Name:
Member Points - Currency Type: Non-Qualifying
- Select Active
- Expiration Model: Fixed
- Extend Expiration: No Extension
- Expiration Interval:
3 - Expiration Interval Unit: Years
- Cost per Unit:
1
- Currency Name:
- Click Save.
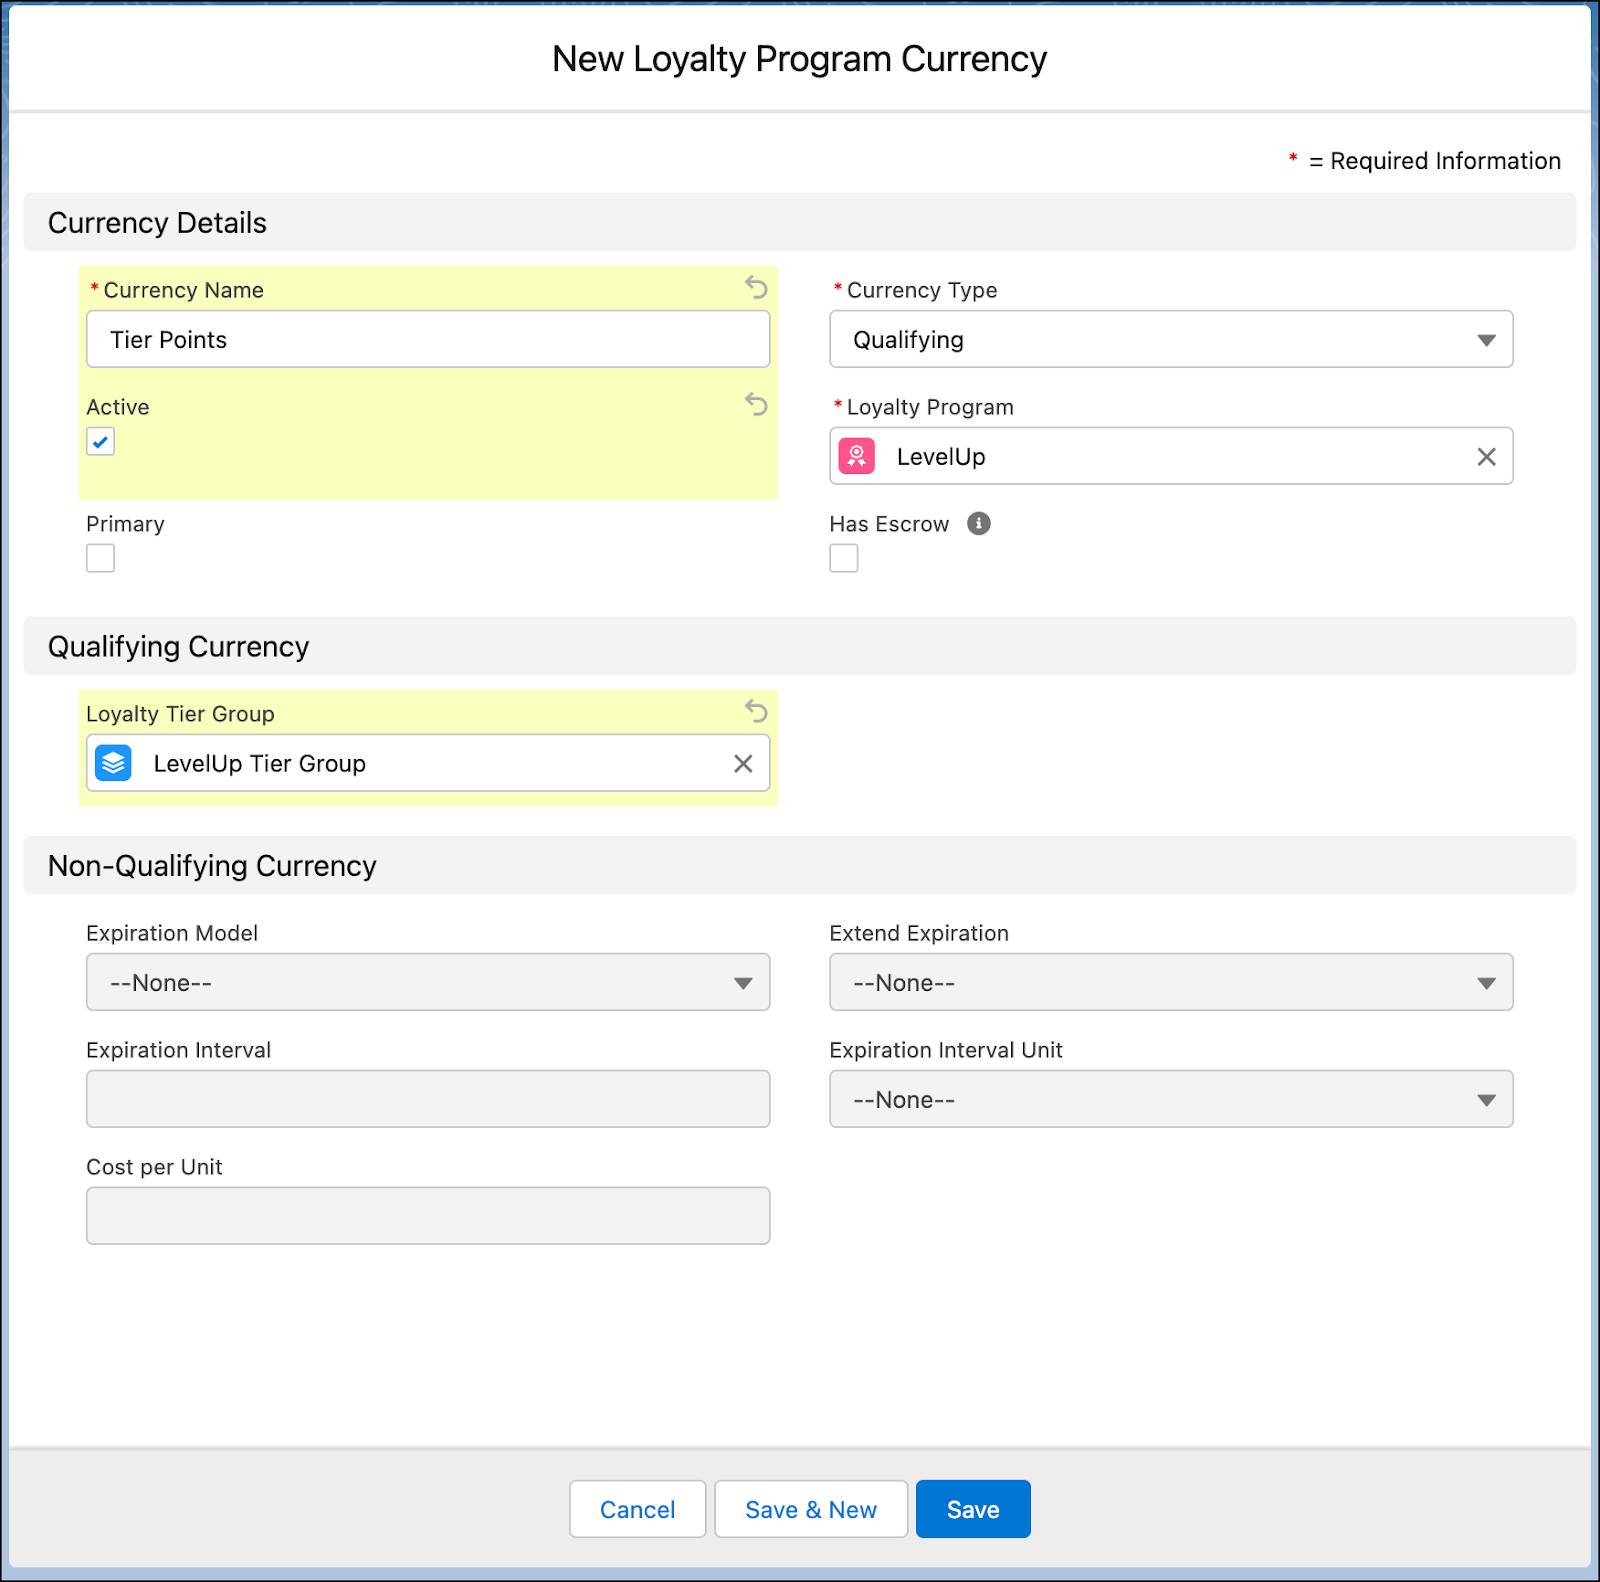
Next, you set up a qualifying currency called Tier Points.
- In the LevelUp program record, ensure the Setup tab is displayed.
- In the Loyalty Program Currencies related list, click New.
- Add these details.
- Currency Name:
Tier Points - Currency Type: Qualifying
- Select Active
- Loyalty Tier Group: LevelUp Tier Group
- Currency Name:
- Click Save.
If the program has an escrow period, Jose selects the Has Escrow checkbox. The program then credits points to a member’s escrow point balance. With this setting enabled, only after the escrow period ends can they redeem the points.
Next, Jose adds partner products that members can redeem.
Add Program Partners and Products
Mary wants to promote the LevelX range of shoes. LevelX is an exclusive line created in collaboration with leading designers. To make this product category available for members to redeem, it must be added to the program.
To add the product category to the program, first add En Mode as a partner in the program.
- In the LevelUp program record, click the Members And Partners tab.
- In the Loyalty Program Partners related list, click New.
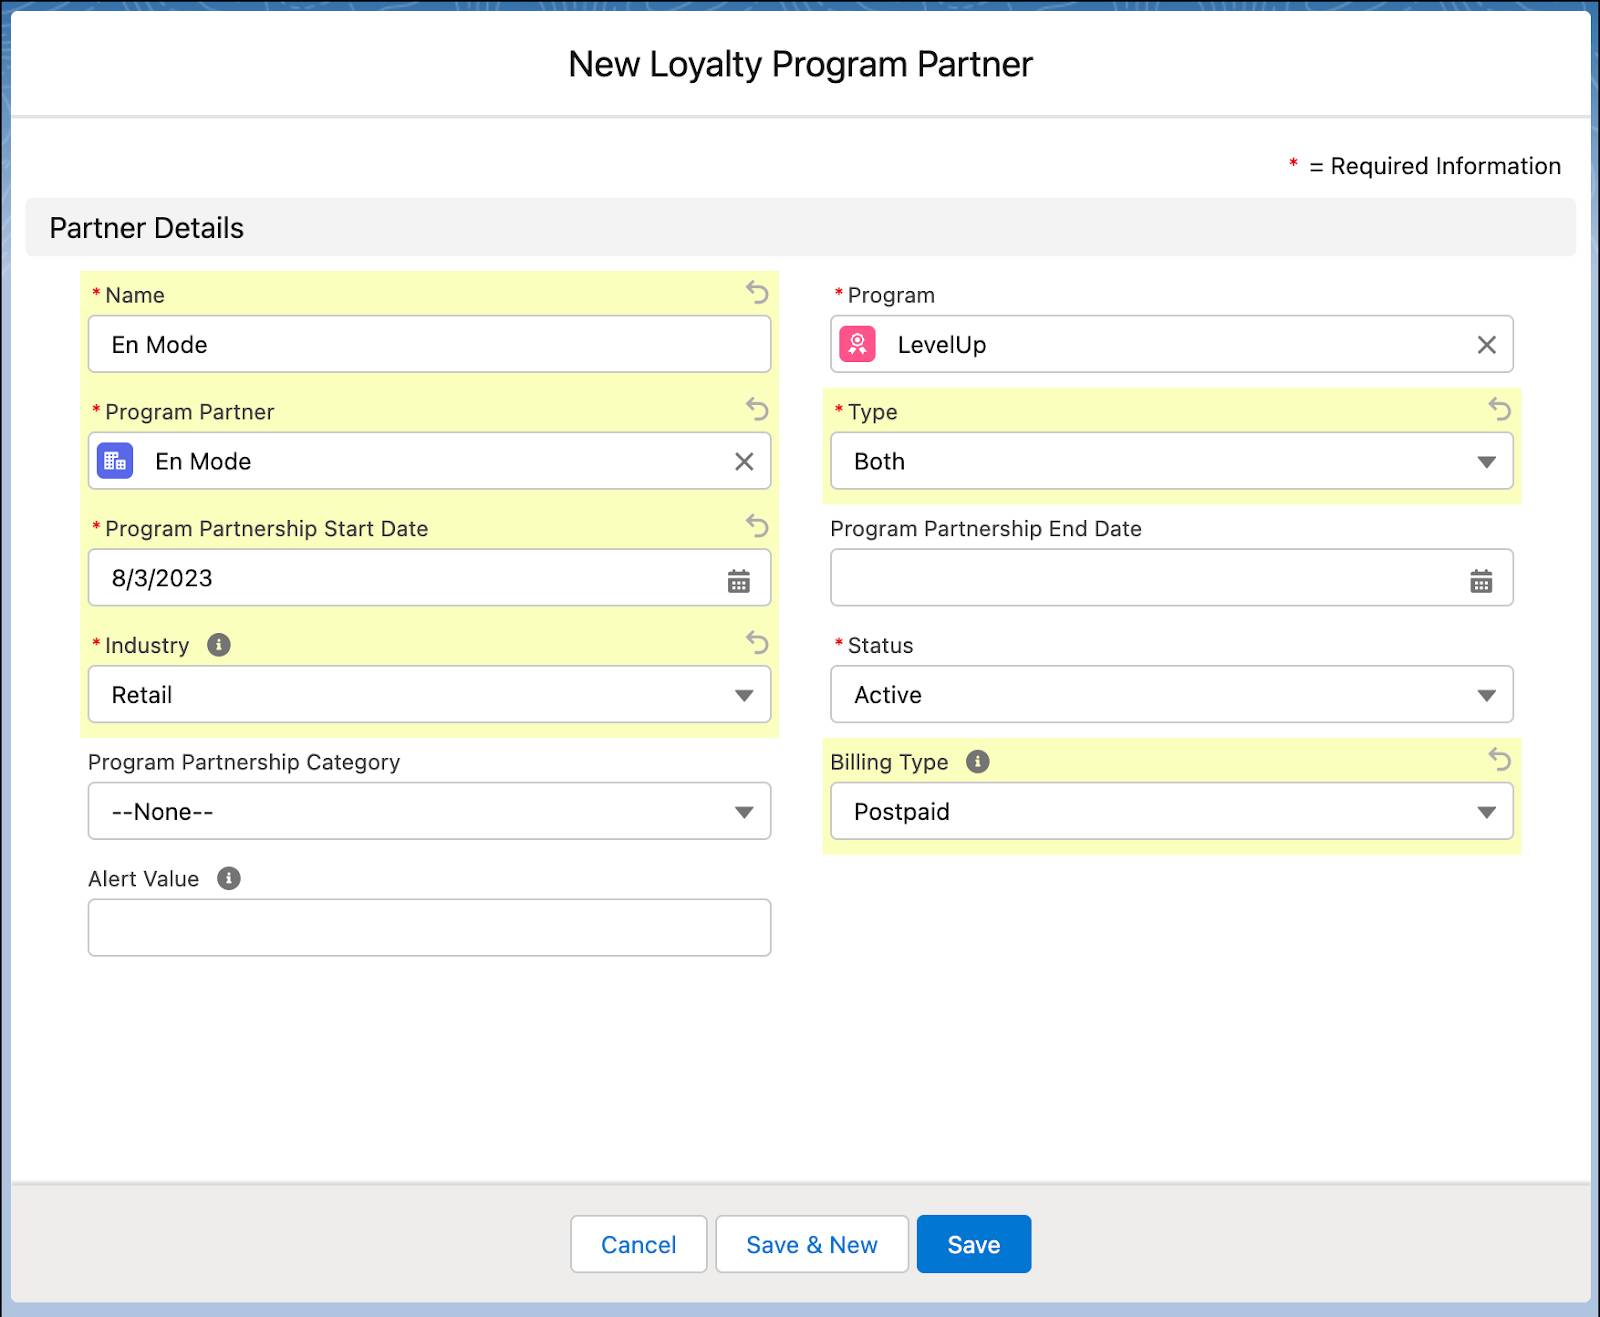
3. Add these details.
- Name:
En Mode - Program Partner: En Mode
- Type: Both
The Type picklist has three options: Accrual, Redemption, and Both. With the Both option, members who purchase products get points that they can redeem for future purchases.
- Program Partnership Start Date: Current date
- Industry: Retail
- Status: Active
- Billing Type: Postpaid
4. Click Save.

Next, add the product category, LevelX shoes.
- In the LevelUp program record, ensure the Members And Partners tab is displayed.
- In the Loyalty Program Partners related list, click En Mode.
- In the Loyalty Partner Products related list, click Add Products.
- Select Add Product Categories.
- Click Next.
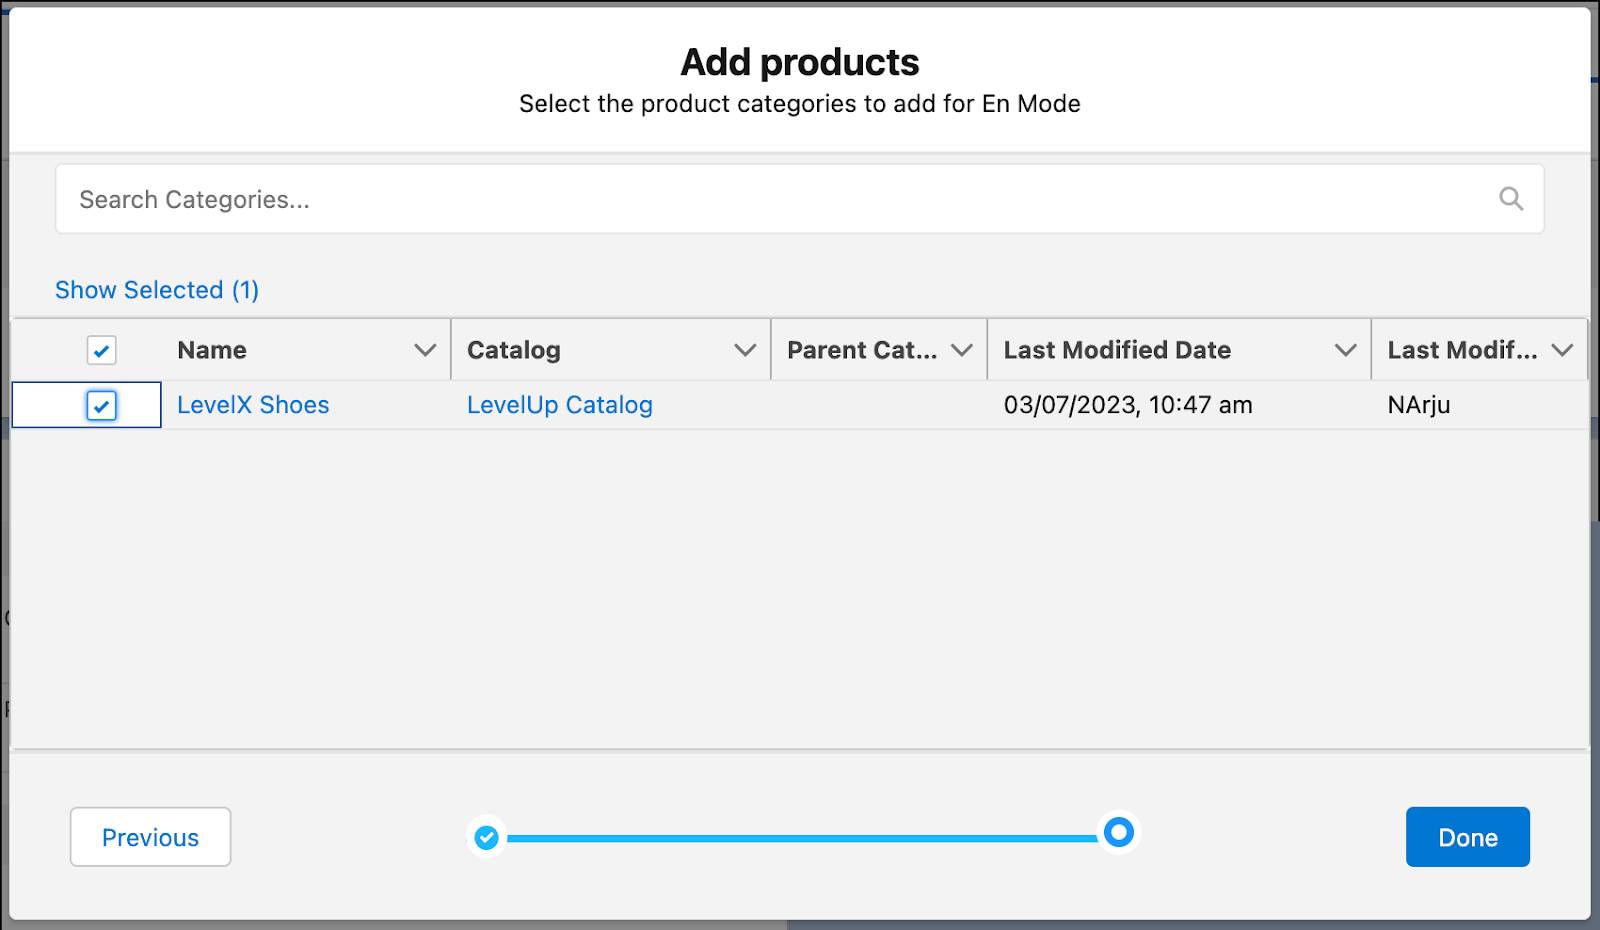
- Select LevelX Shoes.
- Click Done.
Now that you’ve added the LevelX product line, you can promote it within the loyalty program.
So far, you’ve created a loyalty program, added tiers to the program, and set up the program currencies. Next, you learn how to set up different types of rewards.