Get to Know the Lightning Web Components OSS Recipes Sample App
Using the Recipes Sample App
Now that the app is deployed, let’s dive in and see how it works.
Each tile in the app is a recipe that shows you how to code for a particular task in 30 lines of code or less. The menu items on the left represent groups of recipes. For example, the Hello menu has recipes that show the basic framework functionality, and the Misc menu has recipes that show how you can make REST API calls or share JavaScript code between different components.
There are a couple of ways in which you can access the source code of a recipe.
- Click the View Source link that takes you directly to the source code on GitHub.
- Use an integrated development environment (IDE) of your choice to view the corresponding source code. The name of the component corresponds to the tile heading.
Let’s take a look at a few of our recipes in each group.

Hello
The first few recipes in the Hello menu show you what a basic Lightning web component structure looks like, how data binding works, and how you can leverage the standard HTML events to build interactive components.
HelloBinding
The HelloBinding recipe shows how an input field’s value can be bound to a JavaScript property, and how changing its value automatically updates the UI. With the Recipes App open
- Click the Hello menu.
- Locate the HelloBinding card.
- Update the text in the Name field.
- The message on top of the field changes immediately to show the updated name.
HelloConditonalRendering
The HTML elements in a component can be hidden or shown based on different criteria like a user action, data availability, occurence of an error, and so on. To see how you can conditionally hide and show elements, let’s focus on the HelloConditonalRendering recipe.
- Locate the HelloConditonalRendering card.
- Check the Show Details checkbox.
- An element with the text “These are the details!” appears.
This conditional rendering of elements is achieved using the if:true and if:false directives, which are added as attributes to the element that has to be rendered conditionally. This directive uses the Boolean value of a JavaScript property. Whenever the property’s value changes, the template is automatically rerendered to show/hide the element.
Composition
Components are building blocks of a page or an app. You can also assemble components together to make other components.
CompositionBasics
To see component composition in action, let’s use the CompositionBasics recipe.
- Click the Composition menu.
- Locate the CompositionBasics card.
This recipe component includes two child components.
- The ContactTile component, highlighted in red.
- The ViewSource component, highlighted in green. This links a recipe to its source code.
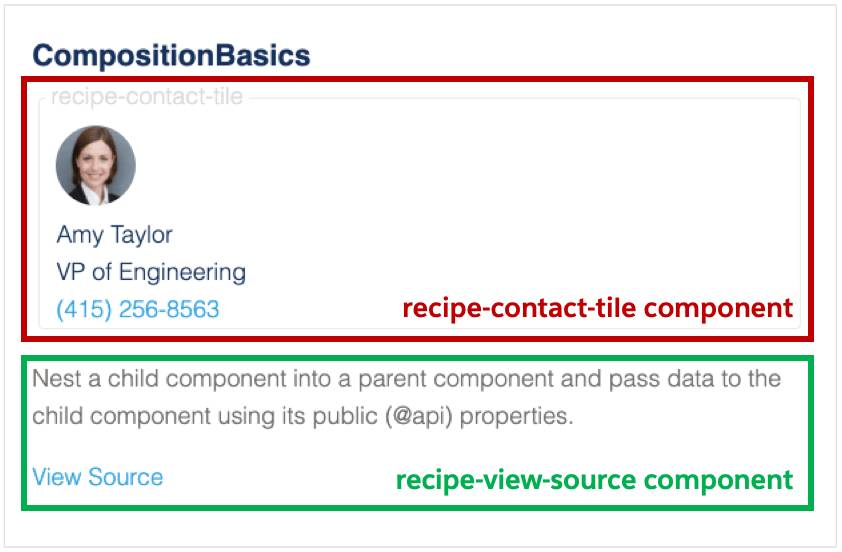
In LWC HTML templates, we follow the kebab case notation of a component’s name when embedding it inside another component. So to embed the contactTile component of the recipe namespace, we write <recipe-contact-tile> in the CompositionBasics’ template.
This way you can combine and reuse different components to create user interfaces.
Parent-to-Child
When building reusable components, you often want to make them dynamic, so that their output and behavior can vary based on the information that is sent to them by their parent component.
ApiProperty
To see parent to child communication in action, let’s focus on the ApiProperty recipe.
- Click the Parent-to-Child menu.
- Locate the ApiProperty card.
- Update the value in the Percentage field.
- The progress bar in the embedded chartBar component is automatically updated.
For parent-to-child communication to happen, the child component exposes a public property by adding the @api decorator to it. The parent can then set the value of exposed properties by adding them as HTML attributes to the embedded child component.
In the case of the chartBar component, the percentage property is exposed to the parent.
Child-to-Parent
Sooner or later you’ll need to pass data from a child component to its parent or grandparent.
EventWithData
To see child to parent communication in action, let’s focus on the EventWithData recipe.
- Click the Child-to-Parent menu.
- Locate the EventWithData card.
- Click on the name of any contact in the list.
- The details of the selected contact display on the right side of the list.
In this recipe, the EventWithData (parent) component contains a list of ContactListItem (child) components. Each ContactListItem component shows the avatar, and the contact’s name as a link. When the user clicks the contact’s name, the contacts’ details are shown to the right of the contact list.
In order for this to happen, the child component:
- Triggers the
handleClickevent handler when the user clicks on a link. - Instantiates a custom event named
select. - Populares the custom event’s detail property with the contact’s ID.
- Dispatches (fires) the event.
Inside the parent component:
- In the HTML file, an event handler is attached using the
onselectattribute on the child component. Note, to listen for an event, a component uses an HTML attribute with the syntaxon<eventtype>. - The event handler then passes the incoming details from the event to display the contacts details.
Misc and 3rd Party Libs
The Misc menu item has recipes that show you how you can share JavaScript code with multiple components, get data from a REST service, access the DOM elements from your JavaScript code, and so on.
The recipes in the 3rd Party Libs menu item show you how you can use third-party JavaScript libraries with Lightning web components. The recipes use d3.js and chart.js to create rich visualizations and moment.js to calculate date/time values.
And for Your Next Trick…
Hopefully, these recipes have sparked your imagination, and you're excited to build a fully functional app with LWC. You can use Lightning Web Runtime (LWR) to build and run LWC apps. With Lightning Web Runtime on Node.js, you can build digital experiences that meet the high scale, security, and performance demands of modern web applications. LWR is a non-opinionated way to configure and load the modules, services, and dependency providers (including Lightning Web Components) you need to build a JavaScript app.
In fact, this sample app runs using Lightning Web Runtime. You can deploy these applications from your Heroku account. If you don't have one, Click here to create an account.