Set a Default Value for an Engraving Attribute
More Than Just Picklists
In the previous step you created two configuration attributes that were based on picklist fields. Configuration attributes can use many fields of other data types as their inspiration.
- Checkbox
- Currency
- Date
- Number
- Percent
- Picklist
- Picklist (Multi-Select)
- Text
- Text Area
- Text Area (Long)
- Text Area (Rich)
- URL
- Lookup
Technically, you can create Time and Date/Time attributes, but the time component isn’t visible on the Product Configuration page, so it limits how you can use them.
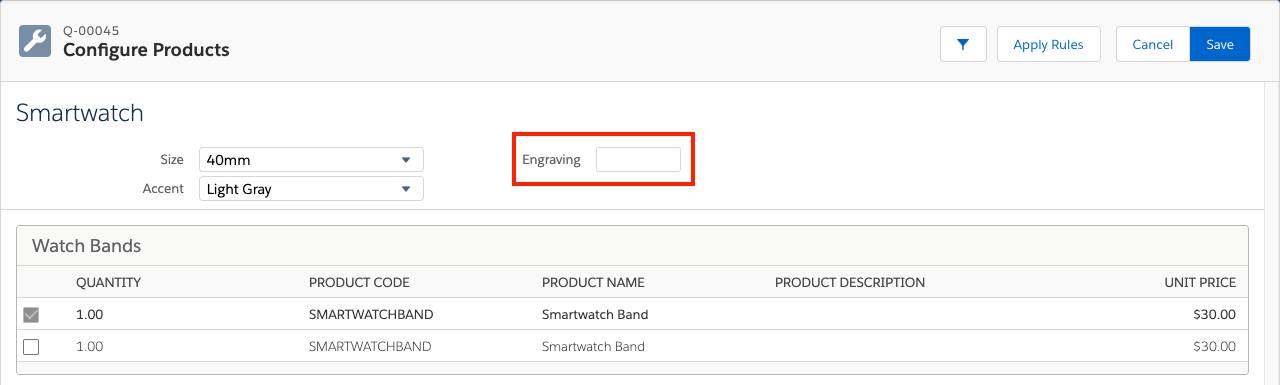
In this step you create a Text-based configuration attribute named Engraving. This allows customers to add a special message engraved on the underside of the smartwatch. To demonstrate the power of configuration attributes, you set up CPQ so that it defaults to the contact related to the quote.
Just like the first two configuration attributes you created in the last step, you start by creating a field on the Product Option object.
- Click
 and click Setup. The Setup page opens in a new tab.
 - Click Object Manager.
- Click Product Option.
- Click Fields & Relationships.
- Click New.
- Click Text.
- Click Next.
- For Field Label, enter
Engraving. - For Length, enter
100. - Click Next.
- Click Next to keep field-level security as is.
- Click Save.
Good, now you have to add the API name for Engraving to the Target Field field on the Configuration Attribute object.
- Click Object Manager.
- Click Configuration Attribute.
- Click Fields & Relationships.
- Click Target Field.
- In the Values list, click New.
- Enter
Engraving__c. - Check the box next to Record Type Name.
- Click Save.
Close the Setup tab to get back to the Salesforce CPQ tab.
Now you’re ready to create the actual configuration attribute record.
- In the navigation bar, click Products.
- Click Smartwatch.
- Click the Related tab.
- In the Configuration Attributes related list, click New.
- Click Next to leave the record type as Configuration Attribute.
- For Attribute Name, enter
Engraving. - For Target Field, choose Engraving__c.
If you don’t see Engraving__c in the picklist yet, click Cancel, then refresh the page in your browser. Then go back to step 3. - For Row Order, enter
10. - For Column Order, choose 2.
The Product Configuration page is divided into three columns. By choosing 2, we’re telling CPQ to put the attribute into the second, or middle, column. Choosing 3 would put the attribute into the far right column. - Click Save.
Excellent, your new configuration attribute will appear to the right of the first two you made.
Your sales reps can manually enter text, but you want to prepopulate the attribute with known information, specifically, the name of the customer. That takes a little more work.
Use a Formula Field to Supply a Default Value
You want CPQ to populate the Engraving attribute with some data, but that raises a question: Where does the data come from? In this example, you create a formula field on the quote to supply the data CPQ needs. You start by navigating to the Object Manager in Setup.
- Click
 and click Setup. The Setup page opens in a new tab.
 - Click Object Manager.
- Click Quote.
- Click Fields & Relationships.
- Click New.
- Click Formula.
- Click Next.
- For Field Label, enter
EngravingDefault.
For this example you use a label that’s easy to remember, but when you create your own attributes there is no specific requirement for what you call the field. Just make note of the API name since you need it later. - Click Text.
- Click Next.
- For the Formula, enter
SBQQ__PrimaryContact__r.FirstName + " " + SBQQ__PrimaryContact__r.LastName
This formula is a basic example of using information from the quote to make a string of text. As an admin, you can use the full power of formulas to create whatever makes sense for your business. - Click Next.
- Click Next to keep field-level security as is.
- Click Save.
Close the Setup tab to get back to the Salesforce CPQ tab.
EngravingDefault (which has an API name of EngravingDefault__c) will act as the source of default data for your text-based attribute. The last step is to tell CPQ about this data source.
- From the navigation bar, click Products.
- Click Smartwatch.
- Click the Related tab.
- From the Configuration Attributes related list, click Engraving.
- Click Edit.
- For Default Object, choose Quote.
This tells CPQ where the field exists for the default data. - For Default Field, enter
EngravingDefault__c.
It’s critical to type in the exact API name, otherwise you can’t save the configuration attribute record. Also, the data type of the Default Field must match the data type of the configuration attribute’s Target Field. - Click Save.
Fantastic, your Engraving attribute will automatically populate the text with the name of your quote’s Primary Contact. You can test it by adding the Smartwatch to Q-00045, and you should see Philip Cleverham appear in the Engraving text area.

Using a formula to supply a default value is a clever way to help your sales rep, but it does have a big limitation. Formula fields can only return certain data types. Since the data type of the Default Field must match the data type of the Target Field, this makes it impossible to use formulas to default certain configuration attributes, such as text areas, picklists, and email addresses.
If you want to supply a default for a field, such as an email address, you have to go about it a slightly different way. Create a normal email field on the Quote object. Then, use something like Flow Builder to populate the field however you want. From that point you can follow the same last eight steps from above, but with your email field API name instead of EngravingDefault__c.
Setting a default value is a great way to give your sales rep a little guidance while helping them get quotes created even faster. In the next step we see how to create a configuration attribute that exists in a specific bundle Feature.