Create Twin Fields on the Order Product
Pass Information Down the Line
AW Computing spent the time to create configuration and global attributes so the company could give its customers customized smartwatches. But that only happens if Order Fulfillment can deliver on the promises outlined on the quote. To do that, they must know what size watch to deliver, what color and material the band should be made of.
Although the information lives on the quote line, Order Fulfillment (and by extension, automated systems) may not have access to the quote line data. For that reason, you need to make sure the relevant data gets transferred to the Order Product records that are created when an order is generated. And the way to do that is through twin fields.
So, get ready for another round of creating fields, this time on the Order Product object. You start by navigating to the Object Manager.
- Click
 and click Setup. The Setup page opens in a new tab.
 - Click Object Manager.
- Click Order Product.
- Click Fields & Relationships.
- Click New.
- Click Picklist.
- Click Next.
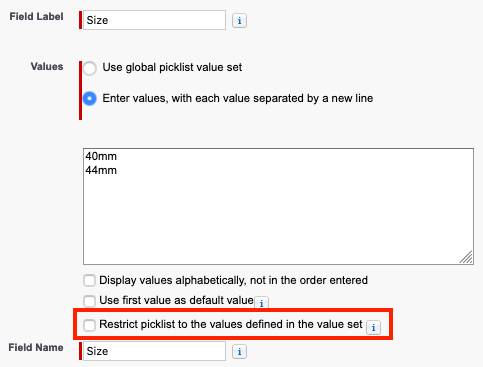
- For Field Label, enter
Size. - Click the radio button to Enter values, then enter each of these values on a separate line:
40mm44mm - Click Next.
- Click Next to keep field-level security as is.
- Click Save & New.
- Click Picklist.
- Click Next.
- For Field Label, enter
Accent. - Click the radio button to Enter values, then enter each of these values on a separate line:
Light GrayDark GrayGold - Click Next.
- Click Next to keep field-level security as is.
- Click Save & New.
- Click Text.
- Click Next.
- For Field Label, enter
Engraving. - For Length, enter
100. - Click Next.
- Click Next to keep field-level security as is.
- Click Save & New.
- Click Picklist.
- Click Next.
- For Field Label, enter
Outlet Standard. - For Values, choose Outlet Standard.
- Click Next.
- Click Next to keep field-level security as is.
- Click Save & New.
- Click Picklist.
- Click Next.
- For Field Label, enter
Material. - Click the radio button to Enter values, then enter each of these values on a separate line:
SiliconeCanvasStainless SteelLeather - Click Next.
- Click Next to keep field-level security as is.
- Click Save & New.
- Click Picklist.
- Click Next.
- For Field Label, enter
Color. - Click the radio button to Enter values, then enter each of these values on a separate line:
Light GrayDark GrayGoldBlackWhiteBrownRedBlueGreenPurplePinkYellow - Click Next.
- Click Next to keep field-level security as is.
- Click Save.
Close the Setup tab to get back to the Salesforce CPQ tab.
Good job, each piece of attribute data from the quote line fields has a place to go on the Order Product. And like before, CPQ will do the work of moving the data as long as the API names and data types are the same. If you’d like to learn more about twin fields, and how CPQ can use them to move data from other objects, check out the Salesforce Help document named Mapping Custom Fields Between Objects.
Finally, a word about picklists. We created Global Picklist Values for Outlet Standard, so you didn’t have to type a bunch of values each time you created a new field for Outlet Standard. You may want to create your own Global Picklist Values for any picklist that you plan to use for an attribute. Not only will this save time (less typing) but it can prevent errors by keeping the values consistent across objects. For example, if you need a new color of watch band, you have to update three picklists: the one on the product option object, the quote line object, and the order product object.
If you forget to update the “downstream” picklists, like the one on the quote line object, your users can encounter errors. That’s because picklists have a setting “Restrict picklist to the values defined in the value set” that defaults to true. So when CPQ tries to save the new color into the downstream picklist, it’s blocked. If you use Global Picklist Values instead, you know every picklist on every object is in sync, and you don’t have to worry about blocked values.
If you can’t use Global Picklist Values for some reason, consider removing the restriction as you create your downstream picklist. Just uncheck that setting after entering your picklist values.
Put on Your Sales Rep Hat
The final thing to do is test to make sure everything works as expected. To verify that it does, you add the smartwatch to a preexisting quote, then make an order out of the quote.
- From the navigation bar, click Quotes, then choose the All list view.
- Click Q-00046.
- Click Edit Lines.
- Click Add Products.
- Check Smartwatch.
- Click Select.
- Verify that Size, Accent, and Outlet Standard attributes have values.
- Verify that Material, Color, and Accent attributes for the included smartwatch band have values.
- Click Save, then click Save again.
Great, we have a quote with quote lines for a smartwatch and related products. Time to generate an order. - Click Edit.
- Check Ordered.
- Click Save.
CPQ is taking a moment to create an Order record, along with Order Product records based on the quote lines. At the same time, it’s copying the attribute values into the Order Product twin fields. - Click the Related tab.
- From the Orders related list, click the number of the order.
If you don’t see an order yet, click the refresh button of your browser. Keep refreshing until the order appears. - From the Order Products related list, click Smartwatch.
Here you should see fields for Size, Accent, Outlet Standard, all with the values you selected in step 7. - Click the Back button in your browser.
- From the Order Product related list, click Smartwatch Band.
On this order product the fields of Size, Accent, Material, and Color should all have values. Outlet Standard will have a value too, but you can ignore that, it’s really only relevant to the AC Adaptor Order Product.
Excellent work, you’ve made it possible for AW Computing to fulfill orders that include potentially hundreds of different watch customizations. Furthermore, you did so with only a few products, avoiding SKU proliferation like a pro!