Create Smartwatch Attributes for Size and Accent
Create Product Option Fields
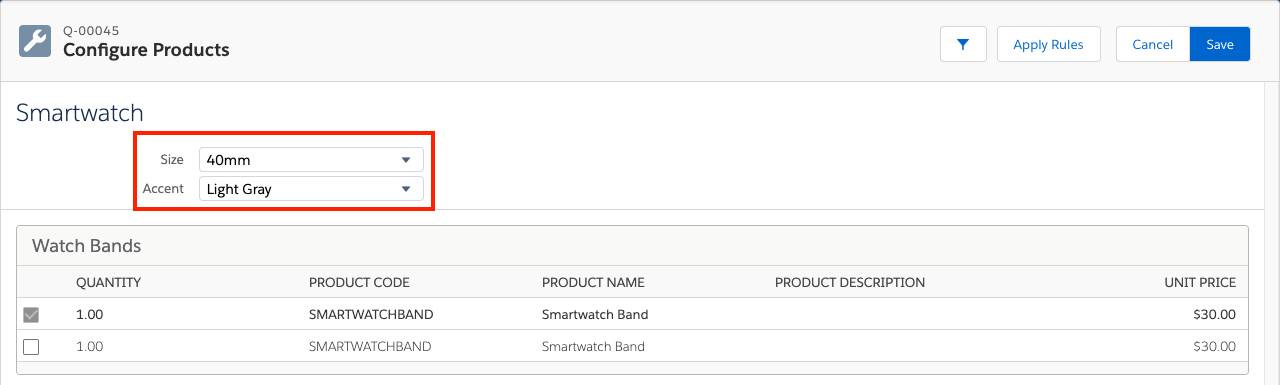
AW Computing knows that some people prefer large smartwatches to get more screen real estate, while others want a more modest size. To accommodate this preference, you will create a Size attribute with two values, 40mm and 44mm. While you’re at it, you’ll create an Accent attribute to capture the preferred color of metal used for the watch housing. It’ll have three choices, Light Gray, Dark Gray, and Gold.
Before you can create a configuration attribute, it’s important to understand that configuration attributes are not actually fields, but are visible manifestations of fields. Think of it this way: When the Product Configuration page loads, what you see is really a page built from records—Product records, Option records, and Feature records. The page itself is not actually a record! And if the page isn’t a record, it can’t have its own fields. But what it can have is a representation of a field, and that’s what a configuration attribute is—a representation.
So before you create the representation, you need to create a field that acts as its inspiration. And that is always done on the Product Option object. You start by creating the Size picklist field.
- If you’re not already in Setup, click
 and click Setup. The Setup page opens in a new tab.
 - Click Object Manager.
- Click Product Option.
- Click Fields & Relationships.
- Click New.
- Click Picklist.
- Click Next.
- For Field Label, enter
Size.
This label is what users will see in the Product Configuration page. - Click the radio button to Enter values, then enter each of these values on a separate line:
40mm44mm - Check Use first value as default value.
- Click Next.
- Click Next to keep field-level security as is.
Now you’re ready to save the Size field, and create the Accent field.
- Click Save & New.
- Click Picklist.
- Click Next.
- For Field Label, enter
Accent. - Click the radio button to Enter values, then enter each of these values on a separate line:
Light GrayDark GrayGold
Note that throughout this project you must use 'gray' and not 'grey' for the spelling in order to pass the challenge check at the end. - Check Use first value as default value.
- Click Next.
- Click Next to keep field-level security as is.
- Click Save.
Great, you have two new fields on the Product Option object. Now you must make a change to the Configuration Attribute object to let CPQ know the new fields exist and can be used as inspiration for attributes. This is a one-time process you can do quickly.
- Click Object Manager.
- Click Configuration Attribute.
- Click Fields & Relationships.
- Click Target Field.
This is a picklist that has the names of fields we can represent as attributes. You need to add the API names of your two new fields as values. We use API names because they typically don’t change, even if the Field Label does. - In the Values list, click New.
- Enter these two values on separate lines:
Size__cAccent__c - Check the box next to Record Type Name.
This makes the fields usable for both configuration and global attributes. You might not need to use every field for one or the other, but it doesn’t hurt to have the option for later. - Click Save.
Alright, you’re finally at the point where you can create configuration attributes. Good work!
Create Configuration Attribute Records
Configuration attributes are related (through a lookup) to the bundle where they appear. For that reason it’s easiest to create a configuration attribute by navigating to the Product record of the bundle.
- Click the App Launcher (
 ), and then click the Salesforce CPQ tile.
 - In the navigation bar, click Products, then choose the All Products list view.
- Click Smartwatch.
- Click the Related tab.
- In the Configuration Attributes related list, click New.
- Click Next to leave the record type as Configuration Attribute.
- For Attribute Name, enter
Size.
The attribute name isn’t really important, since users will see the Field Label of the field you created on the Product Option object. - For Target Field, choose Size__c.
This is the most important field, since it tells CPQ what field should be represented in the Product Configuration page. - Check Required.
The order fulfillment team needs this critical piece of information so they can deliver the right sized watch. Setting the attribute as required prevents the sales rep from forgetting to choose a value. - For Row Order, enter
10.
This tells CPQ how to order the list of attributes from top to bottom if you have more than one in a column. (We talk about columns in the next unit.) It’s best to use increments of 10, so that if you need to add a new attribute above the first, you can number it 5 without having to renumber all the other attributes. - Click Save.
Excellent work, the Size attribute will now appear next time you configure the Smartwatch bundle. Before you check your work, let’s create the Accent attribute.
- In the Configuration Attributes related list, click New.
- Click Next to leave the record type as Configuration Attribute.
- For Attribute Name, enter
Accent. - For Target Field, choose Accent__c.
- Check Required.
- For Row Order, enter
20.
This will place Accent directly below Size. - Click Save.
OK, you now have two attributes in the Smartwatch bundle. Every good admin checks their work, right? Let’s add Smartwatch to a pre-made quote and see how it looks.
- From the navigation bar, click Quotes, then choose the All list view.
- Click Q-00045.
- Click Edit Lines.
The first time the page loads, it can take a few minutes. Subsequent page loads are faster. - Click Add Products.
- Check Smartwatch.
- Click Select.
At this point you see the fruits of your labor. Two configurable attributes that you can change to suit what your customer wants. You don’t want to save the quote yet, so for now just abandon it. - From the navigation bar, click Home.
Anytime you create a new configuration attribute you’ll go through the same three steps you went through for Size and Accent:
- Create a field on the Product Option object.
- Add the API name of the field to the Target Field field on the Configuration Attribute object.
- Create a configuration attribute record on the bundle product.
In the next unit you create an Engraving attribute that allows customers to add custom text on the underside of the watch.