Work with Lists of Records
Create the Bear List Component
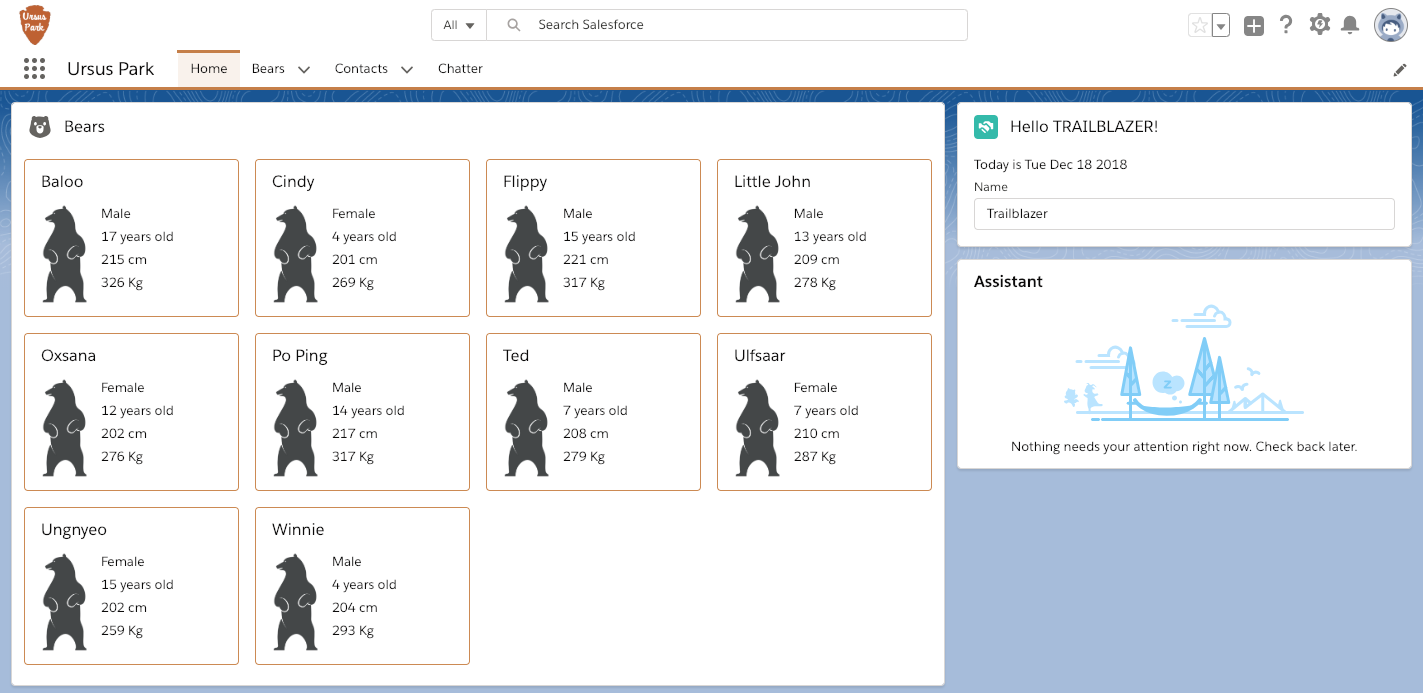
Park rangers want to see a directory of bears directly from their home page. You have been tasked with implementing that bear list.
- In VS Code, right-click the
lwcfolder and click SFDX: Create Lightning Web Component. - Name the component
bearList. - Edit the
bearList.js-meta.xmlfile, and replace<isExposed>false</isExposed>with these lines.<isExposed>true</isExposed> <targets> <target>lightning__AppPage</target> <target>lightning__RecordPage</target> <target>lightning__HomePage</target> </targets>
This enables your component to be placed on any type of page in Lightning App Builder. - Replace the contents of
bearList.htmlwith:<template> <lightning-card title="Bears" icon-name="utility:animal_and_nature"> <div class="slds-card__body slds-card__body_inner"> <!-- Start bear list --> <template if:true={bears}> <lightning-layout multiple-rows="true" pull-to-boundary="small"> <template for:each={bears} for:item="bear"> <lightning-layout-item key={bear.Id} size="3" class="slds-var-p-around_x-small"> <!-- Start bear tile --> <lightning-card title={bear.Name} class="bear-tile"> <div class="slds-var-p-horizontal_small bear-tile-body"> <div class="slds-media"> <div class="slds-media__figure"> <img src={appResources.bearSilhouette} alt="Bear profile" class="bear-silhouette"/> </div> <div class="slds-media__body"> <p class="slds-var-m-bottom_xx-small">{bear.Sex__c}</p> <p class="slds-var-m-bottom_xx-small">{bear.Age__c} years old</p> <p class="slds-var-m-bottom_xx-small">{bear.Height__c} cm</p> <p class="slds-var-m-bottom_xx-small">{bear.Weight__c} Kg</p> </div> </div> </div> </lightning-card> <!-- End bear tile --> </lightning-layout-item> </template> </lightning-layout> </template> <!-- End bear list --> <!-- Data failed to load --> <template if:true={error}> <div class="slds-text-color_error"> An error occurred while loading the bear list </div> </template> </div> </lightning-card> </template>Code highlights:- The
templatetag with thefor:eachandfor:itemdirectives is used to iterate over thebearsrecords. Each iteration item is passed to thebearproperty. - Each iteration of the template is marked with a special
keyattribute.keymust have a unique value in the context of the iteration. That is the bear id in our component.
- The
- Replace the contents of
bearList.jswith:import { LightningElement } from 'lwc'; import ursusResources from '@salesforce/resourceUrl/ursus_park'; /** BearController.getAllBears() Apex method */ import getAllBears from '@salesforce/apex/BearController.getAllBears'; export default class BearList extends LightningElement { bears; error; appResources = { bearSilhouette: `${ursusResources}/standing-bear-silhouette.png`, }; connectedCallback() { this.loadBears(); } loadBears() { getAllBears() .then(result => { this.bears = result; }) .catch(error => { this.error = error; }); } }Code highlights:- We import the
ursusResourcesadapter, which gives us access to a static resource associated with our app. We use this adapter to build anappResourcesobject that exposes the bear silhouette image URL in the template. - We import the
getAllBearsadapter, which allows us to interact with theBearController.getAllBears()Apex method. TheBearControllerclass is bundled in the code that you deployed at the beginning of this project. ThegetAllBearsmethod returns the result of a query that fetches all bear records. - We implement the
connectedCallbackfunction, which allows us to execute code after the component is loaded. We use this function to call theloadBearsfunction. - The
loadBearsfunction calls thegetAllBearsadapter. The adapter calls our Apex code and returns a JS promise. We use the promise to either save the returned data in thebearsproperty or to report errors. Retrieving data using this approach is called imperative Apex.
- We import the
- Create a new
bearList.cssfile in thebearListdirectory and paste the following code into the file..bear-tile { display: block; border: 1px solid #d2955d; border-radius: .25rem; background-color: #fae8d2; } .bear-silhouette { height: 100px; }These CSS rules add a border to bear cards and sets the height of a bear silhouette image. - Deploy the updated code to the org. Right-click the default folder and click SFDX: Deploy Source to Org.
Add the Bear List Component to the App Home Page
Let’s add our new component to the app home page.
- Back in your org, from the App Launcher (
 ), find and select Ursus Park.
 - Click Setup (
 ) and select Edit Page.
 - Under Custom Components, find your bearList component and drag it to the top left of the page.
- Click Save and then Back to return to the home page and check your work.
Use Wired Apex
Now we’re going to explore a new approach for retrieving the list of bears. We are going to use wired Apex instead of imperative Apex.
- Edit
bearList.htmland replace<template if:true={bears}>with<template if:true={bears.data}>. - Replace
<template for:each={bears} for:item="bear">with<template for:each={bears.data} for:item="bear">. - Replace
<template if:true={error}>with<template if:true={bears.error}>. At this point the template is mostly the same other than the imperative Apex. We are now accessing the list of bears by callingbears.datainstead of justbears, and we are now retrieving errors withbears.errorinstead of justerror. - Replace the contents of
bearList.jswith:import { LightningElement, wire } from 'lwc'; import ursusResources from '@salesforce/resourceUrl/ursus_park'; /** BearController.getAllBears() Apex method */ import getAllBears from '@salesforce/apex/BearController.getAllBears'; export default class BearList extends LightningElement { @wire(getAllBears) bears; appResources = { bearSilhouette: `${ursusResources}/standing-bear-silhouette.png`, }; }We’ve greatly simplified the JS code by decorating ourbearsproperty with wired Apex. All the data we need is now coming through this single line:@wire(getAllBears) bears; - Deploy the updated code to the org and see that it behaves in the same way than with imperative Apex.
Pass Parameters in Your Apex Calls
The number of inhabitants in Ursus Park is on the rise. Rangers want to be able to filter the bear list to quickly find them. Let’s add a search bar to our bear list to help them.
- Edit
bearList.htmland add the following code after the<template if:true={bears.data}>tag.<lightning-input type="search" onchange={handleSearchTermChange} variant="label-hidden" class="slds-var-m-bottom_small" label="Search" placeholder="Search for bears" value={searchTerm}> </lightning-input>This adds a search input field. When its value changes, we call thehandleSearchTermChangefunction. - Add the following code after the
</lightning-layout>closing tag.<!-- No bears found --> <template if:false={hasResults}> <div class="slds-align_absolute-center slds-var-m-vertical_small"> This is beary disturbing, we did not find results... </div> </template>This adds a message indicating no results were found. This message is shown only when thehasResultsexpression is false. - Replace the contents of
bearList.jswith:import { LightningElement, wire } from 'lwc'; import ursusResources from '@salesforce/resourceUrl/ursus_park'; /** BearController.searchBears(searchTerm) Apex method */ import searchBears from '@salesforce/apex/BearController.searchBears'; export default class BearList extends LightningElement { searchTerm = ''; @wire(searchBears, {searchTerm: '$searchTerm'}) bears; appResources = { bearSilhouette: `${ursusResources}/standing-bear-silhouette.png`, }; handleSearchTermChange(event) { // Debouncing this method: do not update the reactive property as // long as this function is being called within a delay of 300 ms. // This is to avoid a very large number of Apex method calls. window.clearTimeout(this.delayTimeout); const searchTerm = event.target.value; // eslint-disable-next-line @lwc/lwc/no-async-operation this.delayTimeout = setTimeout(() => { this.searchTerm = searchTerm; }, 300); } get hasResults() { return (this.bears.data.length > 0); } }Code highlights:- We add a
searchTermreactive property and we pass it as a parameter of our wired Apex call tosearchBears. - The
handleSearchTermChangefunction is used to react to changes in the value of the search input field. We purposefully introduce a 300 millisecond delay when updating thesearchTermreactive property. If an update is pending, we cancel it and reschedule a new one in 300 ms. This delay reduces the number of Apex calls when the user is typing letters to form a word. Each new letter triggers a call tohandleSearchTermChangebut ideally,searchBearsis only called once when the user has finished typing. This technique is called debouncing. - We expose the
hasResultsexpression to check whether our search has returned bears.
- We add a
- Deploy the updated code to the org and check that the search works with or without results.

That’s it for this step. We have seen how to handle record lists with imperative Apex then with wired Apex, and we learned how to pass parameters in our Apex calls. Our component’s code has grown significantly in the process, so now let’s break it into subcomponents to make it easier to maintain.