Upload Your Data into NPSP Data Importer
Get Ready to Import
You’re about to dive right in to NPSP Data Importer in your Trailhead Playground, but in the real world you want to be more careful.
Here are a couple of recommended best practices:
- Test your import in a sandbox first to make sure you're ready. That way, the practice import won’t affect your existing data in production.
- When you’re ready to import your data into production, make sure you have regular data exports set up first. It’s best practice to back up data before any major import and to have regularly scheduled exports of your data for backup. See the link in Resources for details on how to do this.
- When importing to production, start first with a few records to ensure the import works before loading the full dataset.
Now on to NPSP Data Importer.
Configure Data Import Wizard
Find the importer through the App Launcher to get started.
- From the App Launcher (
 ), find and select NPSP Data Imports.
- Click Import.

- You’re now in the Data Import Wizard and ready to configure your import. On the Custom objects tab, click NPSP Data Imports.
- You’ll see three options in the “What do you want to do?” panel. With NPSP Data Imports you always want to select Add new records because you’re creating new NPSP data import records to hold the information before you send it to the target objects.
- Leave the settings under Add new records as the defaults.
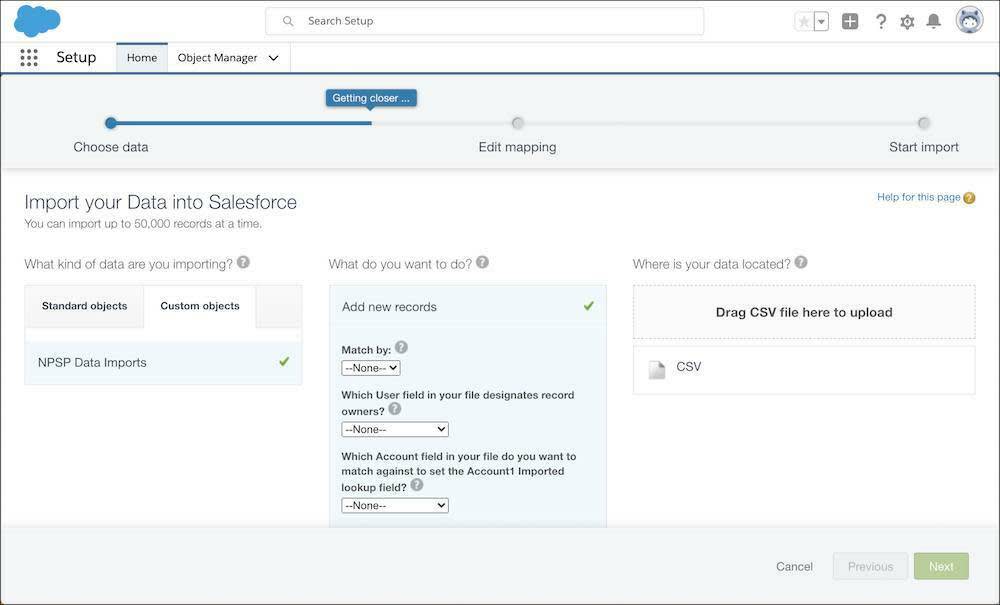
- In the “Where is your data located?” panel, drag your CSV to where it says Drag CSV file here to upload.
- You don't need to change the Character Code or Values Separated By picklists for this practice run. If you have data in another character type for another project, you may.
- Click Next.

You’re now on the Edit Field Mapping page. Because the data template you’re using includes all of the fields, you’ll see that a few are unmapped. It’s usually a good idea to delete unused columns or map the unmapped fields. Don’t worry about that for now, though, because the data you’re importing is all in mapped fields.

Click Next and then, on the next page, click Start Import.
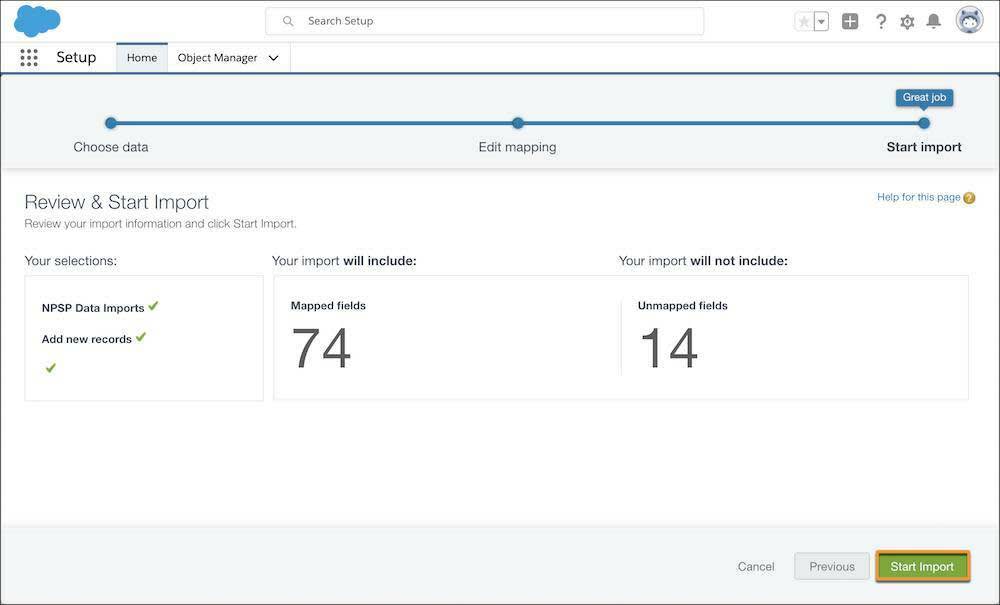
One last message will let you know that your import is starting. Click OK to get going and view the import’s status.

While your import runs, pause to consider a few limitations of the Data Import Wizard. For example, your total import file can be no more than 100MB and 50,000 records. There are a few ways to work around the file size limitation. For example, break up a bigger import using four different templates for different objects. You can learn more about that, and other strategies and tools like Salesforce Data Loader and Dataloader.io, in the Resources section.
Review Records Uploaded into NPSP Data Import Objects
Now that your import is complete, it’s time to go back to the NPSP Data Imports list. From the App Launcher, find and select NPSP Data Imports to navigate back.
Click on the list view name and select To Be Imported to view the records you just imported.

From that view, click into the first record, which should be for the contact Haley Brown.
The fields from the CSV have been uploaded into NPSP Data Import records and no matching to real contact, account, and opportunity fields or existing records has been attempted. The Contact1 Import Status field will be blank.

You know Haley Brown is already in the system because you created that record in the last step, but if you looked for her husband Jake Brown or their donation in Global Search they wouldn’t appear. Those records only exist in this data import record where you can review and edit the data before it moves to its destination.
Pro tip: You can fix data by clicking  next to any field on a data import record. If you notice a lot of problems in your import, delete all of the data import records, fix your CSV, and try your upload again. Seriously, we can’t stress this enough.
It’s time to move on to the next step after you select the Playground where you performed these steps and click Verify.
Resources
- Salesforce Help: Export Backup Data from Salesforce
- Salesforce Help: NPSP Import DI Object
- Salesforce Blog: How to Import Data into NPSP More Effectively
- Salesforce Help: Import Limits
- Salesforce Help: How Large Can My Import File Be?
- Trailhead: Import and Export with Data Management Tools
- Video: How To Import Data into Salesforce Series
- Trailhead: Data Management
- Trailblazer Community: Data Quality & Management