Prepare Your Data for Import
Download the Data Template
When you’re starting a data import project, take time to make sure that the data you’re going to import is correct, clean, de-duplicated, and error-free. This important step will avoid “garbage in, garbage out,” as they say.
Also prepare yourself to spend a lot of time in spreadsheets and CSVs. About 99% of the time you spend on an import will be making sure your data is ready outside Salesforce. To help with that process, we created NPSP Data Importer templates with the instructions and column headers you need to format your data for either a simple import or advanced mapping features. Download the templates from the link in the Resources section below to use with your own data when you import for real after practicing in this module.
Consider the challenges here as a test import similar to what you’ll want to do in your own Salesforce org. You may have big data sets to import, but start any import with one record—or just a few, depending on the situation. This can help you make sure you have the right formatting and to first practice the import in a Sandbox, and not your main Salesforce org.
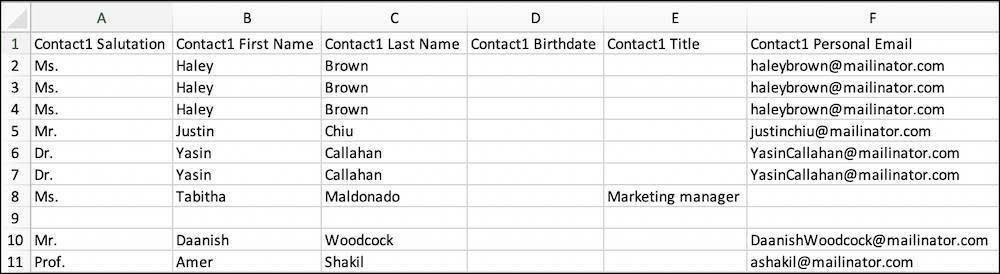
For your use in completing the challenges, we provided 10 records already entered and formatted in a CSV file. This module uses a simple example without mapping custom fields and importing a small number of records. First, download one of the sample CSV files and save it to a convenient place like your desktop. Select the sample file that matches the way your locale formats dates.
-
Sample data for dates formatted month/day/year
-
Sample data for dates formatted day/month/year
-
Sample data for dates formatted year/month/day
If your locale formats dates differently, edit one of the data sets to match your date format. You can learn more about locales in the documentation link in Resources.
After you download and open the correct file, move ahead to the next section.

Understand and Use the Template
The data you just downloaded is in a relatively simple table of supported objects and fields.
Each column header corresponds to a field in the NPSP data import object that temporarily houses your data as you prepare for final import to contacts, accounts, and other objects. It’s best to line up these column headers with the fields in the NPSP data import object to save yourself time mapping columns when the data is in Salesforce.
Here’s how a few of the fields line up in the template, data import object, and contact object.
|
Template Column Header
|
Data Import Object Field
|
Contact Object Field
|
|---|---|---|
Contact1 First Name |
Contact1 First Name |
First Name |
Contact1 Last Name |
Contact1 Last Name |
Last Name |
Contact1 Title |
Contact1 Title |
Title |
Contact1 Personal Email |
Contact1 Personal Email |
Personal Email |
Contact1 Preferred Email |
Contact1 Preferred Email |
Preferred Email |
Contact1 Home Phone |
Contact1 Home Phone |
Home Phone |
Why add Contact1 to field names? You learn about that in the next section, but first you should know that if you need more objects or fields you can add those through Advanced Mapping in NPSP Data Importer. This module doesn’t cover that topic, but you can check the link in the Resources section if you want to know more.
Looking at the dataset you downloaded again, there’s one change to make now before you upload the file for import.
- Find the row for Amer Shakil.
- The value for Contact1 Preferred Email is blank. This is a picklist field in Salesforce that allows for Personal, Work, or Alternate as values by default.
- Enter
Workin Amer Shakil’s Contact1 Preferred Email.
- Save the template as a CSV somewhere it will be easy to find, like your desktop. You’ll need this file in the next step.
How to Use The Template in Specific Situations
You probably noticed the extra columns in the dataset you just edited. There are many more columns in the example dataset than you’ll use for this project. If you were preparing for an import to your production org, you’d delete any columns you don't need.
The NPSP Data Importer Templates in Salesforce Help help you focus on critical information for different types of imports with a few templates for specific needs. For example, there are templates for importing donations from individuals and recurring donations. Download the template that best applies to your situation and start from there when it's time to import data to your production org.
Examine the example dataset to learn how to use combinations of columns and rows for different needs.
If you want to add second, third, or more household members: Use the Contact2 fields on several rows with the same primary contact in the Contact1 fields. If Contact1 matches the first name, last name, email, or legacy ID, NPSP Data Importer will add each Contact2 to the same household account and not create duplicates. See the rows where Haley Brown is Contact1 as an example where you are adding three more contacts to her household.

If you want to add multiple donations for the same contact: Use the same Contact1 fields on several rows with different data in the Donation fields. The same matching rules apply as with household members. See the rows where Yasin Callahan is Contact1 as an example, recording two $50 gifts on different days.

If you want to add opportunities other than donations, such as grants or memberships: Designate the record type in the Donation Record Type Name field. The template is set up for the values Donation, Grant, In-Kind Gift, Major Gift, Matching Gift, or Membership. See the row where Tabitha Maldonado is Contact1 and her employer, Electric Lighting Systems (ELS), is Account1 as an example.

If you want to add a donation from an account, not a contact: In the column with the Donation Donor header, you can set the donation to come from either Contact1 or Account1. Use Contact1 to record a donation for an individual and the person's household, and use Account1 for organization donations. See the row where there's no Contact1 and Green’s Antique Farm is in the Account1 Name field for an example of an organization's donation. One quick note: You can only set Contact1 or Account1 as the donation donor—Contact2 and Account2 won't work.

Create an Example Contact
To demonstrate how the matching rules work, you need to create a new contact that you’ll update through NPSP Data Importer. Go to your Trailhead Playground, then:
- From the App Launcher (
 ), find and select Contacts.
- Click New.
- In the First Name field enter
Haley.
- In the Last Name field enter
Brown.
- In the Personal Email field enter
haleybrown@mailinator.com.
- Save your work.
You just created a contact record for Haley Brown and NPSP created a household account for her, as well. You’ll add members to that household soon with your import.
That’s all for this step. Select the Playground to which you added Haley Brown’s contact in the dropdown on this page and click Verify, then move on to the next step.
Resources
- Salesforce Help: NPSP Data Importer Templates
- Trailhead: Data Management
- Salesforce Help: Configure NPSP Data Importer
- Trailblazer Community: Data Quality & Management
- Salesforce Help: Locales Overview