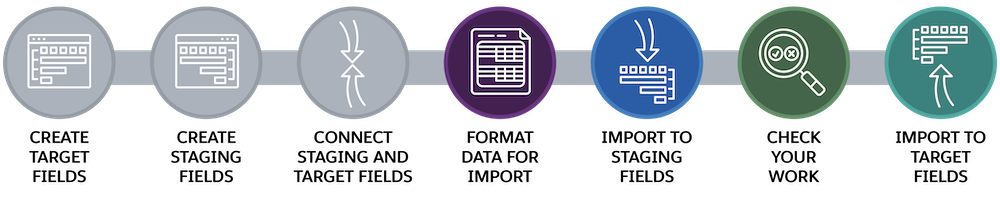
Import Data to a Standard Object
Now that you created your staging and target fields, and connected them with Advanced Mapping, it’s time to format your data and put it through the NPSP Data Import process.
Add Fields to the Import Template
You know by now that 99% of the work you do on any data import is outside of Salesforce, so now it’s time to hit the spreadsheets.

First, go to the NPSP Data Importer Templates page in documentation and download the Accounts and Contact Import template. There are two tabs where you can enter data: Import Wizard Template uses field labels to match data, while Data Loader Template uses API names.
If you were to use Salesforce Data Loader or Dataloader.io, you would use the Data Loader Template. For this project you’re using the Data Import Wizard and the Import Wizard Template, so open up that tab and get started adding your new columns.
- Add a new column after Contact1 Last Name, and enter
Contact1 Preferred Languagein the header row.
- Add another column after your new Contact1 Preferred Language column, and enter
Contact1 Email Opt Outin the header row.
- Add a new column after Contact2 Last Name, and enter
Contact2 Preferred Languagein the header row.
- Add another new column after Contact2 Preferred Language, and enter
Contact2 Email Opt Outin the header row.
- Delete the sample data in the first row.
- Save the template but leave it open. You use it in the next step.
Create Test Records
Now, it’s time to enter some test data to see how the import works with your new fields and mappings. Create a copy of the spreadsheet you just modified—preserving a version with all of the fields that you’ll use in a later step—and and enter two rows of data:
- First, enter a row with these details:
- Contact1 FirstName:
Elisa - Contact1 LastName:
Harmon - Contact1 Preferred Language:
English - Contact1 Email Opt Out:
True(Remember that in a picklist that is being translated to a checkbox, “True” means “Checked.”)
- Contact1 Personal Email:
elisa@mailinator.com - Contact1 Preferred Email:
Personal - Contact2 FirstName:
Bryan - Contact2 LastName:
Harmon - Contact2 Preferred Language:
English - Contact2 Email Opt Out:
False - Contact2 Personal Email:
bryan@mailinator.com - Contact2 Preferred Email:
Personal
- Next, enter these details into another row:
- Contact1 FirstName:
Bill - Contact1 LastName:
Rodriguez - Contact1 Preferred Language:
Tagalog - Contact1 Email Opt:
False(In a picklist that is being translated to a checkbox, “False” means “Unchecked.”)
- Contact1 Personal Email:
bill@mailinator.com - Contact1 Preferred Email:
Personal
- Optionally, you can delete all columns without data to avoid hitting data limits. (You should only have columns A through L after this.) It's important that you're working from a copy of your template when you do this, though, because later in this project you'll need the full template that includes your new fields and others you aren't using here. See the note below for advice on creating your own templates.
- Save a copy of the file as a .csv in an easy-to-find place, like your desktop.

Upload Your CSV to NPSP Data Import Objects
It’s time to test your work by importing it to NPSP Data Import objects.
- From the App Launcher (
 ), find and select NPSP Data Imports.
- Click Import.
- You’re now in the Data Import Wizard. On the Custom objects tab, click NPSP Data Imports.
- You’ll see three options in the “What do you want to do?” panel. With NPSP Data Imports, you always want to click Add new records because you are creating new NPSP data import staging records.
- In the “Where is your data located?” panel, drag your CSV to where it says “Drag CSV file here to upload” or click CSV and then Choose file to select the CSV you saved earlier.
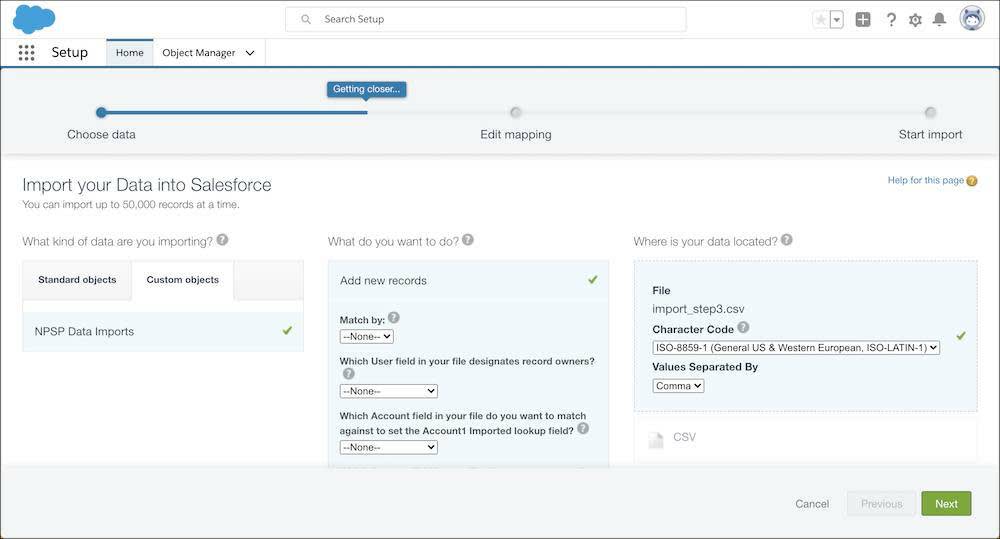
- Click Next.
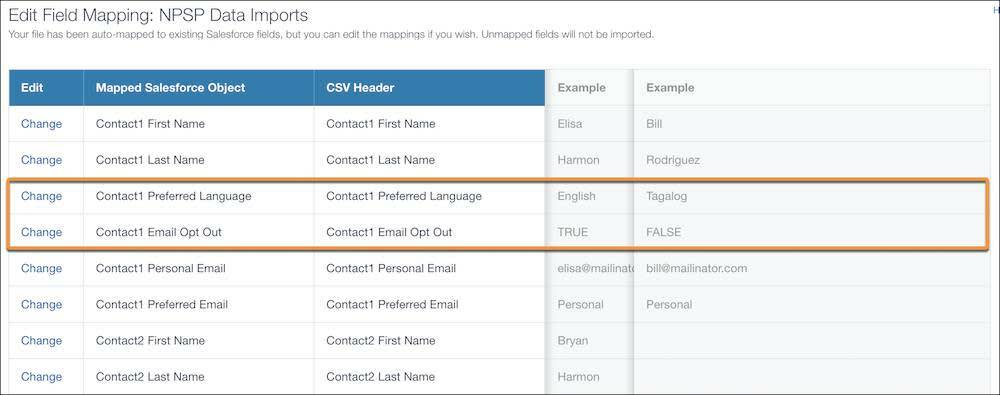
- You’re now on the Edit Field Mapping page. This is an important step to make sure your CSV headings match the NPSP Data Import staging fields. Because you used the same text in the CSV and in the Data Import staging object, these should all match. If you didn't delete the unused columns in the spreadsheet, you may notice some unmapped fields. That’s OK. Check this one more time, and then click Next.
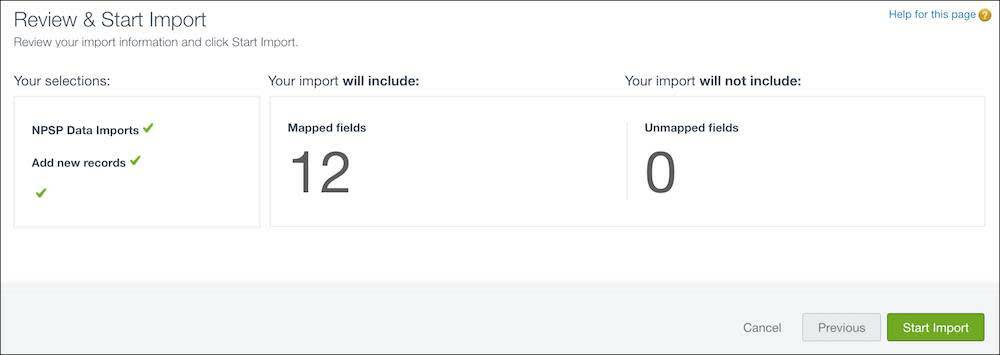
- On the Review & Start Import page, you should see that the import will include 12 mapped fields and 0 unmapped fields. If you didn’t delete the empty spreadsheet columns, you may see different numbers. Click Start Import.
- Click OK on the Congratulations, your import has started! window.

You’ll see the Bulk Data Load Jobs screen with details about the import next. If you want to check the results, you can click View Result in the Batches section to download a CSV of records.
You should also check the NPSP Data Import records themselves. Use the App Launcher ( ) to go back to the NPSP Data Imports page, then select the To Be Imported list view. Check the first record, for Elisa Harmon, to make sure all of the fields appear as you’d expect.
Perform an Import Dry Run
Now that the records are in the NPSP Data Import object, validate them by performing a dry run on the import to check for problems. This is optional, but you want to double-check the records to make sure that everything is okay before you move ahead with the actual import.
- Starting on the To Be Imported list view on the NPSP Data Imports page, click Import All Data Import Records.
- Leave the settings as is, and click Begin Dry Run.

- Wait for the dry run to complete and then check the status. You should have 2 records processed and 2 records validated. Click Close.

- Back on the NPSP Data Imports page, change the list view to Dry Run - Validated.

Check out the records. They should both be validated and ready for import.
Import Your Data
With setup and a test run complete, you’re ready to send your data to their target fields and objects.
- On the Dry Run - Validated list view on the NPSP Data Import page, click Import All Data Import Records.
- Click Begin Data Import Process.

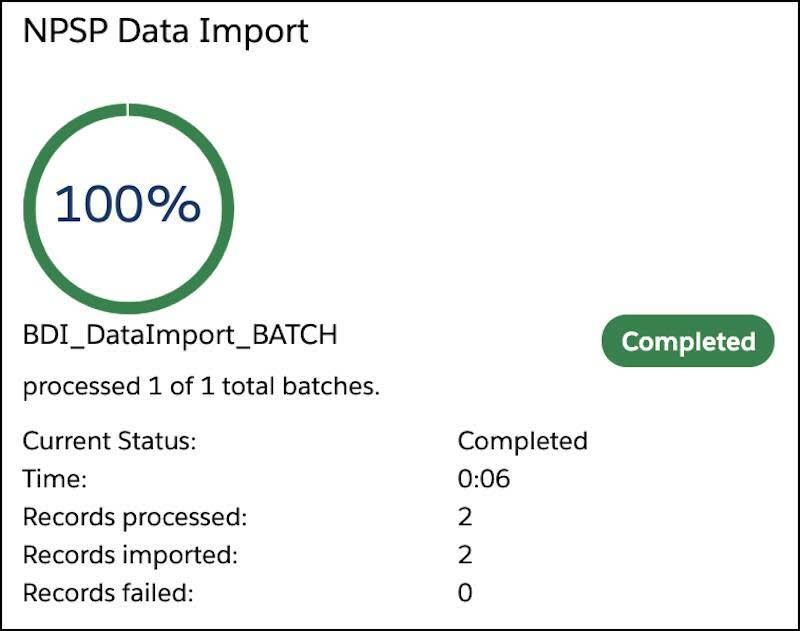
- Wait for the import to complete, and then check the status. You should have 2 records processed and 2 records imported. Click Close.
Now look for the records you just imported. Go to global search, and find and select the contact record for Elisa Harmon.

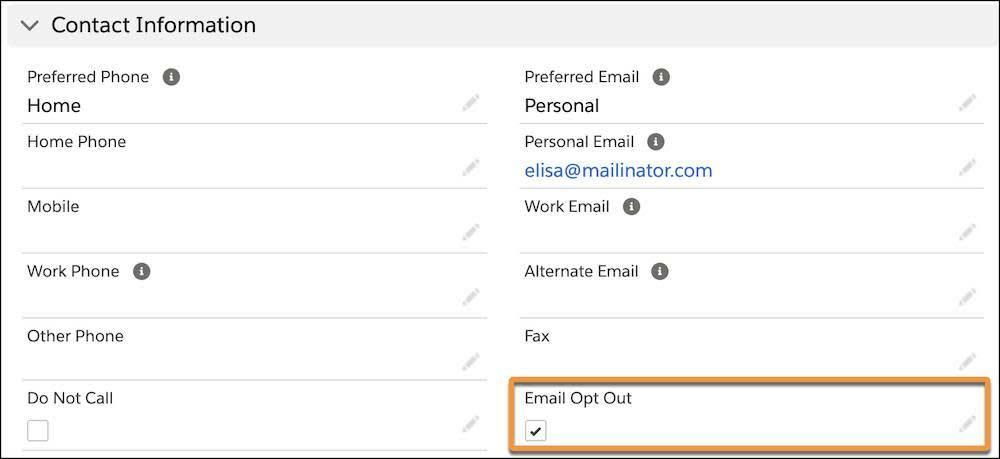
In the Contact Details section, you can see that her preferred language is set to English, and in the Contact Information section, you can see that the email opt-out box is checked.
NPSP Data Importer also created a new household account for her. Click Harmon Household under Account Name and look at the related contacts.

You can see that a record was also created for Bryan, who belongs in Elisa’s household. If you click into his record, you can see that his preferred language and email opt-out preference were imported, as well.
Now, look at your other imported contact by searching for and selecting Bill Rodriguez in global search.

Looking at Bill’s record, you can see that his language and email opt-out preference were also imported.
It worked! This is great and helps to meet some of the goals at No More Homelessness (NMH)—but what about its other goal? Can Gorav and the team at NMH set up a custom object and import data to it with NPSP Data Importer?
They can, and so can you! You do just that in the next step.
But before you move on, be sure to select the playground you used to follow along with these steps, and click Verify to collect your points.
Resources
- Salesforce Help: NPSP Data Importer Templates
- Salesforce Help: Upload Data from the Template
- Salesforce Help: Verify Data Upload
- Salesforce Help: Verify Your Upload with Dry Run
- Salesforce Help: Process Your Import