Explore NPSP Advanced Mapping
Learning Objectives
In this project, you’ll:
- Learn how to extend NPSP Data Importer by using Advanced Mapping features.
- Map standard fields and objects to the NPSP Data Import object.
- Create custom fields and objects and map them to the NPSP Data Import object.
- Modify the NPSP Data Import template to support additional fields and objects.
- Complete two test imports.

Before You Start
Before you complete any steps in this module, make sure you complete the hands-on challenges in Set Up a Nonprofit Success Pack Trial for Trailhead using the same special Developer Edition org. The work you do in the hands-on challenges here builds on the work you complete in that badge.
Also, consider completing the following recommended content.
Go Beyond Standard Fields and Objects
As you know from the Import Your Data project, NPSP Data Importer works on many NPSP objects and fields without any additional configuration and comes with a handy import template to support that data. But what do you do if NPSP Data Importer doesn’t include the fields and objects your organization needs by default?
That’s the question the staff at the nonprofit No More Homelessness (NMH) has been asking lately.
NMH has made steady progress toward their goal of getting all important data into Salesforce. They prioritized importing donor contact and past donation data from their legacy fundraising system, and now the next phase is donor and volunteer data from other systems and spreadsheets. Specifically, they would like to import:
- Donors’ and volunteers’ preferred languages to contact records.
- Email preferences to contact records.
- Details about donor survey answers, completions, and acknowledgements.
Having this data in Salesforce will help NMH better communicate with their donors, stay compliant with email marketing laws, and manage donor surveys more efficiently. Fortunately, these needs can be met with Advanced Mapping.
In this project you follow along with NMH’s heroic Salesforce admin, Gorav Patel, as he imports additional data into Salesforce.

Take Data Safety Seriously
You dive right into this project in your Trailhead Playground, but you won’t want to do that in the real world.
Before you start any import, it’s important to make sure you protect the valuable operational data your organization stores in Salesforce. That’s why it’s always a good idea to follow these best practices:
- Test your import in a sandbox first. Check out the sandbox documentation in Resources for more information.
- Make sure you save an unedited version of the data. Always work from a copy while you format it in the NPSP Data Import template or another tool so you can reference the original source.
- Back up your data before any major import and make sure you set up regularly scheduled backup exports of your data. (See the Export Backup Data from Salesforce link in Resources.)
- When it’s time to start the import in production, start first with a single record before loading the full dataset to make sure everything works as expected.
Map Toward Your Goal
The default settings for NPSP Data Importer work on many of the fields and objects you may need to import—see the full list at the Standard NPSP Data Import Fields link in Resources. However, they probably don't cover every situation.
In those cases, use Advanced Mapping to connect the fields on the NPSP Data Import staging object to the fields on the objects where the data will be stored, such as contacts or opportunities. Those target fields can be Salesforce standard, part of NPSP, included in another managed package, or your own custom creations. The only requirement is that the target fields are directly related to accounts, contacts, or opportunities.
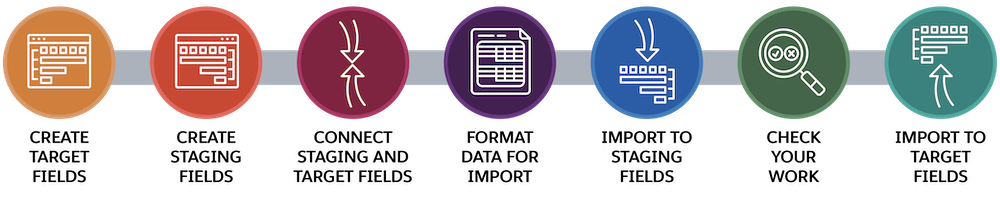
Generally, you’ll follow this process:
- Create the fields where you want the data to be stored. We call those the target fields in this project.
- Create the corresponding fields on the NPSP Data Import object, which serve as staging fields to check your data before importing it to the target fields.
- Connect the NPSP Data Import staging fields and target fields with Advanced Mapping.
- Add the new fields to your import template and format your data for import. (You can start with the NPSP Data Import template.)
- Import the data to the NPSP Data Import object (the staging fields) using the Data Import Wizard or another tool.
- Check the import on the NPSP Data Import records by performing an optional import dry run.
- Import your data from the NPSP Data Import staging records to the target fields.
This process will stay the same in most situations, whether you are importing data to custom or standard fields on custom or standard objects.
You learn from a few examples in this project. You can find instructions in the NPSP Import documentation linked in the Resources section for using Advanced Mapping in other situations.
To make sure you have your NPSP trial set up correctly, select the special Developer Edition org in which you completed the Set Up a Nonprofit Success Pack Trial for Trailhead prerequisite module and click the Verify button.
In the next step, you dive into mapping standard and custom fields on a standard object to NPSP Data Importer.
Resources
- Trailhead: Set Up a Nonprofit Success Pack Trial for Trailhead
- Trailhead: Import Your Data Using NPSP Data Importer
- Salesforce Help: Export Backup Data from Salesforce
- Salesforce Help: Sandbox Licenses and Storage Limits by Type
- Salesforce Help: How the Import Process Works
- Salesforce Help: Standard NPSP Data Import Fields
- Salesforce Help: Configure Gift Entry