Modify Your Data Model

Introduction
Salesforce offers lots of customization options that allow you to tailor your org to fit the needs of your teams. Like a gearhead tricking out a muscle car, you can add some pretty sleek bells and whistles—creating processes and record types, customizing fields, and creating picklists—all to suit the needs of your business and keep its engine purring.
Customize Fields
Your users need custom fields to capture their unique business data. You can add custom fields for each of the tabs and objects that your organization uses, with field limits dependent on your org edition (see Custom Fields Allowed Per Object help article to learn more).
Manager Kenya Collins would like you to create a custom Support Plan Start Date field for her team. Here’s how to get that done for her:
- Click the setup gear
 and select Setup.
- Click the Object Manager tab.
- Click Account, then click Fields & Relationships.
- At the top of the Fields & Relationships section, click New.
- Select the Date radio button, and click Next.
- Complete the new field details in Step 2:
Field
Value
Field Label
Support Plan Start DateDescription
Start date of current support planHelp Text
When did the current support plan begin? - Click Next, then complete Step 3.
- In the Read-Only column header, select the checkbox.
- In the Read-Only column, deselect the Custom: Support Profile and System Administrator checkboxes.
- Click Next, then click Save.
Kenya also requested you show a few members of her support team how to update support plan information on an account. Use the Edge Communications account as an example:
- With the Object Manager still open, click Account.
- Click Fields & Relationships and then click the Description field from the list.
- Click Edit.
- Select Active from the Field Usage dropdown.
- Click Save.
- Click the App Launcher
 and select Service.
- Click the Accounts tab, and select Edge Communications from the list. Note: May be necessary to toggle the list view to All Accounts.
- Click Details.
- Scroll down. Next to the Support Plan Start Date, hover over the help icon to view the help text.

- Click the pencil icon at the end of that field, to enable inline editing of the field.
- Select the date of one year ago today.
- Click Save.
Create Dependent Picklists
Dependent picklists help users enter accurate and consistent data. A dependent picklist is a custom or multi-select picklist for which the valid values depend on the value of another field, called the controlling field. Controlling fields can be any picklist (with at least one and fewer than 300 values) or checkbox field on the same record.
Create a dependency between the Stage field and the Delivery/Installation Status field:
- Click the setup gear
 and select Setup.
- Click the Object Manager tab.
- Click Opportunity.
- Click Fields & Relationships.
- Click Field Dependencies.
- Click New, and set up the new field dependency with these details:
Field
Value
Controlling Field
Stage
Dependent Field
Delivery/Installation Status
- Click Continue.
- At the top of the table, click Next until you see the Closed Won and Closed Lost columns.
- Double-click In progress, Yet to begin, and Completed in the Closed Won column to highlight them.
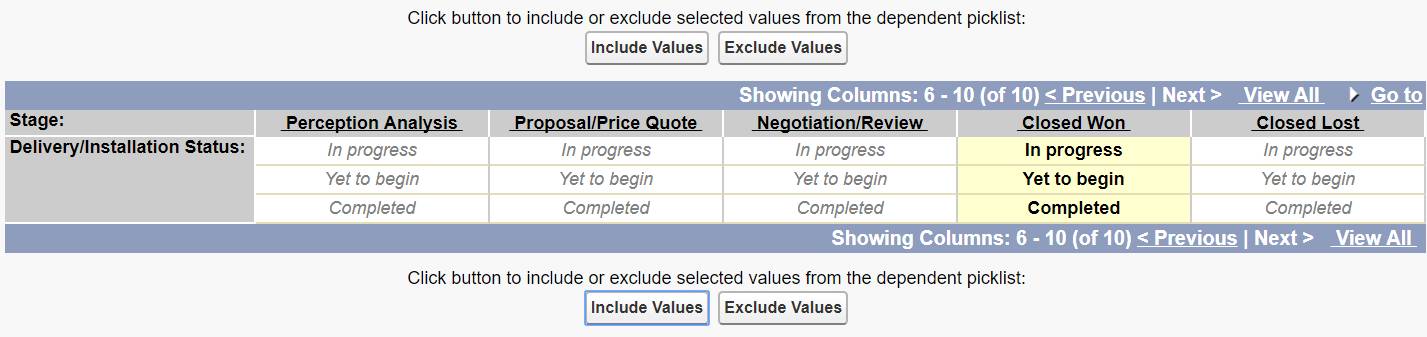
- Click Preview, and then test the dependency by selecting different stages and viewing the different close reasons available for the Closed Won stage.
- Click Close to close the preview window.
- Click Save, and click OK to accept the warning that not all dependent values have been included.
Create a Support Process
After another meeting with Kenya, it’s come to light that your support team needs two different processes for keeping track of the status of customer product support and billing inquires in your Salesforce org.
Create a new support process for them:
- From Setup, click the Home tab.
- Enter
Support Processesin the Quick Find box and select Support Processes.
- At the top of the Support Process section, click New and fill in these details:
Field
Value
Existing Support Process
Master
Support Process Name
Product SupportDescription
Process for logging customer support - Click Save.
- Ensure that New is selected in the Default drop-down.
- Click Save.
- At the top of the Support Process section, click New and fill in these details:
Field
Value
Existing Support Process
Master
Support Process Name
BillingDescription
Process for logging billing inquiries - Click Save.
- Ensure that New is selected in the Default drop-down.
- Click Save.
Add Picklist Values
Picklist values specific to a situation reduce your users’ frustration and improve accuracy over a generic bucket where a catch-all would be otherwise selected. A customer calling with a product issue has different needs than one with a billing issue, and the agent entering the case will need to select different values to handle them.
Add new Case Type picklist values for agents to choose from.
- From Setup, click the Object Manager tab.
- Click Case then Fields & Relationships.
- Click Type.
- Click New under Case Type Picklist Values and enter each of the following picklist values (each value needs to be on a separate line):
RefundCredit CardSubscriptionProblemFeature RequestQuestion
- Click Save.
Create Record Types
Record types determine the business processes, picklist values, and page layouts that are available to you when creating records. Create Billing and Product Support record types so they can be utilized by your support team.
Here’s how to create the two new records types:
- From Setup, click the Object Manager tab.
- Click Case then Record Types.
- Click New.
- Complete the record type details in Step 1:
Field
Value
Existing Record Type
Master
Record Type Label
Product SupportRecord Type Name
[auto-generated]
Support Process
Product Support
Description
Use to log customer support issues.Active
Select
- In the Make Available column header, deselect the checkbox.
- In the Make Available column, select the Custom: Support Profile and System Administrator checkboxes.
- Click Next.
- In Step 2, ensure that the Apply one layout to all profiles radio button is selected.
- From the Select Page Layout list, select Case (Support) Layout.

- Click Save.
- In the Picklists Available for Editing section click Edit next to Type. Move Mechanical, Structural, Refund, Credit Card, and Subscription from Selected Values to Available Values. No Default selected.
- Click Save.
- Select Record Types again and click New.
- Complete the record type details in Step 1:
Field
Value
Existing Record Type
Master
Record Type Label
BillingRecord Type Name
[auto-generated]
Support Process
Billing
Description
Use to report customer billing issues.Active
Select
- In the Make Available column, select the Custom: Support Profile and System Administrator checkboxes.
- Click Next.
- In Step 2, ensure that the Apply one layout to all profiles checkbox is selected.
- From the Select Page Layout list, select Case (Support) Layout.
- Click Save.
- In the Picklists Available for Editing section click Edit next to Type. Select and remove Mechanical, Electrical, Structural, and Feature Request. No Default selected.
- Click Save.
Since you’ve created new support processes and record types for Kenya’s team, they’re now able to create cases for Billing and Product Support that help them more efficiently take care of customer needs. Kenya would like you to show the team leads how to do this task.
Here are the instructions to create a new Product Support case:
- Click the App Launcher
 and select Service.
- Click the Accounts tab, and select Edge Communications from the list.
- Scroll down to the Cases related list and click New.
- From the Record Type of new record options, select Product Support.
- Click Next.
- Fill in these product support case details:
Field
Value
Product
(choose any product from drop-down)
Type
Electrical
Case Origin
Phone
Case Reason
Performance
Subject
Laptop PowerDescription
Laptop does not turn on when the power button is pressed - Click Save.
The instructions for creating a new Billing case are very similar:
- Click the Accounts tab and choose Edge Communications from the list
- Scroll down to the Cases related list and click New.
- From the Record Type of new record options, select Billing.
- Click Next.
- Fill in these billing support case details:
Field
Value
Product
(choose any product from the drop-down)
Type
Electronic
Case Origin
Email
Case Reason
Other
Subject
CC overpayment not refundedDescription
Overpayment for a purchase not refunded to customer - Click Save.
Now that you’ve completed the actions in this step, your support team has what it needs to efficiently address their customers’ concerns. Move on to the next step, where we’ll add a little customization to daily communications.