Create Record Types
Follow Along with Trail Together
Want to follow along with an expert as you work through this step? Take a look at this video, part of the Trail Together series.
(This clip starts at the 41:44 minute mark, in case you want to rewind and watch the beginning of the step again.)
Introduction
Noah Larkin would like a few more things tweaked for his teams. He'd like you to set up some custom record pages (next step of this project), but first you need to lay the groundwork by creating record types. Record types determine the business processes, page layouts, and picklist values users have access to.
Setting up record types will ensure that when Noah's Consulting Team views customer accounts, they won't also see the partner accounts. The team also has to scroll through a long list of values in the industry field when they use partners for consulting or training. Creating record types will allow them to simply choose from Consulting or Education in these cases. Let's get to it.
Create Record Types
Create a new account record type called Customer Account.
- From Setup, click Object Manager and select Account.
- Select Record Types, click New, and fill in the details.
Field
Value
Existing Record Type
Master
Record Type Label
Customer Account
Record Type Name Customer_AccountDescription
For customers and prospects
Active
select
- In the Make Available column header, deselect the checkbox.
- In the Make Available column, select these profiles.
- Sales User
- System Administrator
- Click Next.
- Ensure that the Apply one layout to all profiles radio button is selected.
- From the Select Page Layout list, select Account Layout.
- Click Save.
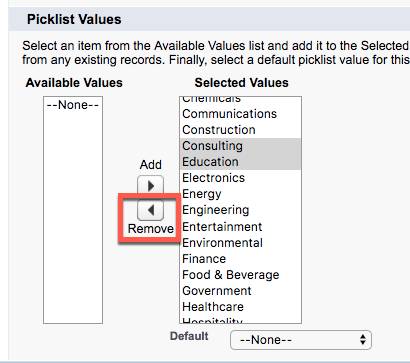
Edit the Industry picklist values to remove Consulting and Education.
- In the Action column, click Edit next to the Industry field.
- In the Selected Values list, hold down Ctrl/Command and select Consulting and Education.

- Click the Remove arrow.
- Click Save.
Create a new account record type called Partner Account.
- While still viewing the Account object in the Object Manager, select Record Types, and click New.
- For Existing Record Type, ensure Master is selected from the picklist.
- Enter
Partner Accountas the Record Type Label andPartner_Accountas the Record Type Name. - For Description, enter
For consulting partners. - Select the Active checkbox.
- In the Make Available column, select these profiles.
- Partner App Subscription User
- Partner Community Login User
- Partner Community User
- Click Next.
- Ensure that the Apply one layout to all profiles radio button is selected.
- From the Select Page Layout list, select Account Layout.
- Click Save.
Edit the Industry picklist values to include only Consulting and Education.
- In the Action column, click Edit next to the Industry field.
- In the Selected Values list, hold down Shift and select the first value and the last value. This will select all values in the list.
- Hold down Ctrl/Command and click Consulting and Education to deselect them.
- Click the Remove arrow, so that Consulting and Education are the only Selected Values remaining.
- Click Save.
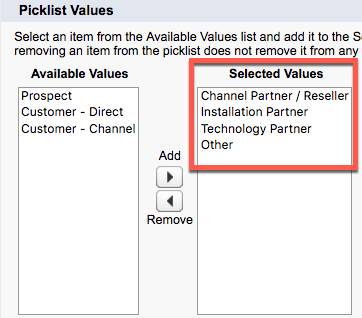
Edit the Type picklist values to include only Channel Partner/Reseller, Installation Partner, Technology Partner, and Other.
- In the Action column, click Edit next to the Type field, and then edit the picklist values.
- In the Selected Values list, hold down Ctrl/Command and select Prospect, Customer - Direct, and Customer - Channel.
- Click Remove.
- Click Save.

You’ve taken care of some of Noah’s concerns by creating record types. Move on to the next step where you work on those custom record pages he asked for.