Create a Marker Layer for Sales Teams
Get Started with the Marker Layer Builder
In the previous step, you created a folder to store marker layers for your sales team. In this unit, you create a marker layer showing all accounts with open opportunities.
- Markers will be displayed on the map as different colors based on industry.
- Visible account fields include: Account Name, Phone Number, Website, and Annual Revenue.
- Visible opportunity fields include: Name, Stage, and Close Date.
Select the Layer Type
Before you create a marker layer, you must select a folder to store it in. You are creating a marker layer for the sales team, so select the Sales Team subfolder you created in the previous unit.
- Click the Sales Team subfolder.
- Click
.
- Select Marker Layer.
- Select the Account (Billing) base object.
- Click Continue.
Create a Marker Layer
It’s time to create the Marker Layer and add the required filters.
- For Marker Layer Name, enter
Accounts with Open Opportunities. - For Description enter
View all accounts with open opportunities. - Select Filter By Owner & Scope.
- Select All Accounts.

Now, let’s add filters for the opportunity object.
- Select Cross Object Filters.
- Select Add cross object filter.
- Leave “with” in the first selection box.
- Search for and select Opportunity from the object search bar.
- Select Add Filter.
- For Name, select Stage.
- Select not equal to.
- Select Closed Won and Closed Lost from the list.

Customize Visible Fields
You’ve added all of the required filters, now it’s time to add the visible field requirements. When the marker layer is plotted, users can select pins on the map to view the following account fields: Account Name, Phone Number, Website, and Annual Revenue.
- Select the Tooltips tab.
- For Tooltip 1, select Account Name.
- For Tooltip 2, select Account Phone.
- For Tooltip 3, select Website.
- For Tooltip 4, select Annual Revenue.
Users can also view the following opportunity fields: Name, Stage, and Close Date.
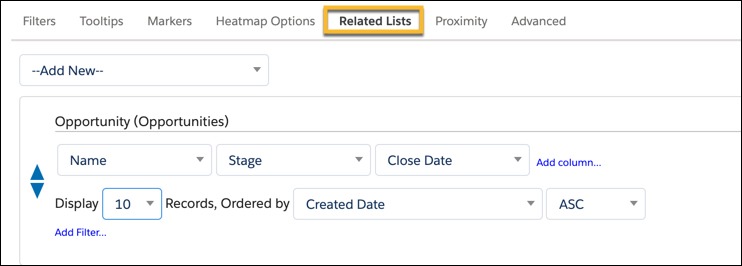
- Select the Related Lists tab.
- In the Add New search bar, select Opportunity.
- In the first column, select Name.
- Click Add column, select Stage.
- Click Add column, select Close Date.
- Change the Display to 10 records. Leave the other default fields so users will be able to see opportunities fields for up to 10 opportunity records, ordered by Created Date in Ascending order.
Finally, users will view records as different colors on the map based in the account industry field.
- Select the Markers tab.
- For Assignment Type, select Dynamic, Field.
- For Field, select Industry.
- Select Colors next to Dynamically Assign.
- Select Save and Plot.
Summary
And just like that, you’ve created a marker layer for your sales team. Now, users with access can plot the marker layer to geographically visualize their Salesforce data and make decisions based on geography, such as creating an optimized route and schedule. Complete the Salesforce Maps User Experience badge to learn more.
Resources
- Salesforce Help: Create a Maps Marker Layer
- Salesforce Help: Open List View on Maps Mobile
- Salesforce Help: Marker Layer Options