Design Common Workflows
Learning Objectives
After completing this unit, you’ll be able to:
- Design a workflow that tracks product feedback.
- Explain workflow best practices.
Design a Workflow
Let’s dive into how to build a workflow from scratch.
You’re a product manager, and you’re constantly receiving customer feedback on the product you work on. This information is coming from different sources—customer support, sales, marketing, engineering, and so on—delivered in inconsistent formats—Slack DMs, Slack channel messages, Jira links, and so on—and in varying levels of detail. Sometimes it’s way too much information; other times it’s barely any information, so you have to ask time-consuming follow-up questions.
Set Up a Product Feedback Workflow
This is the perfect opportunity to standardize product feedback collection with Workflow Builder. Let’s get started.
- First, create a dedicated channel for collecting feedback. Perhaps you already have a feedback channel, or maybe you want to create one that’s specific to the product you’re working on, for example
#feedback-product-name. If you really want to keep the conversation in the channel streamlined and focused, you could make it a read-only channel with instructions for people to submit feedback through your workflow. - Then, click on your workspace name.
- Select Tools | Workflow Builder.
- Then, click Create.
- Give your workflow a name, like
Submit product feedback, and click Next. - Choose a trigger. Remember, this is how your workflow will kick off. In this case, the easiest initiation point is through the shortcuts menu, so click Select next to the Shortcut option.

- You’re prompted to configure your shortcut.
- Search for and select your channel in the Which channel? field.
- Give your shortcut a name. This is what your users see and select in the shortcut menu. It can be the same as your workflow name. Just ensure it's descriptive and straightforward. In the example below, it's Submit product feedback.
- Click Next.

Send a Form
Now that your trigger is set up, let’s add a sequence of steps to your workflow. When it comes to feedback, it’s best to set some parameters for the kind of feedback you want to collect. Prompt users to fill out a form with mandatory fields.
- In Workflow Builder, click Add Step.
- Find Send a form and click Add next to it.
- Give the form a title and build out the questions you’d like answered. You can select from different answer types—Short answer, Long answer, Select from a list, Select a person, or Select a channel or DM. You can also make certain fields mandatory or optional.
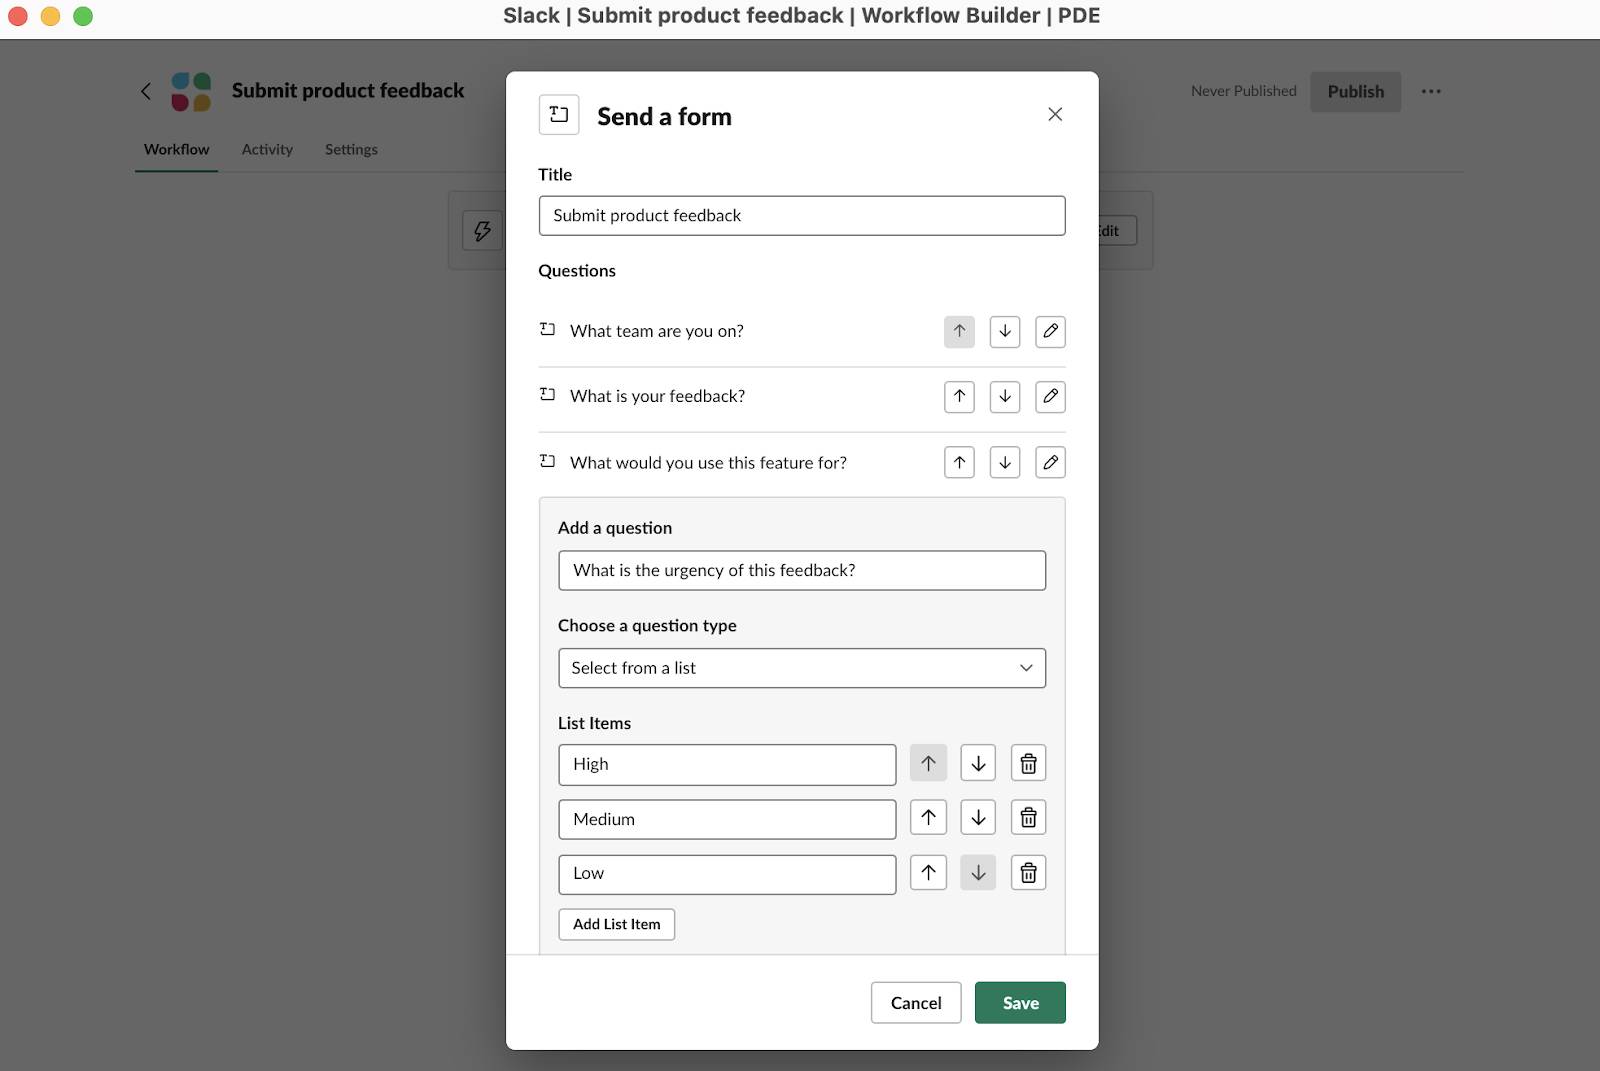
- It’s best to share feedback in-channel for others to read. So ensure Send submitted responses to a channel or to someone in a DM is selected.
- Then, select Channel where workflow started.
- Click Save.
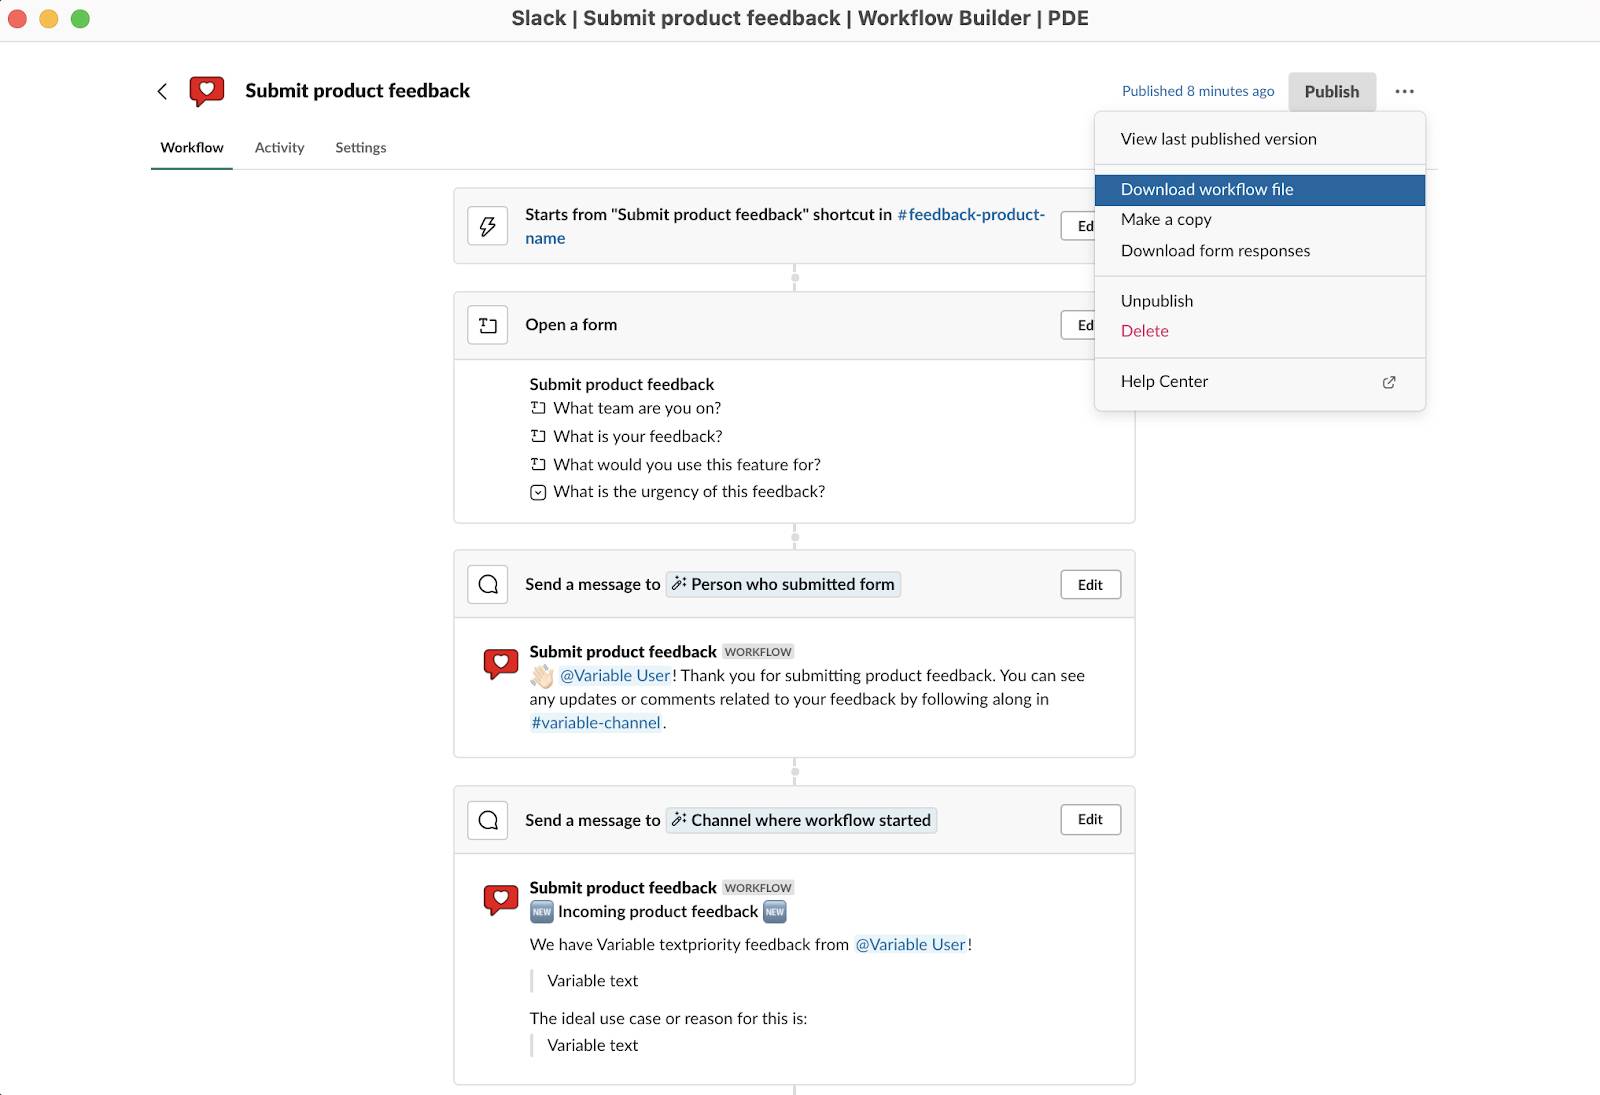
Notice you’ve included the variable, Channel where workflow started. In the next step of your workflow, you get more experience with variable data in messages.
Add a Step with Variable Data
Another best practice in the feedback process is to privately send the submitter a confirmation message. This is where variable data comes heavily into play.
- Click Add Step in your workflow.
- Find Send a message and click Add next to it.
- Send message to: Person who submitted form
- Message text:
- Enter
Hello - Then click Insert a variable
- Select Person who submitted form
- Then continue the message:
! Thank you for submitting product feedback. You can see any updates or comments related to your feedback by following along in - Again click Insert a variable
- Select Channel where workflow started
- Enter
- The Send a message configuration gives you a preview of how the message will appear with placeholders for the variable data. Go ahead and click Save.

Go further by adding a message to the channel announcing new feedback. You can follow the steps above to craft a message. When you insert a variable, notice you can incorporate specific answers to the form. In the example below, the message calls out the feedback’s urgency, the general feedback, as well as the use case or reasoning—all variables from the form.

Your workflow doesn’t have to stop there. If you really want to get fancy, you can also send this information into Google Sheets for easier tracking and analysis, or to PagerDuty to spin up a new incident, or to Trello to create a new card on your product feedback board. This ensures your workflow is tailored to your specific processes and technology.
Once you’re satisfied with your workflow, simply click Publish.
Personalize Your Workflow
To make your workflow more personalized and user-friendly, change its icon, so when it posts in channel, your workflow has its own custom avatar. This is done with simple clicks. Click the workflow icon | click Choose file … | select your desired image saved to your machine. Your custom icon needs to be 128px or larger, preferably a square.

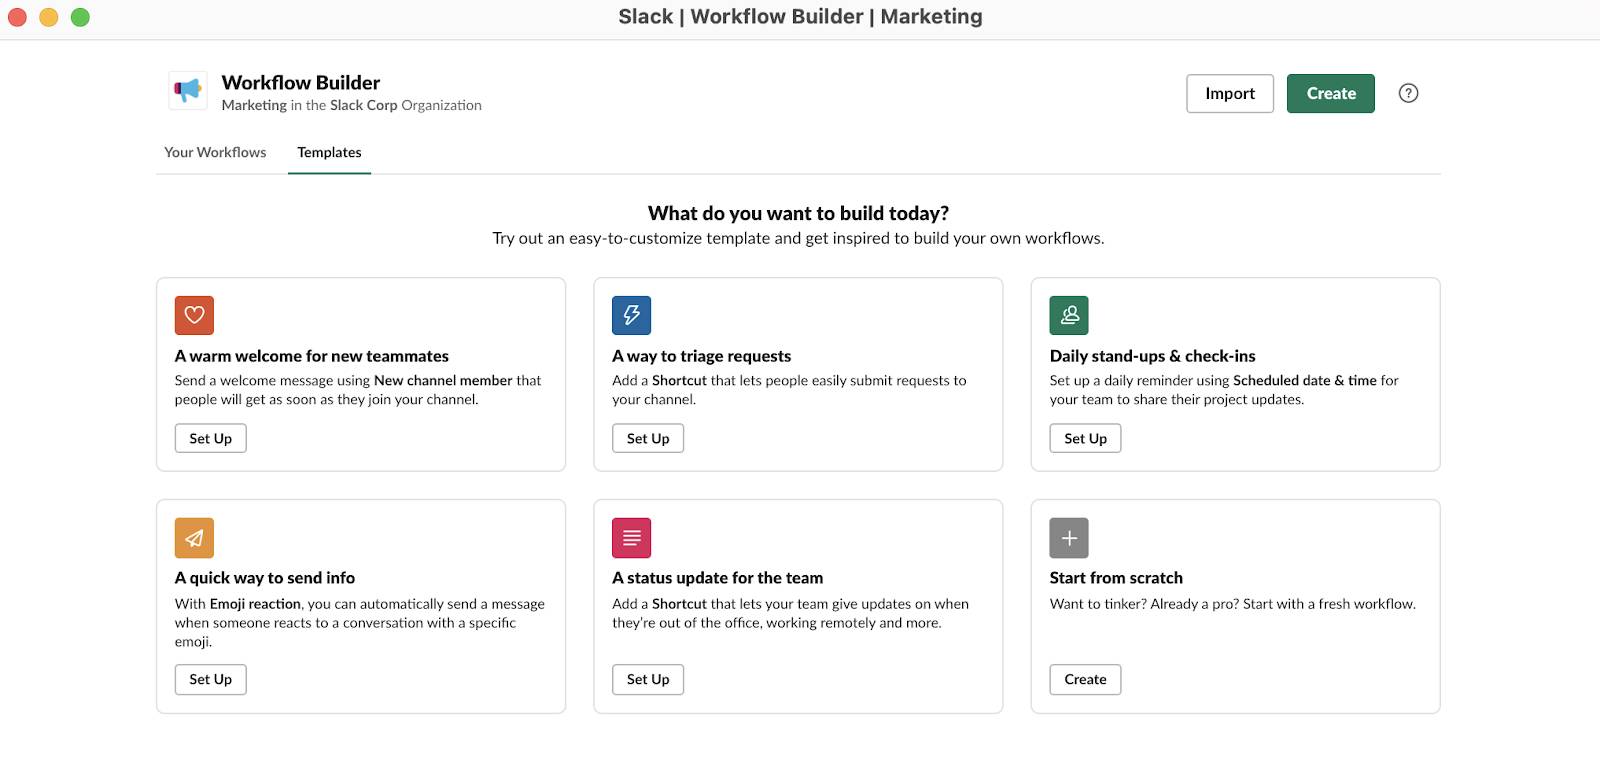
Use Workflow Templates and Existing Workflows
If starting from scratch feels too time-consuming, you can get started more quickly by visiting the template library in Workflow Builder. Pick a template, customize it in your own Slack workspace, then publish to the channel of your choice.
Templates include the following.
- A warm welcome for new teammates
- A way to triage requests
- Daily standups and check-ins
- A quick way to send info
- A status update for the team
Maybe you’ve seen someone else’s workflow that you’d like to replicate. Simply ask them to share their workflow file (from the workflow, click the menu icon | then, click Download workflow file). You can upload their file to Workflow Builder, edit it for your own purposes, and publish it to a different channel.
Tips for Building Great Workflows
Everyone’s workflows are unique, and so are their best practices. Here are a few tips and tricks to get you started.
Create a personal test channel. Test your workflows before installing it in an official channel. This way, you can ensure the workflow behaves as expected.
Customize with a unique avatar. This gives your workflow personality and flair for users. You can do this by going into the settings tab of your individual workflow, editing the icon, and uploading any image you’d like.
Use variable data. Personalize messages or information sent to other tools and services by pulling from data collected by your workflow, like the name of the person who triggered the workflow, or their specific form responses.
Add confirmation messages. Let your workflow users know that their form has been submitted, share a copy of their responses, and tell them what to expect next. Never keep your users guessing!
Connect your existing tools to Workflow Builder. Consider how different tools intersect within your daily tasks and repeatable processes, then automate that work.
Sum It Up
Automating repetitive tasks and tedious information gathering can go a long way to ensure your teams are productive. In this module, you learned the essentials of Slack Workflow Builder and how you can streamline work in channels. Kick off automation with triggers and customize actions with workflow steps. And follow the best practices listed above to get the most out of your workflows.
Want to Learn More?
If you’re ready to take your Workflow Builder skills to the next level, check out the Automate business processes with Workflow Builder badge on the Slack Certified site. Whether you’re building Slack experiences at your company, consulting on Slack implementations or developing Slack apps, more careers than ever are built on Slack.
The Slack Certified program helps you build the knowledge, skills and mindsets to be successful in:
- Tailoring Slack’s features and settings for your organization
- Building apps and experiences on Slack’s Platform
- Guiding organizations to use Slack more productively
Once you’re certified, you’ll be able to show off your credentials to the broader community of professionals building on Slack.