Prepare to Build a Second-Generation Managed Package
Learning Objectives
After completing this unit, you’ll be able to:
- List the Salesforce DX tools needed to create a package.
- Explain the role of Dev Hub.
Setting Up Your Development Environment
In this unit, we explore the key tools and concepts that get you ready to build your first managed 2GP.
Here are the key tools you use in managed 2GP.
- Salesforce CLI, a rich set of commands to execute different packaging operations like package creation and package install
- A source control system of your choosing
- A Dev Hub org
-
Salesforce Extension for Visual Studio Code (optional), an IDE designed to facilitate the development of Salesforce components
Use these tools for both managed 2GP package development and any other Salesforce DX development.
Managed 2GP tool setup isn’t needed for completing this module. But if you’re eager to get started, see Before You Create Second-Generation Managed Packages in the Second-Generation Managed Packaging Developer Guide for step-by-step instructions on setting up your development environment.
Use the Dev Hub to Keep Track of Package Development
As you start to work through the Salesforce development lifecycle, you’ll want to keep track of the packages you’ve created, the namespaces you used, and the scratch orgs in which development happens. And, you guessed it, the Dev Hub Org is the place to do just that.
Your Developer Hub, or Dev Hub, is the designated place to find and manage all your managed 2GP packages, scratch orgs, and namespaces. After you enable the Dev Hub setting on a Salesforce org, that org becomes your Dev Hub org. And that Dev Hub becomes the owner of every managed 2GP package you create.
All Salesforce ISV and OEM partners should designate their Partner Business Org as their Dev Hub org. A Partner Business Org (PBO) is the production org where Salesforce Partners run their business.
Configure Your Managed 2GP Package
To understand the elements of package configuration, let’s look at Get Cloudy’s Expense Manager package.
Here’s the project directory for Get Cloudy’s Expense Manager package.
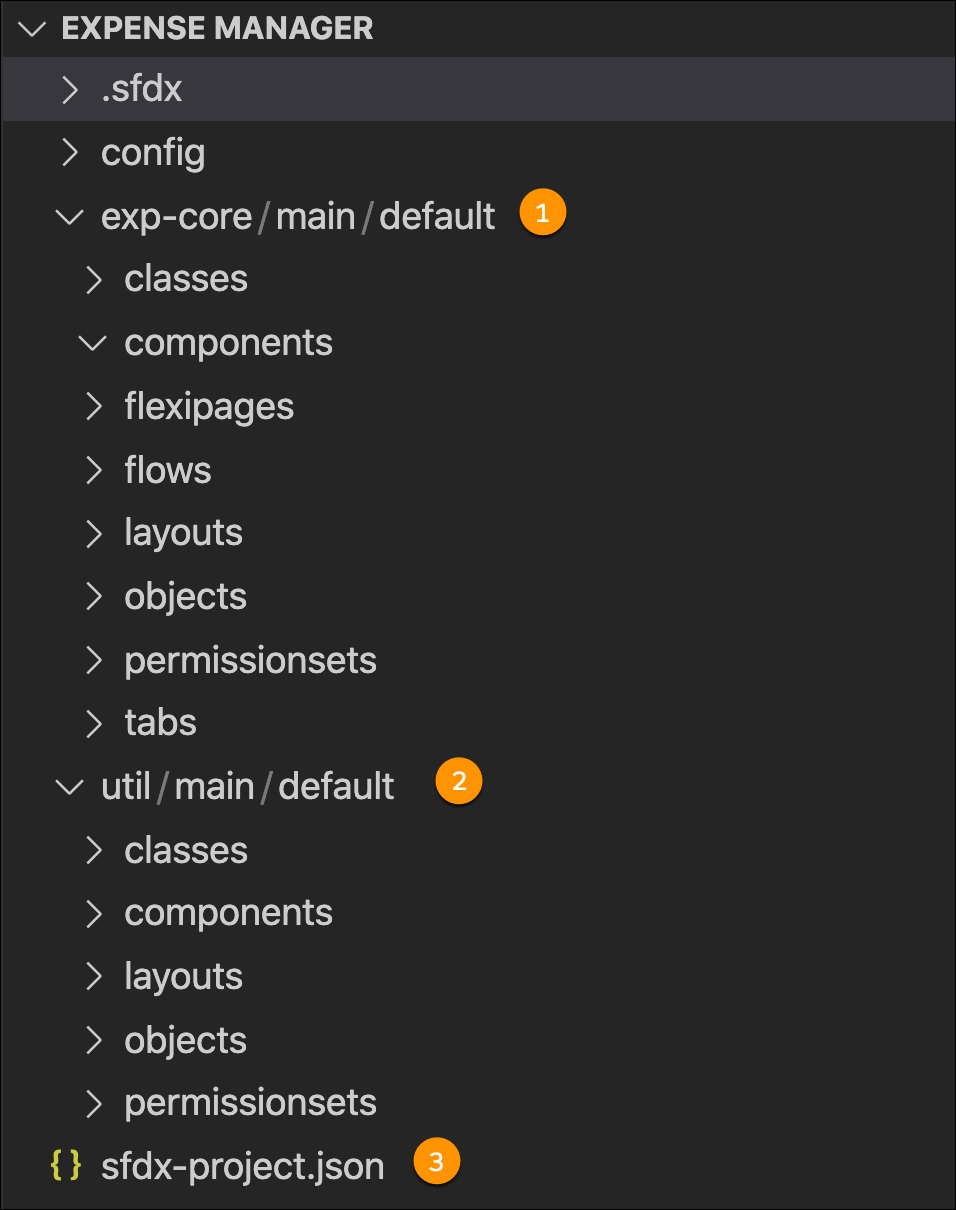
Get Cloudy’s package starts with an outer Salesforce project directory, and within it, it has two package directories, exp-core (1) and util (2). The Salesforce DX project is the container for development, and one or more packages live in a project directory.
The settings in the sfdx-project.json (3) project file describe the configuration for each package in their project directory.
Understand the Project Configuration File
Here's the sfdx-project.json file for the Expense Manager package. This project configuration file specifies that the package namespace is exp-mgr (1), and the API version is 47 (2).
This project has two package directories—Expense Manager - Util (3) and Expense Manager (4). Each package directory specifies the path, version name, description, and definition file for that package.
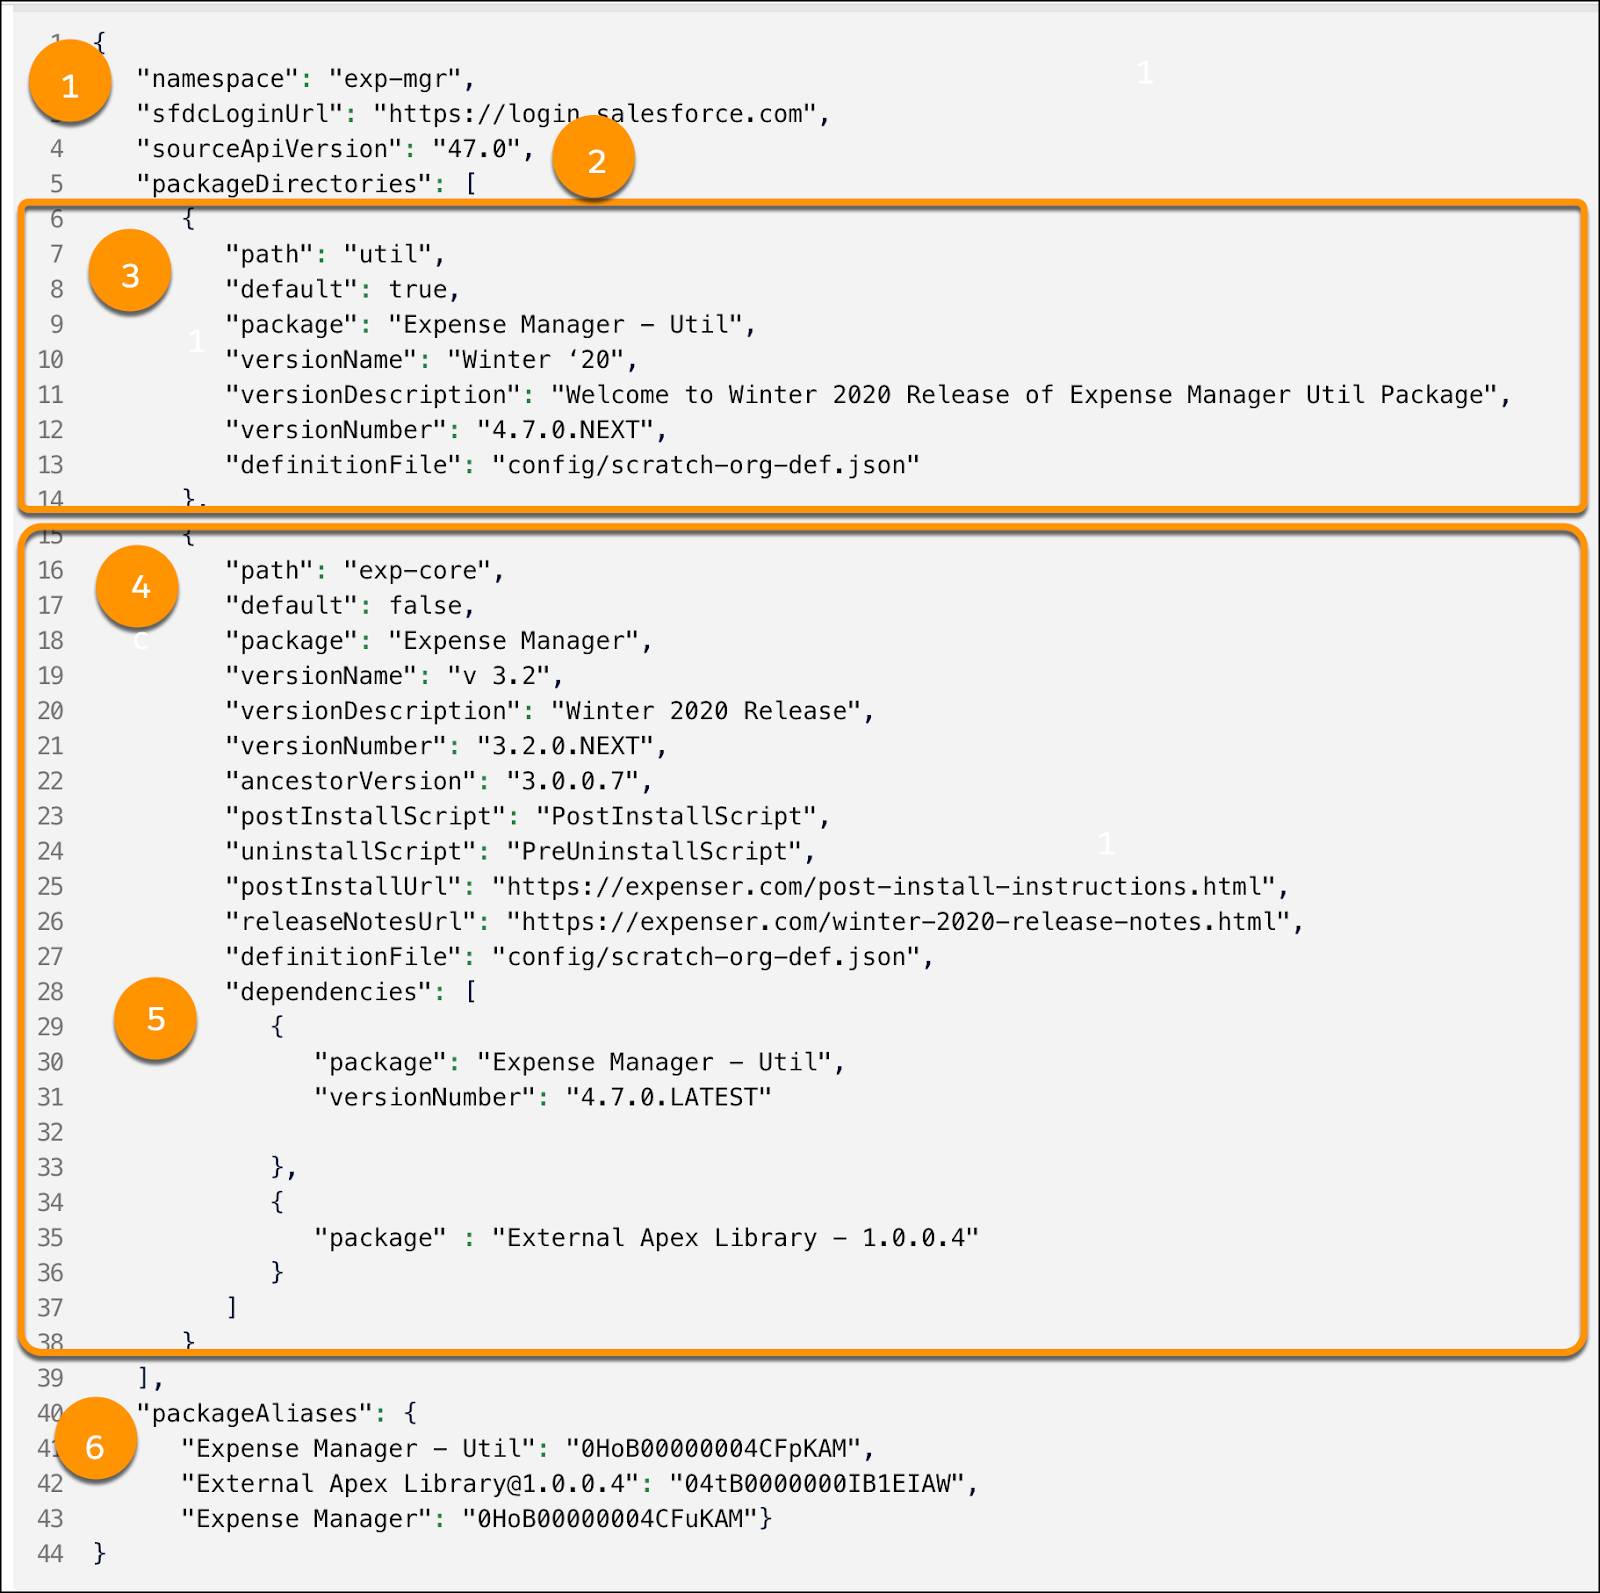
The Expense Manager package lists two package dependencies (5), a package called Expense Manager - Util that Get Cloudy created, and that’s also associated with the exp-mgr namespace, and an external package called External Apex Library.
Let’s pause to note that this explicit declaration of dependencies in the sfdx-project.json file is one of the key benefits of managed 2GP. So you and any developer working on your app can see every managed 1GP or managed 2GP that your package depends on. This makes development and management of multiple, modular packages a straightforward exercise.
The package aliases section (6) maps user-friendly strings (aliases) to package IDs. This makes the rest of the sfdx-project.json file easy to read by using descriptive package alias names instead of long and cryptic package ID numbers.
As you design your package, keep in mind that each AppExchange listing maps to a single package. So if you develop modular packages, then communicate with your subscriber about how to install dependent packages, including the order they must be installed. And stay tuned, we’re working on a feature that will bundle the installation of associated packages.
Understand Version Numbering in Managed 2GP
Let’s look closer at the version numbers for the two packages in this project file, 4.7.0.NEXT and 3.2.0.NEXT. Package version numbers follow this pattern.
Major version |
Minor version |
Patch version |
Build number |
|---|---|---|---|
4 |
7 |
0 |
NEXT |
The version numbering format for managed 2GP is similar to the semantic versioning format. You increment the major version when introducing major changes, the minor version number when making incremental improvements, then you use a patch version for bug fixes. It’s up to you to determine what qualifies as major vs minor updates.
In the example the build number isn’t explicitly set. Instead they used the keyword, NEXT, which automatically increments the value of the package build.
When you look at the version number listed in the package dependencies section, you see another keyword being used in the version number 4.7.0.LATEST.
"dependencies": [
{
"package": "Expense Manager - Util",
"versionNumber": "4.7.0.LATEST"
}
]
By using the keyword LATEST, the developers at Get Cloudy indicate that they want to use the latest package version of their Expense Manager - Util package. That makes it easy to iterate on package development, without stopping to manually increment the version number listed in their sfdx-project.json file. Instead, the package automatically references the latest version of the utility package.
There’s a third keyword available for use, and that’s RELEASED. Use this keyword in scenarios where you want to depend on the latest, released version of a package. Only use keywords if both the package you’re creating and the package dependency are owned by the same Dev Hub.
The project configuration file makes it easy to visualize and explicitly declare package dependencies. For details on the other parameters specified in a project file, see Project Configuration File for Packages in the Second-Generation Managed Packaging Developer Guide.
Now that you’re familiar with the tools and foundation for creating a managed 2GP, let’s look at the package development workflow.
Resources
-
Second-Generation Managed Packaging Developer Guide: Keywords
-
Second-Generation Managed Packaging Developer Guide: Project Configuration File for Packages