Enter Donations in Salesforce
Learning Objectives
After completing this unit, you’ll be able to:
- Use Nonprofit Success Pack (NPSP) Gift Entry to enter a single gift.
- Batch one-time transactions in Gift Entry.
- Manage recurring donations using Salesforce and Elevate.
Your Salesforce Org: A Gift Processing Machine
Once you get rolling with Elevate, most of your gifts might come from a Giving Page. The data is then imported to Salesforce and Nonprofit Success Pack (NPSP) to automatically create new opportunities, payments, and recurring donation records.
But when your donor calls, sends a check through the mail, or provides their credit card number, you can enter and process their gift directly in Salesforce using NPSP.
In this unit we’ll walk you through how to enter single payments, batch many one-time payments using Gift Entry, and create and manage recurring donations all from the comfort of your Salesforce org.

Process Single Payments
If you need to enter a single, one-time donation by credit card or Automated Clearing House (ACH) bank transfer you can use Gift Entry in NPSP.
Here’s how.
- In Salesforce, click the App Launcher (
 ) and find and select Gift Entry.
- Click New Single Gift.
- Enter your donation details.
- Select the appropriate Payment Method, either ACH or Credit Card. We’ll select Credit Card in this example.
- The Salesforce.org Elevate payment element (also called the field bundle) automatically updates with fields for either ACH or Credit Card payment information. We’ll fill in the credit card information.

- Click Save.
The payment is processed in Elevate and sent to your payment processor through the payment gateway. When the transaction is completed, the donation and payment details are recorded in both Elevate and Salesforce.
ACH transactions might take several days to process. You can track their status on the Elevate Admin Console’s Payments Management page before the transaction appears in Salesforce.
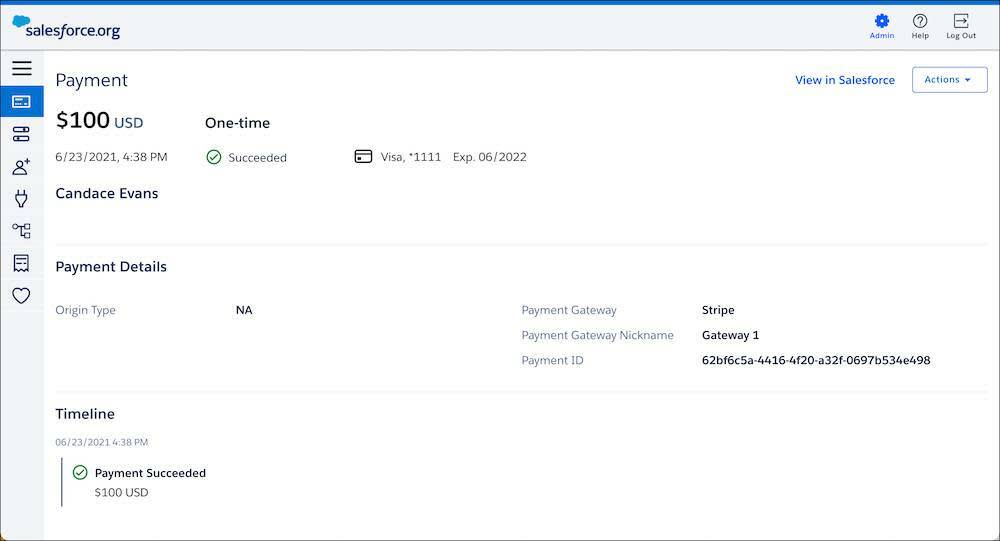 If a donor wants a refund for their donation or they ask for another receipt, you’ll go to the Elevate Admin Console, which gives you the tools to provide both.
- To refund a payment, click Actions then Refund.
- To resend a receipt, click Actions then Resend Receipt, or navigate to the Receipt section and click Resend Receipt. (If receipts aren’t enabled you won’t see these options.)

Batch One-Time Transactions
If you have a bunch of gifts to process all at once—like when you process direct mail responses—you can process credit card transactions in batches using Gift Entry.
Here’s how:
- Click the App Launcher (
 ) then find and select Gift Entry.
- Click New Batch.

- Select a template, and click Next.
- Enter a Batch Name along with any other batch details, and click Next.
- Set any field defaults if needed. For example, you may want to set a default primary campaign source or payment method. When you’re done, click Save.

- Enter the donation details.
- Select Credit Card as the Payment Method if you haven’t set it as default.
- Enter the card details in the Salesforce.org Elevate payment element.
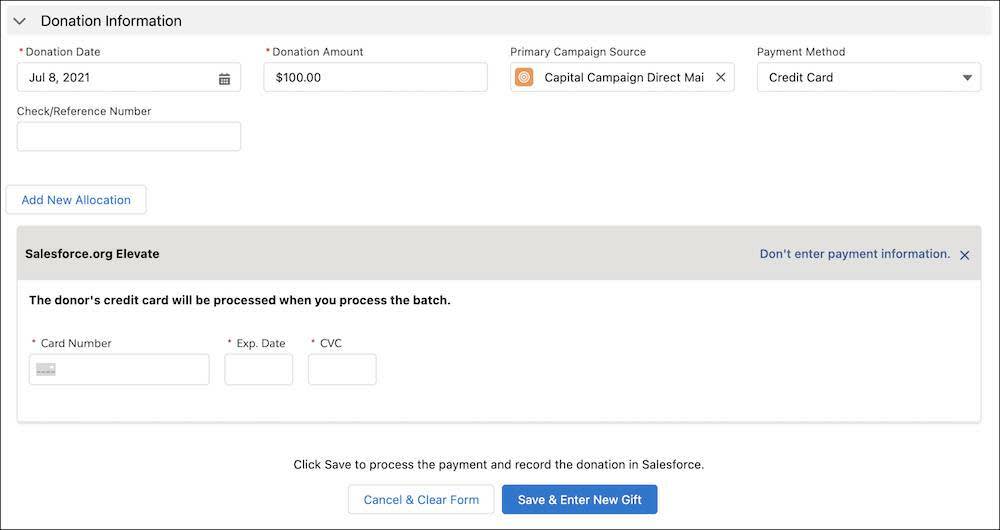
- Click Save & Enter New Gift. Once you click Save, Elevate authorizes the gift for processing for 72 hours. If you don’t complete the batch before that authorization expires, you’ll need to reenter the payment details. Check the Manage One-Time Donations in NPSP documentation in Resources for more information.
- Continue entering gifts as needed.
- After you’ve entered all of the gifts for the batch, click Process Batch & Payments.
It may take some time for Elevate to process all of the credit cards and add the completed transactions to Salesforce, but it’s safe to close the batch and check back later.
When the batch finishes processing, review the gifts in the batch table in Salesforce to confirm the payments were processed and records were created. In the batch table, successfully processed gifts have the Elevate Payment Status of Succeeded and a Status of Imported.

Manage Recurring Donations
Donors can create recurring donations by selecting the weekly, monthly, quarterly, or yearly donation options on a Giving Page. When they complete the transaction, your payment processor authorizes the payment and Elevate creates the associated recurring donation, opportunity, and payment records in Salesforce.

You can also create a recurring credit card or ACH donation directly in Salesforce.
- Click the App Launcher (
 ), then find and select Recurring Donations.
- Click New.
- Fill in the details as you would with any recurring donation.
- Select the Payment Method, either Credit Card or ACH. We’ll select Credit Card here. The Salesforce.org Elevate payment element appears.
- Enter your donor’s payment information.

- Click Save.
Whether a recurring donation was entered through a Giving Page or by your staff directly into Salesforce, you can update its payment information from the recurring donation record on Salesforce.
Go to the recurring donation record, click Edit, scroll down to the Salesforce.org Elevate payment element and click Update Payment Information, then enter and save your changes.

Now that you understand how to manage payments when they’re in Elevate and Salesforce, let’s check out the way they might arrive most often: through Elevate Giving Pages.
Resources
-
Salesforce Help: Manage One-Time Donations in NPSP
-
Salesforce Help: Manage Recurring Donations in NPSP
-
Salesforce Help: Manage Payments and Recurring Donations
-
Salesforce Help: Configure Receipt and Alert Settings
-
Trailhead: Donation Management Basics with Nonprofit Success Pack