Manage Your Picklist Values
Learning Objectives
After completing this unit, you’ll be able to:
- Manage values for picklists.
- Use formulas to define picklist values dynamically.
- Explain what happens to existing data as you change picklist values.
Good Value Management Matters
Are you still thinking about cookies from that last challenge? There are so many flavors of cookies in the world. If you’re running a cookie company, you want to standardize your flavor names. Are your cinnamon cookies called “snickerdoodles”? Once you pick the name, you want to make sure your orders, and other records, always use the same name.
We show you how to get smart about how you set the values for picklists. Good picklist value management saves you time and helps keep the data in your org consistent.
Where You Set Picklist Values
Picklists are fields associated with individual objects. You set and manage picklists in the same place you add or manage other fields: an object’s Fields & Relationships page. When you created your picklist in the last unit, you set its initial values. Let’s go back and look at a Fields & Relationships page.
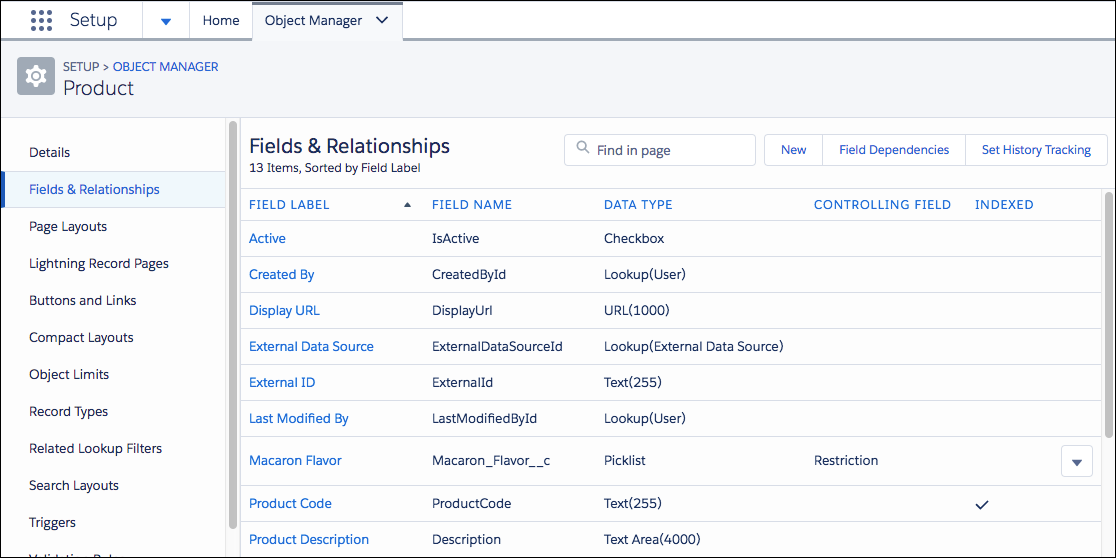
What does “Indexed” mean? The page of Fields & Relationships identifies some fields, including some picklists, as indexed and you’re probably wondering what that means. An indexed field is stored in the database in a way that supports quick retrieval. This optimizes report generation, list views, and other requests…sometimes. What makes a good index candidate is pretty advanced. Salesforce automatically analyzes performance and periodically assigns fields to be indexed. You don’t have to think about this while you’re creating picklists, but it can be important later if you’re trying to optimize report or org performance.
Manage Picklist Values
Time to start tinkering with the values.
- In Setup, click the Object Manager tab, and then select the object associated with your picklist field.
- Click Fields & Relationships.
- Click the picklist’s Field Label to see the field’s detail page. You see your values in the Values related list.

You have a few options on this page.

-
New: Create a new value.
-
Reorder: Rearrange the existing values.
-
Replace: Replace an existing value. You can replace an existing value with a new value, one of the other values, or a blank value. If you replace an existing value with a blank value, existing records will not display the value anymore.
-
Printable View: See all of your values at once. This is a helpful view while you set up a dependent picklist.
-
Chart Colors: Customize the appearance of values on charts and reports.
Active, Inactive, Deleted, and Replaced Values
In the Values related list on the detail page, you can edit, delete, or deactivate individual values. You can probably guess the difference between an active value and an inactive one. Active values appear as an option in a picklist. Inactive values don’t, but they’re not entirely removed from your org.
When is this helpful? Think about your delicious pumpkin cookies. They aren’t popular in summer, so you set that value to inactive all summer. In the fall, customers want pumpkin-flavored everything, so you start making pumpkin cookies and set the value to active, again.
But sometimes you really no longer need a value. You tried selling spinach cookies. Surprisingly, these were not a hit with your customers, so you delete that value.
Here’s some important things to know about inactive values.
- Existing records containing a value when you set it to Inactive continue to contain the value.
- You can reactivate inactive values. This makes it a good alternative to deleting a value entirely.
- There is a limit on total combined active and inactive values. See Picklist Limitations. If you hit these limits and need more, you need to delete some values.
Here’s some important things to know about deleting or replacing values.
- Decide whether to replace the value or leave it blank. If you replace it with a blank value, existing records will not display the value anymore. To keep the value on existing records, use Deactivate, instead of Del.
- Deleting a value in a picklist goes to the background jobs queue. When the job completes, your picklist is updated and you’re notified by email.
- If you replace a parent value in a controlling picklist, the picklist dependency on that value is lost. After replacing the parent value, re-create the dependency using the new parent value.
- To replace a value, create the new value first. Then click Replace to start the process.
Edit Picklist Values
Let’s look at the Values related list.

On the field’s detail page, click Edit to see more options for a single value.

And you can adjust these settings.
-
Label: This is what appears in the UI.
-
API Name: This identifies the value for use in formulas and programming references. Typically, once set, this value shouldn’t change. Otherwise, references to the value can break.
-
Default: Make this value the default for the master picklist.
-
Chart Color: This setting determines how this value appears in reports and dashboards. If not selected, the color is assigned dynamically.
Why a Picklist Value’s API Name Is Important
It’s easy to overlook the API name because it’s auto-populated when you create the field. But this value is incredibly powerful. The API name is a unique identifier for a value, even when the label changes.
Since the Spring ’17 release, picklist values are assigned an API name, which is a reference to the value, as well as a label, which is what shows in the UI. The API name allows formulas and custom apps to refer to a picklist value, even if the field name changes.
Imagine writing a formula, or customizing an app that refers to a picklist label value (as admins and devs had to do before Spring ’17). Then the picklist value changes, and now the formula or reference to that value is no longer valid. Change happens. But, references to the API name continue to be valid, no matter the label value. And you can prevent the API name from changing to ensure references to the field’s value won’t become invalid, later.
Controlling Fields, Dependent Picklists, and Narrowing Values
As we discussed in the previous unit, dependent picklist fields narrow the available values based on a selection in a controlling field. For example, the user selects “nut free” in a controlling field, and only cookie flavors that don’t have nuts show in the dependent picklist field.
The controlling field doesn’t have to be a picklist. It can also be a checkbox.

To set a dependent picklist field:
- From the management settings for the object you want to add a field to, click Fields & Relationships.
- Click Field Dependencies.
- Click New.
- Choose a controlling field and dependent field.
- Click Continue.
- Use the field dependency matrix to specify which dependent picklist values are available when a user selects each controlling field value.
- Optionally, click Preview to test your selections.
- Click Save.
Here’s some things to consider.
- Custom picklist fields can be either controlling or dependent fields.
- Standard picklist fields can be controlling fields, but not dependent fields.
- Multi-select picklist fields can be dependent, but not controlling fields.
- You can set default values for controlling fields but not for dependent picklists.
- If your org uses record types, choose a record type to test how it affects your controlling and dependent picklist values. The record type and the controlling field together determine what values are available in the dependent picklist. For example, a dependent value is only available if it’s available in the selected record type and the selected controlling value.
Use Formulas for Default Picklist Values
Now that you’ve got the basics, let’s assign a dynamic default value. This means, based on certain conditions and values from other fields, the picklist’s default value changes. Setting the right default can speed data entry.
For example, you can change the default value for a field based on the profile of the person viewing the field. Or if a customer’s total cookie purchases are above a certain number, their frequent customer status changes.
- In Setup, click the Object Manager tab, and then select the object associated with your picklist field.
- Click Fields & Relationships.
- Click Edit next to the picklist field.

- Add your formula under General Options. This formula sets the default value of the Macaron Flavor field based on the current month. For example, if it's November (11), then the default flavor is Pumpkin. If the current month isn't in the list, then the formula sets the flavor to Vanilla.

- Click Save.
It’s super helpful to click Show Formula Editor so you have more space.
More importantly, the Formula Editor lets you check your syntax and gives you picklists (Yay picklists!) to suggest fields, operators, and functions for your formula.
Change the Field Type to Allow/Prevent Multi-Selection
With all the options for picklist fields, rest assured you can change the field type when necessary. For example, if you have a custom picklist field and decide you want to make it a multi-select picklist, you can do that.
- In Setup, click the Object Manager tab, and then select the object associated with your picklist field.
- Click Fields & Relationships.
- Click Edit next to the picklist field.
- Select Change Field Type.

And vice-versa. You can convert a multi-select picklist to a custom picklist that doesn’t allow multi-selection by changing the field type.
You can see that you have a lot of flexibility managing picklist values, and even the type of picklist to use. You can start with one type of picklist and switch to another, or change the behavior of the values in a picklist. It helps that you don’t have to have it all figured out in advance. Change the picklist properties to meet your needs. In the next unit, you learn to share picklist values with more than one picklist.
Resources
- Developers' Blog: Keeping Picklist Integrations Safe by Using API Names
- Developers' Blog: Know Thy Salesforce Field Indexes for Fast Reports, List Views, and SOQL
- Salesforce Help: Change the Data Type of a Custom Field
- Salesforce Help: Define a Dependent Picklist
- Salesforce Help: Tips for Working with Picklist and Multi-Select Picklist Formula Fields