Develop and Test Changes Locally
Learning Objectives
After completing this unit, you’ll be able to:
- Create a branch and commit changes to a source control repository.
- Authorize a sandbox using Salesforce Extensions for VS Code.
- Retrieve changes from a sandbox.
Set Up a Code Repository
The Zephyrus Relocation Services development team hosts their code and reviews their work in GitHub. They commit changes to the source repository to identify and merge any customization conflicts before they continue.

Create the Source Control Repository
The repository is where Juan organizes the source files for the development project. Juan then creates a Salesforce DX project and adds it to the repo.
Name the repo something descriptive to reflect its purpose. Because this in an internal development project, Juan creates a private repository using Zephyrus’s enterprise account called language-courses.
Create a Salesforce DX Project
- Open VS Code.
- From the menu, select View | Command Palette.
- In the command palette search box, enter
sfdx project. - Select SFDX: Create Project with Manifest.
- Use the same name as your GitHub repo,
language-courses, then click Enter. - Click Create Project.
Add Project Files to the Repo in GitHub
- In VS Code, open the DX project directory, then click the
 Source Control icon.
 - Click Initialize Repository.
- Hover over Changes, then click the + to stage all changes.
- Accept the default branch in which to commit the repo, such as main.
- Enter a commit message, then click the
 Commit icon.
 - Click Publish Branch.
- Confirm where you want to publish it.
Create Customizations for New Requirements
Calvin has met with the Sales team to gather new requirements for the next release. The Sales team wants to be notified when a language course is added or changed, and they want to know who is teaching each course.
Juan thinks this request is a great way for the team to get comfortable with the org development model. Although it can handle far more complex development scenarios, this simple set of steps can help the team understand the model workflow.
Ella’s assignment is to create a custom object for language course instructor and to link it to the course record. Juan creates a trigger that sends a notification email to the Sales team alias. These are the steps:
Clone the Repo
First, Ella clones the GitHub repo and creates her own branch.
- Go to the repo you want to clone, for example,
https://github.com/zephyrus/language-courses.
This repo doesn’t exist. It’s meant for illustrative purposes only. If you plan to follow along, substitute the sample repo you created in these steps. Also, you’ll be simulating the work of two developer personas, Juan and Ella. We suggest creating two separate parent directories to keep their development work separate. For example, if you’re doing Ella’s development work, you clone the repo in anorg-dev-ellafolder. When you’re doing Juan’s development work, you clone the repo in anorg-dev-juanfolder.- Click Clone or download.
- Copy the HTTPS URL.
- From the command palette in VS Code, select Git: Clone.
- In Repository URL, paste the URL to the repo, then click Enter. Ella clones the repo that Juan created:
https://github.com/zephyrus/language-courses.git. - On your local file system, navigate to the place you want to put the GitHub repo, then click Select Repository Location.
- Click Open Repository.
- From the command palette, select Git: Create Branch.
- Enter your branch name. Ella calls her branch
ella-custom-object. Now she’s working in her own branch.
Authorize and Log In to the Sandbox
Next, Ella authorizes (logs in) to her Developer sandbox using VS Code.
- From the command palette search box, enter
sfdx authorize. - Select SFDX: Authorize an Org.
- Select Sandbox for the login URL.
- Enter an alias for the sandbox—for example,
dev_sandbox. - Log in with the sandbox username and password.
Create the Custom Objects
Then, Ella creates the Language Course and Language Instructor custom objects in her Developer sandbox.
- From Setup, click the Object Manager tab.
- Click Create | Custom Object in the top-right corner.
- For Label, enter
Language Course Instructor. Notice that the Object Name and Record Name fields auto-fill. - For Plural Label, enter
Language Course Instructors. - Check the box for Launch New Custom Tab Wizard, then click Save.
- Select your desired tab style (Ella chooses Presenter), and click Next until you can save the object.
Define the Custom Field
Next, Ella defines the custom object field on the Language Course object that references the Language Course Instructor object.
- From Setup, go to Object Manager | Language Course.
- Click Fields & Relationships. Notice that some fields are already there, including a name field.
- Click New.
- For data type, select Master-Detail Relationship, then click Next.
- From Related To, select Language Course Instructor, then click Next.
- Fill out the following:
- Field Label: Course Instructor
- Description: Teacher for the language course
- Click Next until you can save the field.
Track the Changes in a Change List
Ella creates a change list for the project to capture her changes.
| Metadata Type | Object | Change Type (Create, Update, Delete) | Details |
|---|---|---|---|
| CustomObject | Language_Course_Instructor__c | Create | Object to capture the name of the person teaching the course |
| CustomField | Course_Instructor__c | Create | Master-detail relationship with Language_Course__c custom object |
Retrieve the Changes from the Developer Sandbox
Ella retrieves the changes from the sandbox to her local DX project. Because Ella tracks her changes along the way, she knows what to retrieve from her Developer sandbox.
Because Ella retrieves only a few components from her sandbox, she decides to use the Terminal in VS Code to run the Salesforce CLI project retrieve start command. Based on the default directory specified in the DX project, the CLI places the source in the force-app folder. Because you can’t add an empty folder in GitHub, Ella creates the force-app folder in the DX project on her local file system.
- In the DX project on the local file system, create a
force-appfolder. - In the VS Code Terminal, run the CLI command to retrieve the new custom object and custom field:
sf project retrieve start --metadata CustomObject:Language_Course_Instructor__c --metadata CustomField:Language_Course__c.Course_Instructor__c
Ella uses--metadatainstead of--source-dirbecause--source-dircan retrieve only files that already exist on the file system. The custom object appears in theforce-app/main/default/objectsdirectory.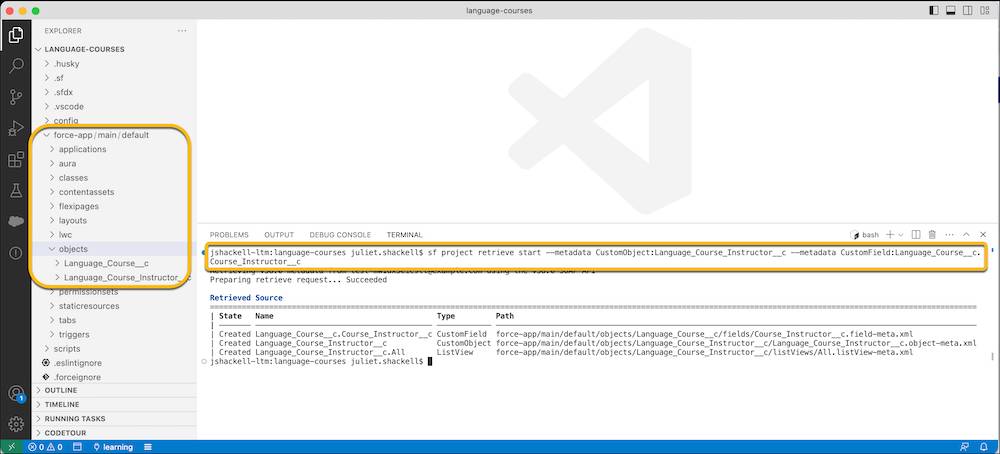
Commit the Changes to the Source Control Repository
Ella commits her changes to the repo, then creates a pull request to inform Juan that her changes are ready to review.
- In VS Code, select the
 Source Control icon.
 - Enter a commit comment, then click the
 Commit icon.
 - Click Yes to add and commit the files.
- From the VS Code command palette, select Git: Push To.
- Select the origin repository.
Review the Code
- Create a pull request. In the GitHub repo, click Compare & pull request.
- Assign reviewers. Ella assigns Juan to review and approve her changes.
- Enter a comment for your reviewers.
- Click Create pull request.
After Juan reviews and approves the code, Ella merges the pull request. Juan knows that he can begin his trigger work.
Create the Trigger
The trigger notifies the Sales team when a course is updated or a new course is added. A trigger is a piece of Apex code that executes before or after records of a particular type are inserted, updated, or deleted from the Lightning Platform database.
Juan clones the GitHub repo that contains the new custom object, creating his own branch. Juan creates his trigger and its corresponding test in VS Code.
Deploy the Project Repo to the Developer Sandbox
First, Juan deploys Ella’s changes to his Developer sandbox so that both their environments are in sync.
- Clone the GitHub repo.
- In VS Code, select Git: Create Branch, then provide a name for the branch. Juan names his branch
juan_apex_trigger. - Select SFDX: Authorize an Org.
- Select Sandbox for the login URL (test.salesforce.com).
- Enter an alias for the sandbox—for example,
dev_sandbox. - Log in with the sandbox username and password.
- Deploy Ella’s changes to his developer sandbox. Right-click the objects folder, then select SFDX: Deploy Source to Org. Alternatively, Juan can run the Salesforce CLI command in the Terminal.
sf project deploy start --metadata CustomObject:Language_Course_Instructor__c --metadata CustomField:Language_Course__c.Course_Instructor__c
Develop the Trigger
- In the
juan_apex_triggerbranch in VS Code, create the directory to put the trigger.- Expand the
force-appfolder. - Right click default, then select New Folder.
- Enter
triggers.
- Expand the
- Right-click the triggers folder, then click SFDX: Create Apex Trigger.
- Enter
LanguageCourseTriggerfor the trigger name. Enter the code for the trigger:trigger LanguageCourseTrigger on Language_Course__c (after insert, after update, after delete) { // <write your own notification code> } - Save the file.
- Create a test for the trigger called TestLanguageCourseTrigger. As a seasoned developer, Juan makes sure that code coverage requirements are met.
Deploy the Changes to the Developer Sandbox
Juan deploys the trigger to validate and compile it, and then tests that it’s working correctly with the new object.
- In the VS Code Terminal, right-click the
triggersfolder, then select SFDX: Deploy Source to Org. Alternatively, Juan can run the CLI command from the Terminal.sf project deploy start --source-dir force-app/main/default/triggers

- Juan verifies that he captured all the changes and they work in the sandbox.
- Juan adds his changes to the change list.
| Metadata Type | Object | Change Type (Create, Update, Delete) | Details |
|---|---|---|---|
| CustomObject | Language_Course_Instructor__c | Create | Object to capture who is teaching the course |
| CustomField | Course_Instructor__c |
Create | Master-detail relationship with Language_Course__c custom object |
| ApexTrigger | LanguageCourseTrigger | Create | Emails Sales team when Language_Course__c object is created, updated, or deleted |
| ApexClass | TestLanguageCourseTrigger | Create | Apex test coverage for the trigger |
Commit the Changes to the Source Control Repository
Juan commits his changes to the repo, then creates a pull request. Ella performs the code review.
Plan the Next Release
Juan and Ella follow the same process for future customizations. If they develop customizations in VS Code, such as Juan’s trigger work, they deploy them to their Developer sandboxes for validation and testing.
They use Setup for everything else, so they can take advantage of builders and wizards and declarative interfaces. And then they retrieve those changes from the sandbox to their local file systems. They commit their changes to source control, create a pull request, and request a code review before merging their changes to the master branch.