Dig into the Omniscript Designer
Learning Objectives
After completing this unit, you’ll be able to:
- Explain how to build Omniscripts with the LWC Omniscript Designer in Omnistudio for Managed Packages.
- Describe features and panels of the Omniscript Designer.
Build an Omniscript with Clicks, Not Code
The LWC Omniscript Designer in Omnistudio for Managed Packages helps you create the structure of an Omniscript using clicks, not code. It has a drag-and-drop interface with what-you-see-is-what-you-get (WYSIWYG) editing.
With it, you can:
- Preview elements inside steps.
- View property changes live.
- Access contextual guidance with in-product help.
More specifically, as you build the Omniscript, you’re able to:
- Add actions that extract or save data or send an email.
- Add input fields to enter data such as a user’s name, address, and other information.
- Configure calculations and messages that provide immediate feedback and error checking to the user.
- Create a function, such as a formula for performing a calculation within the Omniscript.
- Create branches that dynamically adjust the controls and turn on or disable steps depending on choices the user makes in the guided process.
- Group items together by creating a step or displaying a list of items for the customer to select from.
- Refine the display by using a headline or text block.
You access the Omniscript Designer by opening an Omniscript via the Omnistudio app (formerly called Vlocity Digital Studio).
The Omniscript Designer helps you do all sorts of great things—quickly. Let’s find out exactly how.
The Designer’s Fantastic and Fast Features
With Omniscript Designer’s features, you can:
- Build your Omniscripts on a wide and adjustable canvas, and instantly view changes made to element properties.
- Search for and drag elements onto the canvas from the Build panel.
- Reposition, clone, and adjust the width of elements with a 12-column snap-to-grid.
- Configure elements from the Properties panel.
- Configure script-wide settings from the Setup panel.
- Access inactive elements and navigate between them in high-level and detailed views from the navigation panel.
- Preview, test, and debug your script in Preview.
- View contextual in-product help to discover and learn about elements and properties without leaving your script.
Let’s take a closer look at the Omniscript Designer in Omnistudio for Managed Packages.
Header and Navigation Panel
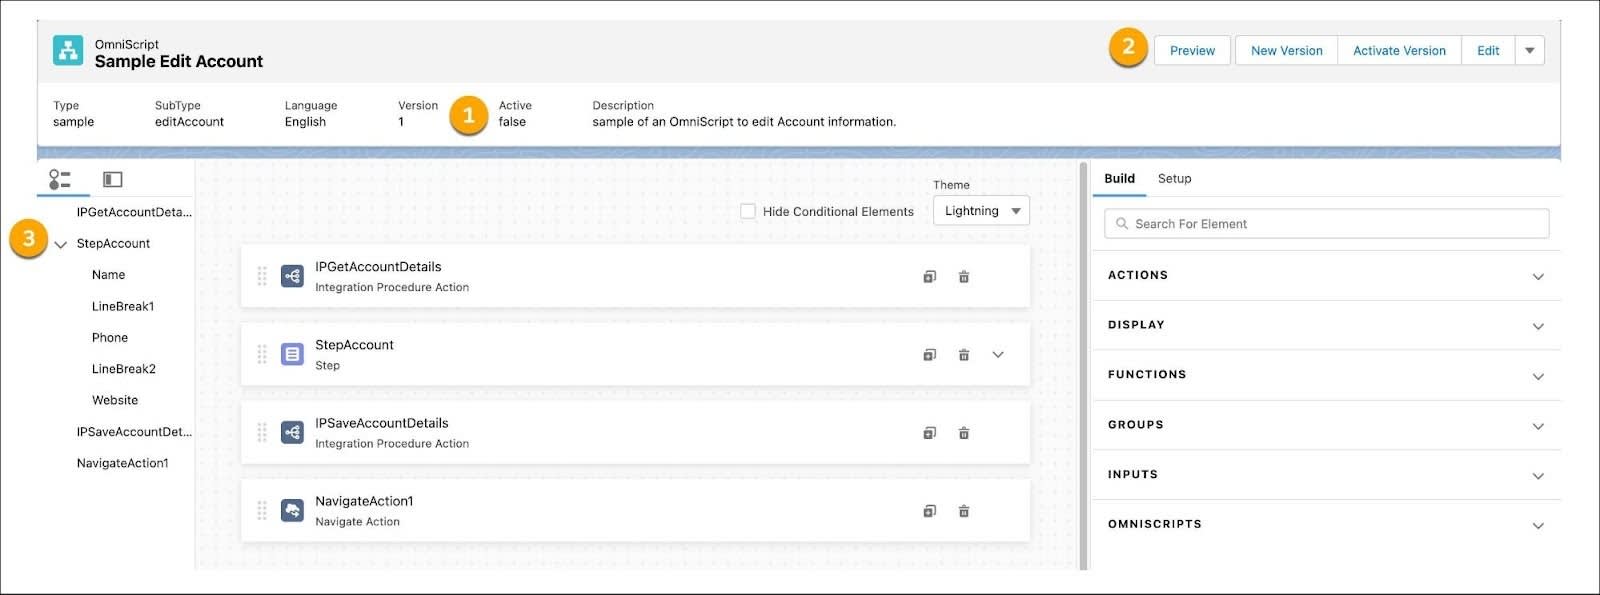
In the header (1), you:
- Perform actions related to your script using the navigation bar.
- View high-level metadata about your Omniscript, such as Type, SubType, Version, Language, and Activation status.
In the actions navigation bar (2) in the header, you:
- Toggle between Design and Preview views.
- Create a New Version, and Activate or Deactivate the current Version.
- Edit basic settings.
- Download your Omniscript.
- Get launch instructions.
In the navigation panel (3), you:
- Access and navigate between active and inactive actions, steps, and step elements.
- Use the Slide View tab for a high-level view of the structure of large and complex scripts. Select a slide to open the Properties panel for a step or action.
- Use the Tree View tab for a detailed view of the script's structure. Select a branch to open the Properties panel for a step, element, or action. Use the Tree View to access inactive steps or elements.
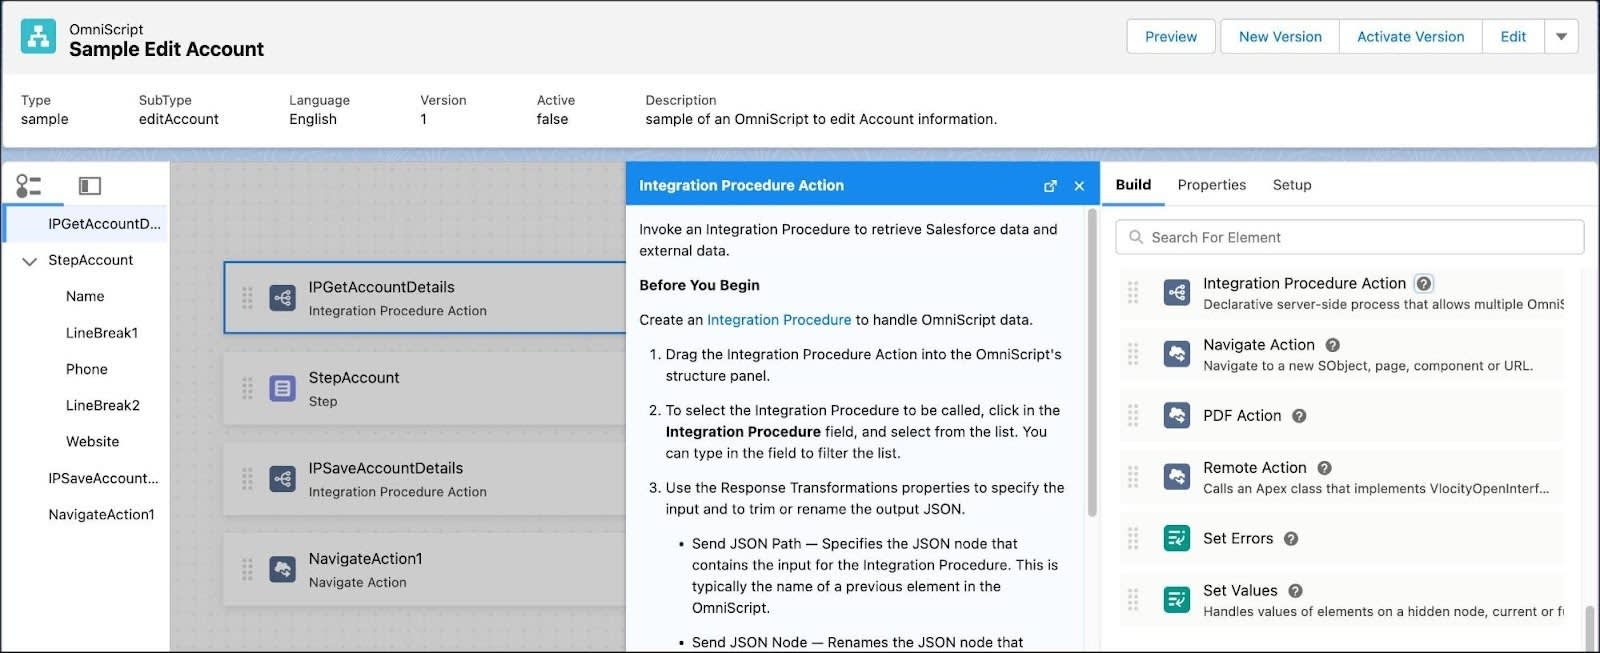
Canvas and Build Panel

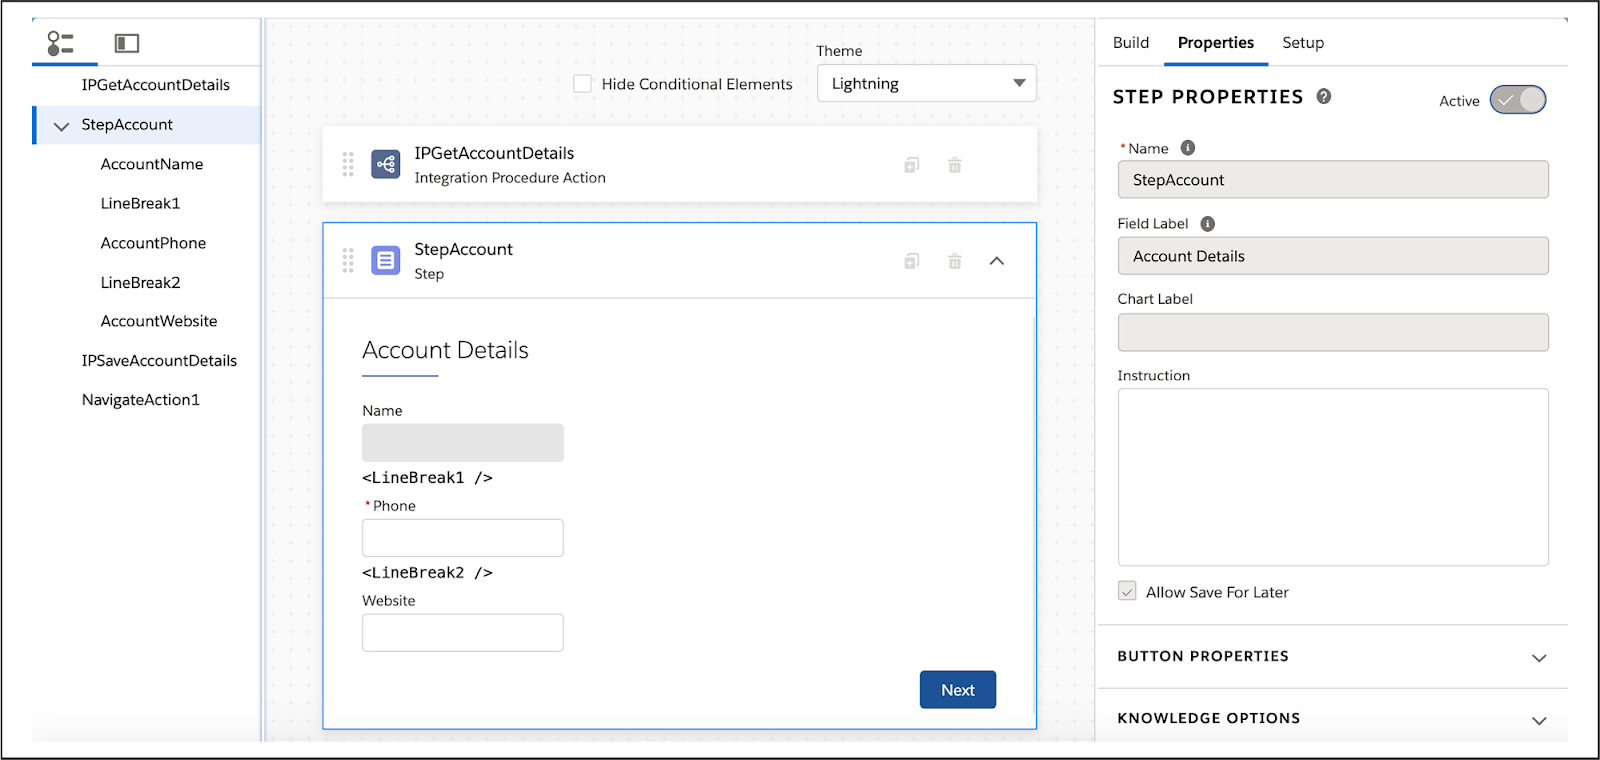
Build your scripts by dragging elements from the Build panel (1) onto the canvas (2).
- Rearrange, clone, and delete elements as needed.
- Adjust the width of the canvas from either side.
- Expand steps (3) to preview and configure elements within them. Adjust the width of elements on a 12-column grid, and drag elements next to each other so that they automatically take up the remaining width of the grid.
- See how your scripts look with a Newport or Lightning theme (4) without switching to Preview.
Properties Panel
Configure properties for action, display, function, group, input, and embeddable Omniscript elements in the user interface (UI), or edit properties as JavaScript Object Notation (JSON).
Setup Panel
Configure optional script-wide settings in the Setup panel.

Configure basic settings: Step Chart Options, Save Options, Knowledge Options, Error Messages, Messaging Framework, and Lightning Design System Tokens in the UI, or edit properties as JSON.
Preview Options
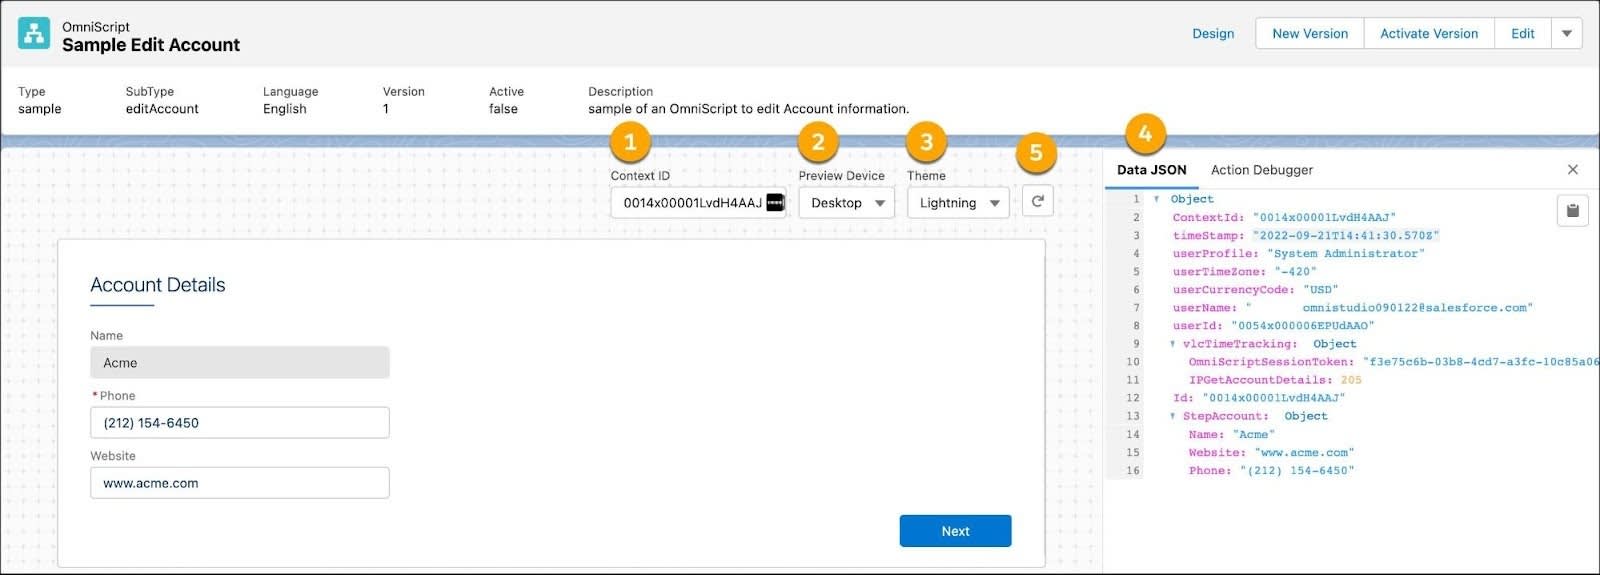
- Preview your script in real time by entering a RecordId into the Context ID field (1) and refreshing to preview your form with live data. If you're using stub data, test data will preview automatically.
- Preview how an Omniscript appears on different devices, such as mobile, desktop, and tablet, with the Preview Device dropdown (2).
- With the Theme dropdown (3), see how your Omniscript looks with a Lightning or Newport theme. If a custom Newport stylesheet is in the org, it overrides the out-of-the-box Newport stylesheet.
Data JSON
- The Data JSON (4) provides an easy-to-read JSON format, which updates when you enter values in data fields on the canvas. Copy the entire JSON with just one click if needed.
- Reset Data (5) to reload the canvas and update the Data JSON and the Action Debugger.
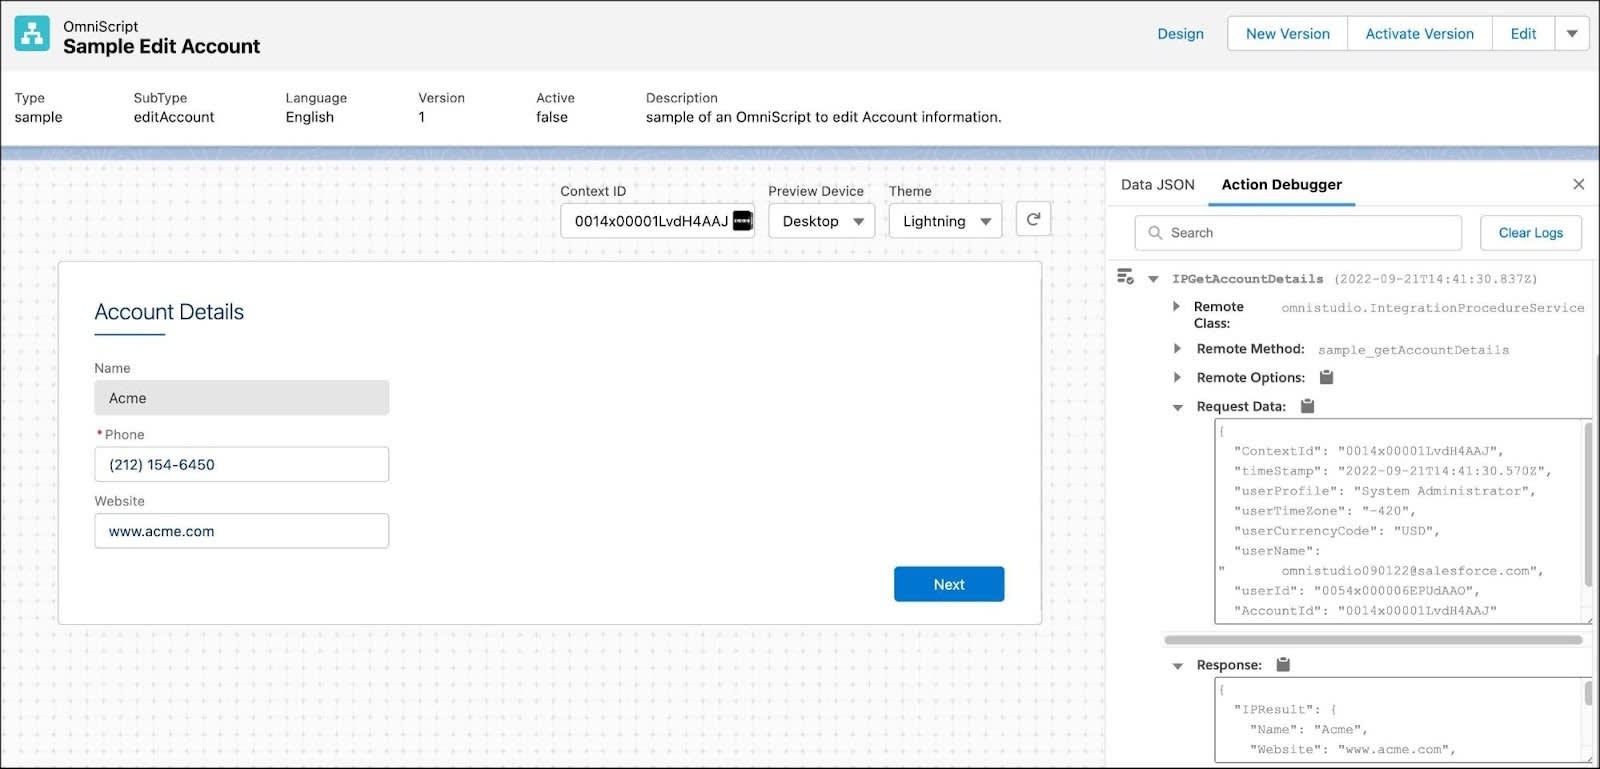
Action Debugger
The Action Debugger lets you debug action requests and response data. Search for actions, copy specific nodes in one click, and clear the logs.
In-Product Help
In the Build, Properties, and Setup panels, use the in-product help feature to view contextual information and instruction about elements and properties without leaving your script.
- Access in-line information about properties with tooltips.
- View detailed documentation about element functionality with slide-out help panels.
Now that you’ve learned the basics of the Omniscript Designer, you’re ready to start designing! That’s coming up in the next unit, so keep on reading.