Configure a Simple Omniscript
Learning Objectives
After completing this unit, you’ll be able to:
- Explain what makes an Omniscript unique.
- Add a Step with Inputs to an Omniscript in Omnistudio for Managed Packages.
- Configure element properties.
- Describe how data flows into and out of an Omniscript.
- Configure Omniscript Action elements.

What Makes an Omniscript Unique?
An Omniscript’s Type, Subtype, and Language gives an Omniscript its unique identity.
Only one active Omniscript may have the same Type, SubType, and Language at any time. Though not required, we recommend you start an Omniscript’s Type with a lowercase letter.
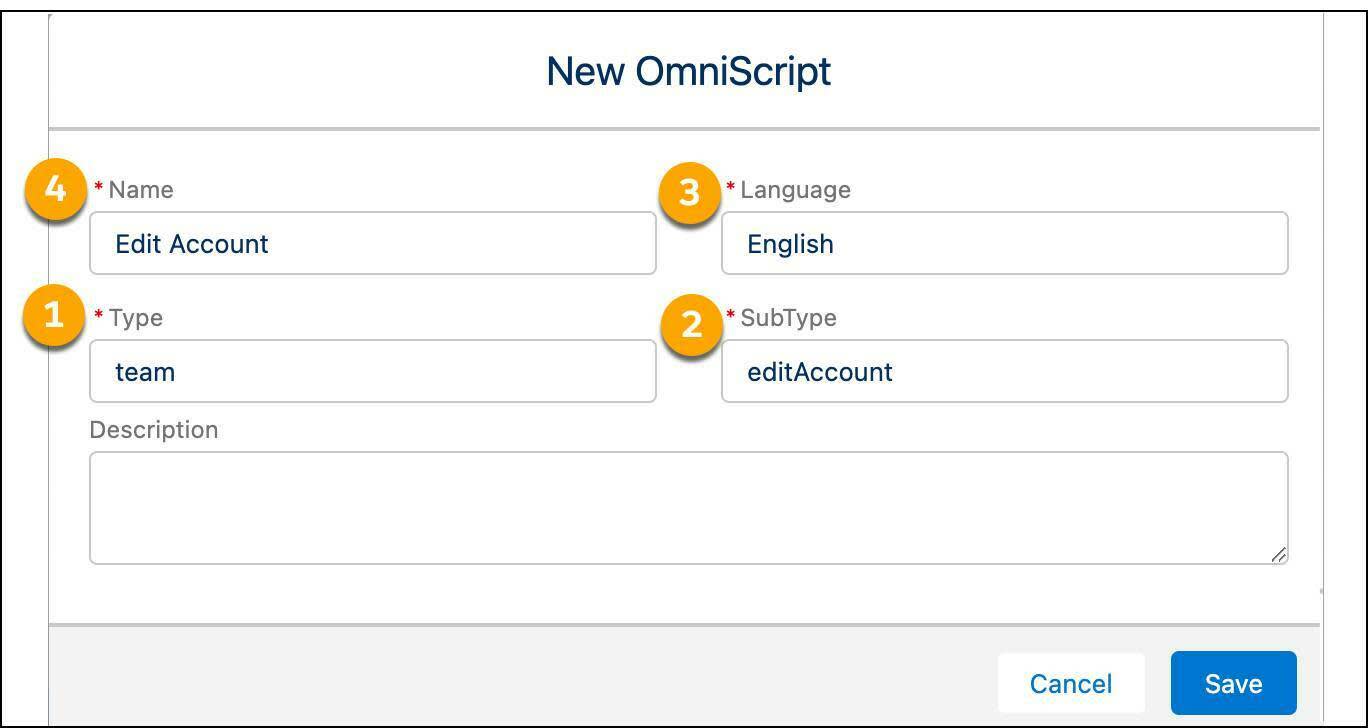
In this example, the Omniscript’s Type is team (1), its SubType is editAccount (2), and its Language is English (3). An Omniscript’s Name doesn't need to be unique in your org. Here, the Omniscript’s Name is Edit Account (4).
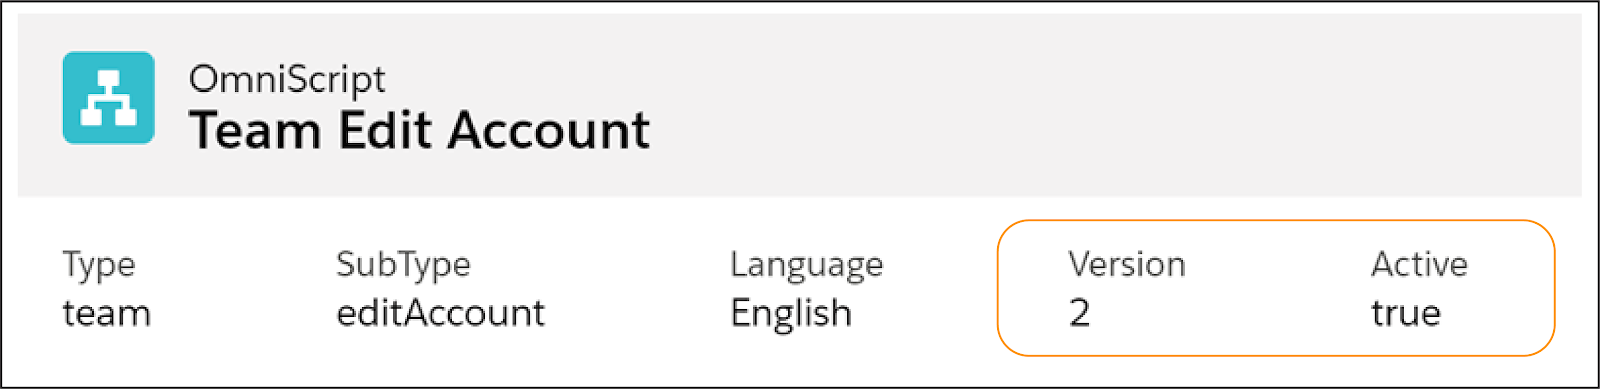
Only one version of an Omniscript can be active at a time. To make a change to an active Omniscript, create a new version. The version of the Omniscript already active and in production remains in place while you work on the new version.
In this example, Version 2 of the Team Edit Account Omniscript is active. The information is displayed in the Omniscript Header.
Add an Omniscript Step and Inputs
Steps are how you organize a page. After you create your Omniscript, you then configure the Step.
How do you add a Step with Inputs to an Omniscript? Start by looking at the Edit Account Omniscript from the last unit.
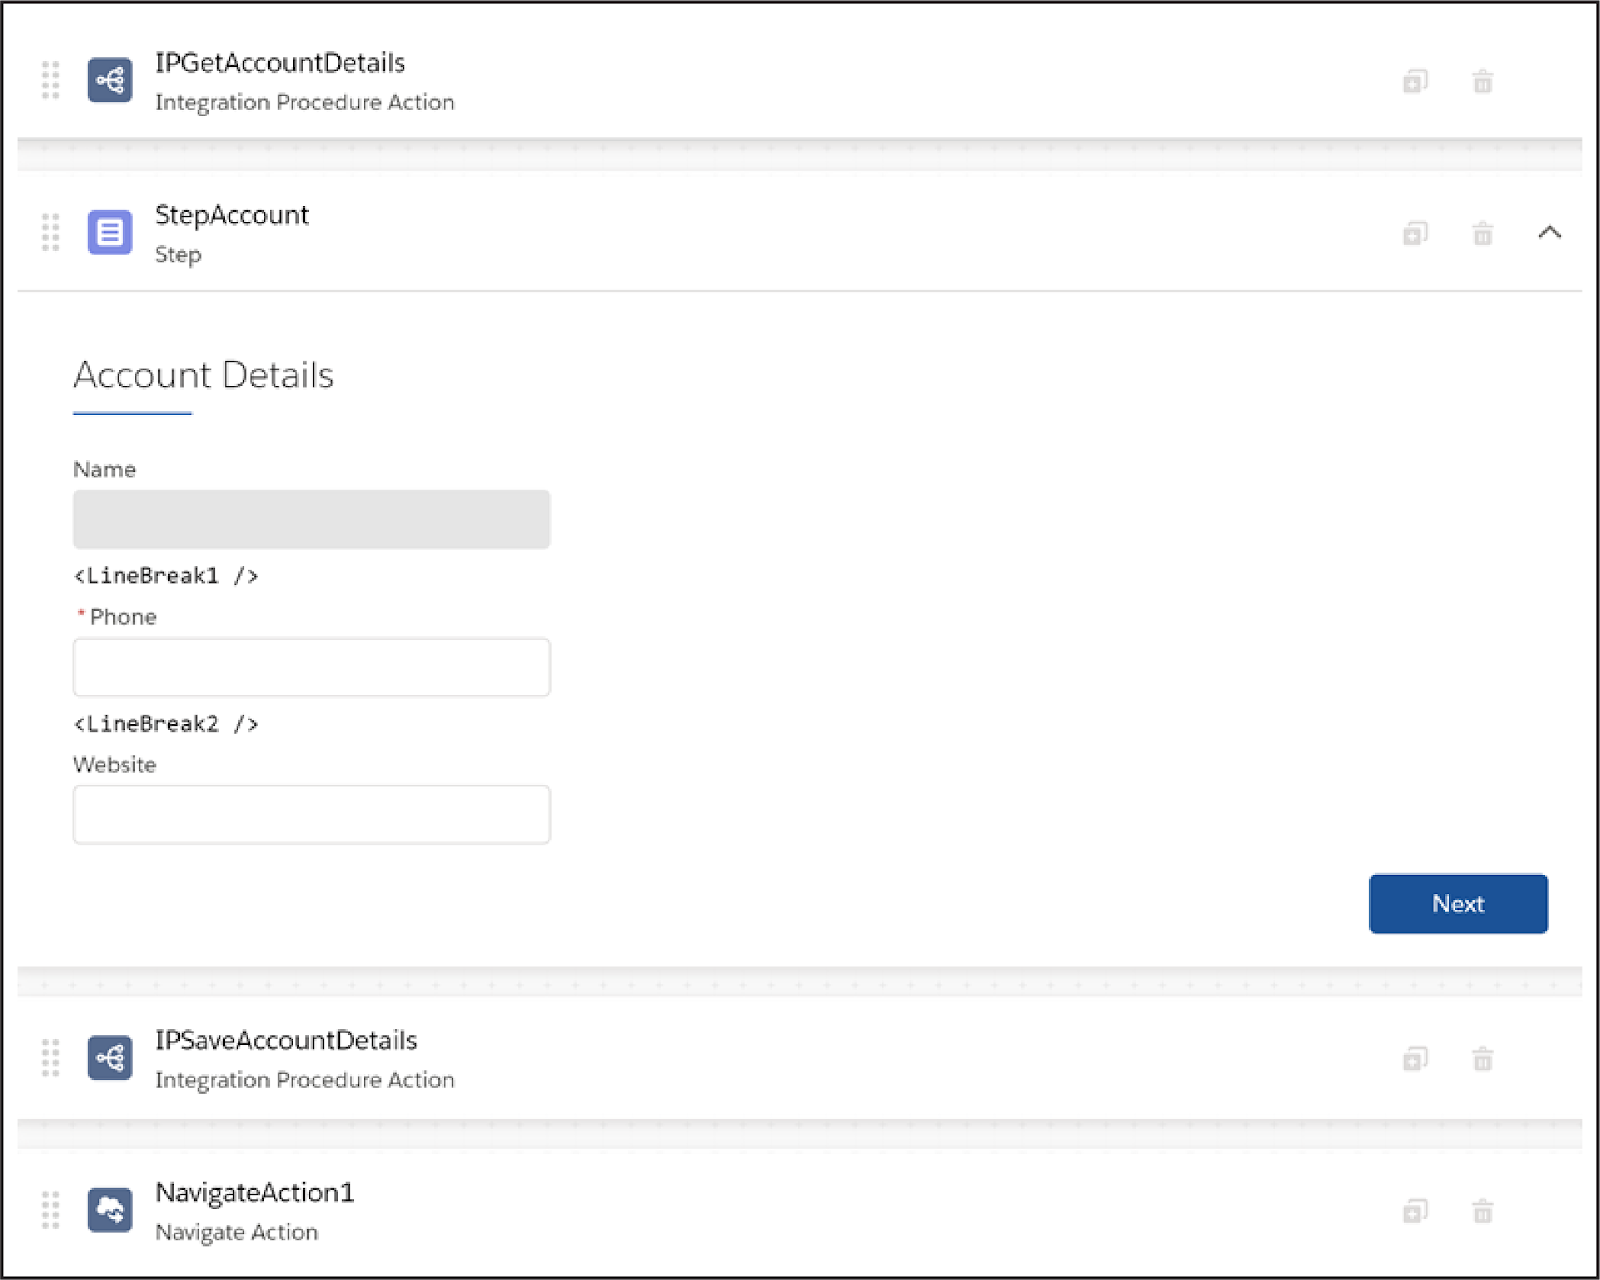
This is a simple one-step Omniscript. To build it, first configure the single Step element with its inputs, and then add the Actions elements.
- From the Build panel, drag a Step element onto the canvas.
- Drag these Inputs elements into the Step creating fields to show and enable the end user to edit data:
-
Text (1),
-
Phone (2)
-
URL (3)
-
Text (1),
- Select the URL element, and enter
Websitefor the Name and Field Label in the Properties tab.
Super! Now that you’ve added the Step and Inputs to the Omniscript, you’re ready to configure their properties.
Configure Element Properties
Many elements have the same types of properties. For example, each element must have a Name.
Element names must be unique in an Omniscript. Here are some other guidelines to follow.
- Use Pascal Case and no spaces for element names, such as
StepAccount.
- Use object and field names for clarity, such as
AccountName.
- Specify the object for Ids, such as
AccountId.
For Display or Inputs elements, element labels are what the end users see on the screen. For Actions elements, element labels appear in the Action Debugger. Labels don't need to be unique.
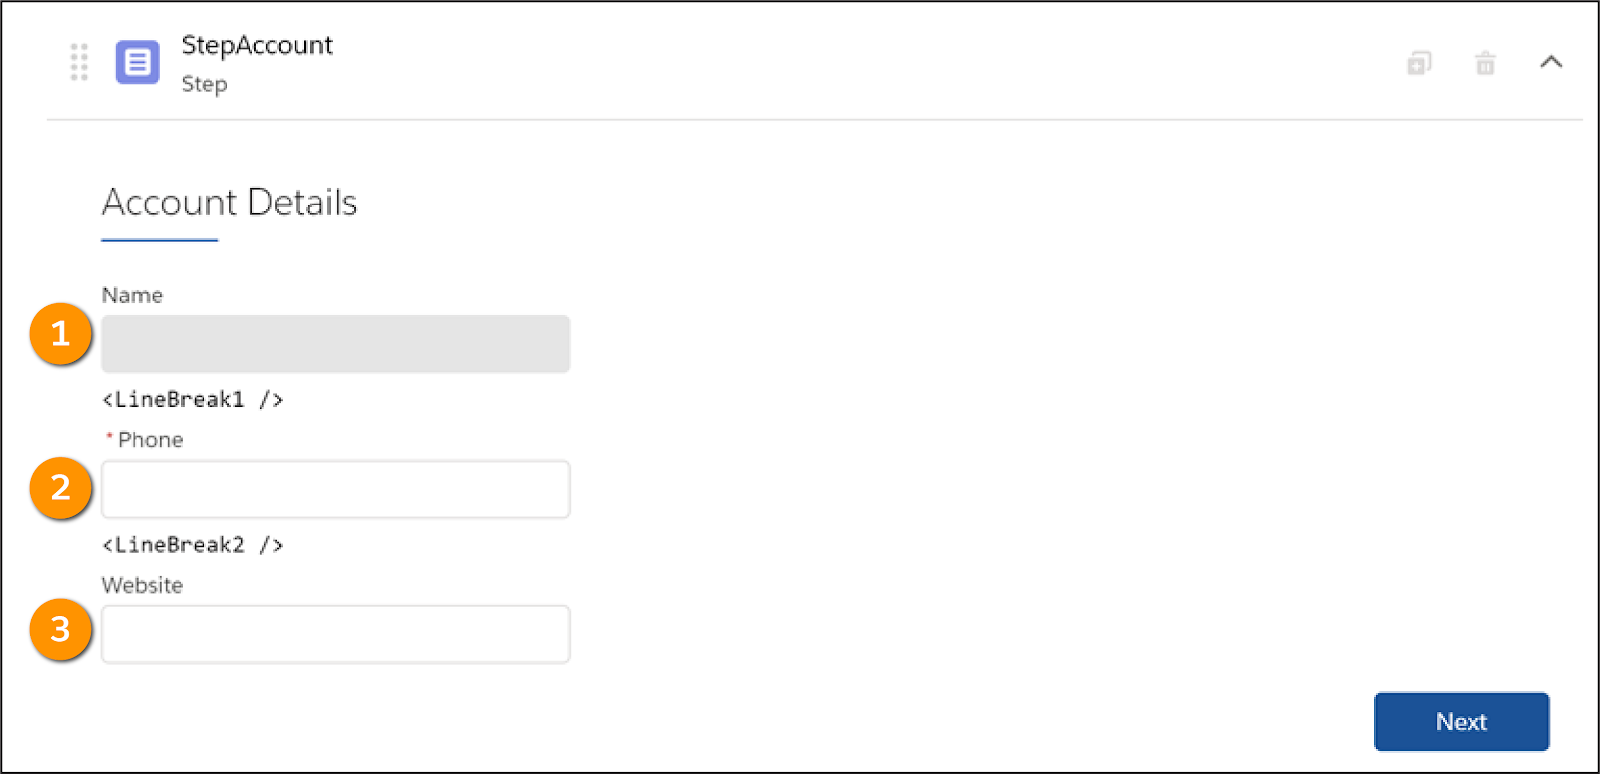
Let’s take a look at the element properties used to configure these features of the Edit Account Omniscript.
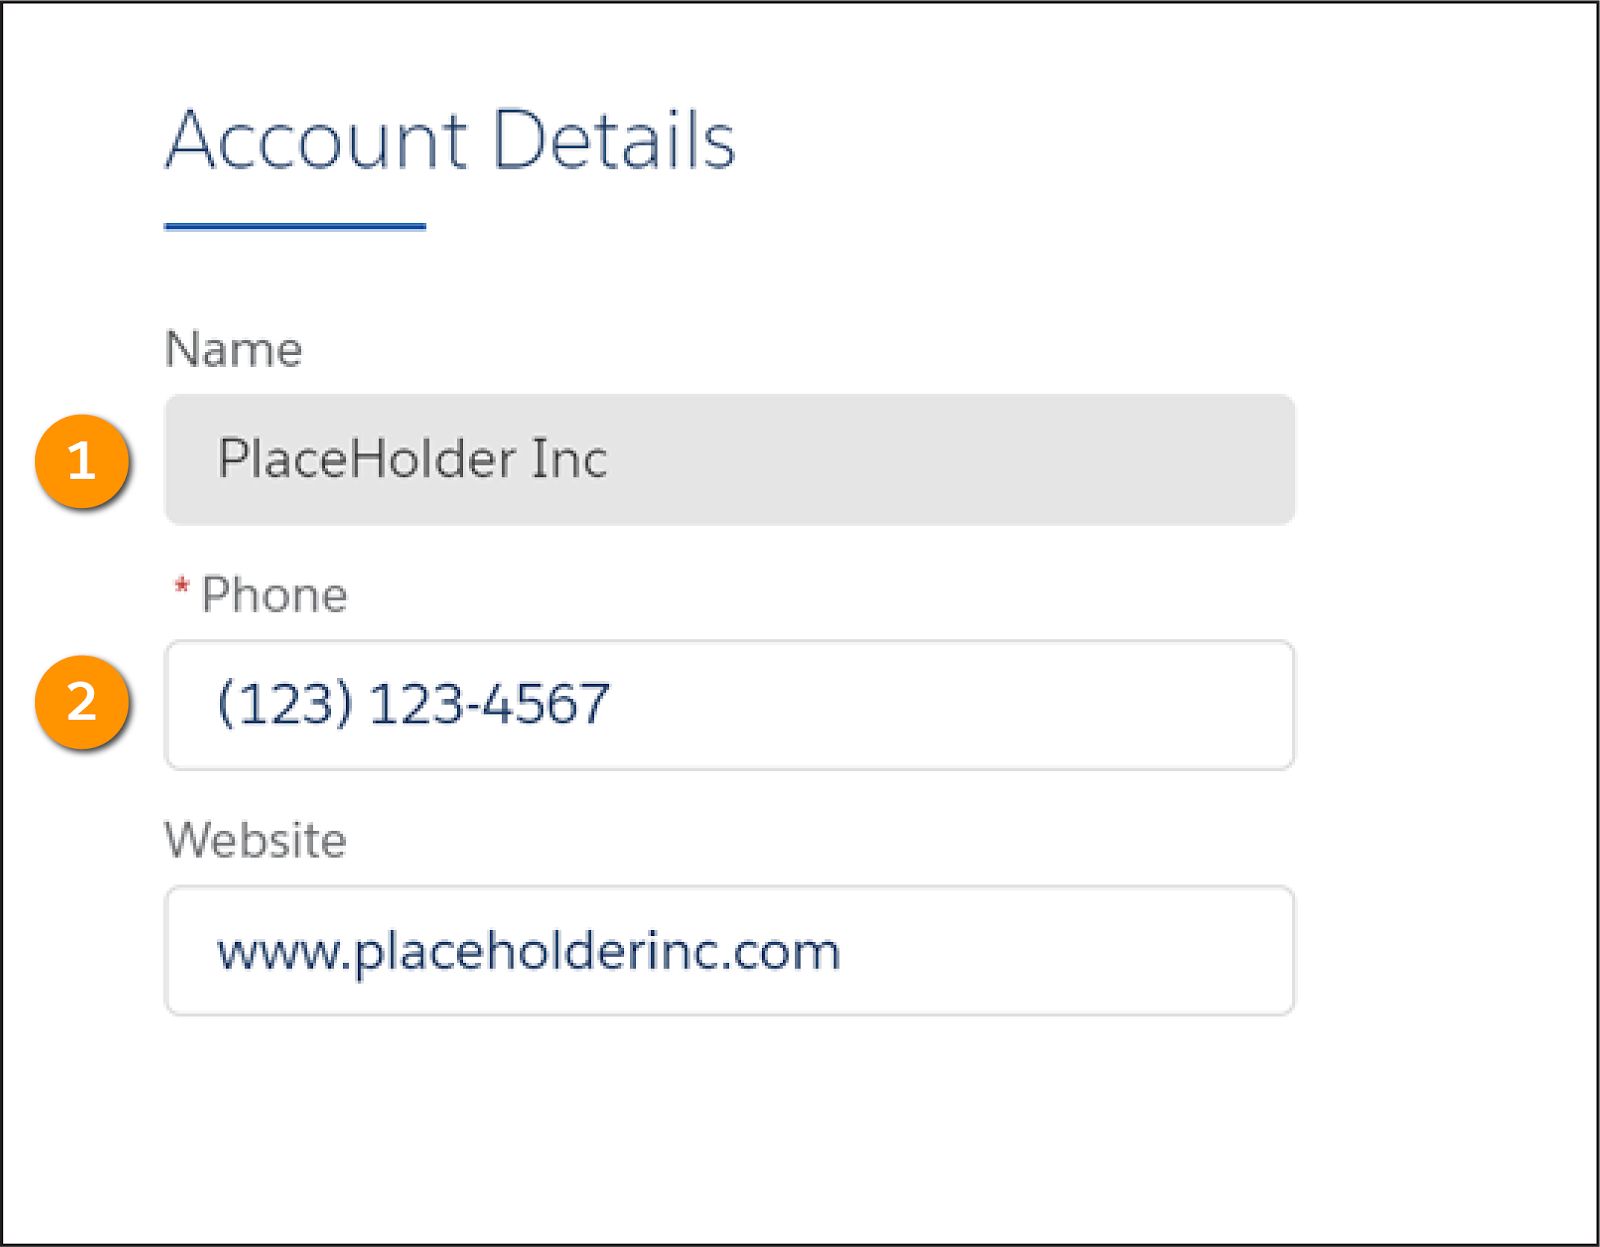
- The Name field (1) is a read-only field to prevent users from changing the account name anywhere other than in the Salesforce Account record itself.
- The Phone field (2) is a required field, and is marked with a red asterisk.
- The Name, Phone, and Website fields don’t fill the width of the line.
How is this accomplished?
|
Property
|
How is it enabled?
|
What does it do?
|
|---|---|---|
Read Only |
Select a checkbox. |
Restricts the user from making changes to a field. |
Required? |
Select a checkbox. |
Requires the end user to enter data in the field before moving on. |
Width Settings |
On the Canvas, drag the responsive control width grid. |
Adjusts the size of a field using HTML web standards (dynamic control). |
When you finish configuring your Inputs elements, you’re ready to add Actions elements. Before you do that, though, let’s take a minute to learn about the way data flows into and out of an Omniscript.
How Data Flows into and out of an Omniscript
There are several data input options for an Omniscript. Using Integration Procedures is best practice. We explain in detail why in the Omnistudio Integration Procedures module, but Integration Procedures help you separate data configuration from Omniscript configuration.
Here are the scenarios for using the other data input options.
|
For This Data Input Source
|
Use This Omniscript Element
|
|---|---|
Salesforce org, one field only |
Lookup, located in the Inputs section and uses Omnistudio Data Mapper Extract service |
Salesforce org, fields from one object only |
Omnistudio Data Mapper Turbo Action |
Salesforce org, fields from one or more related objects |
Omnistudio Data Mapper Extract Action |
API |
HTTP Action |
Anything that Apex can access |
Remote Action |
User |
Any Inputs Element, located in the Inputs section and allows the user to input data |
So, how do you move data from Salesforce to an Omniscript using an Integration Procedure? When an Omniscript is launched via an Action on a Flexcard, the RecordId is passed along the JSON in a node to identify which record’s data to retrieve. In this graphic, the RecordId is called AccountId. AccountId is an arbitrary name, but it must be the same in each of the elements in order for data to flow properly.

When the variable is in the Omniscript, pass the RecordId in the AccountId variable to the data tool you plan to use. Following best practices, choose an Integration Procedure to pass the AccountId to an Omnistudio Data Mapper Extract.
The Omnistudio Data Mapper Extract uses the AccountId variable in a Salesforce Object Query Language (SOQL) query to retrieve data from Salesforce. This retrieved data includes the AccountId variable and data from the Account record. The Omnistudio Data Mapper Extract maps that data to a data JSON, which is sent to the Integration Procedure and then to the Omniscript.
The Omniscript uses a parser to match the JSON that comes from the Integration Procedure to the inputs in the Omniscript based on element names. If the JSON doesn’t match the element name, the fields will appear empty.
The data flow looks like this.

The user and other Omniscript actions manipulate the data while the Omniscript runs.
An updated data JSON, including the AccountId variable, is then passed to an Integration Procedure, which passes the JSON with the AccountId variable to an Omnistudio Data Mapper Load. The Omnistudio Data Mapper Load uses the AccountId variable to identify the original account record and updates the data in Salesforce.

Your job is to configure the Action elements to make sure the data flows in correctly from the Flexcard and out of the Omniscript back to Salesforce.
Configure Omniscript Action Elements
To configure Omniscript Action elements, return to the canvas. Take a look at this example, which configures two Integration Procedure Actions, to understand how this works.
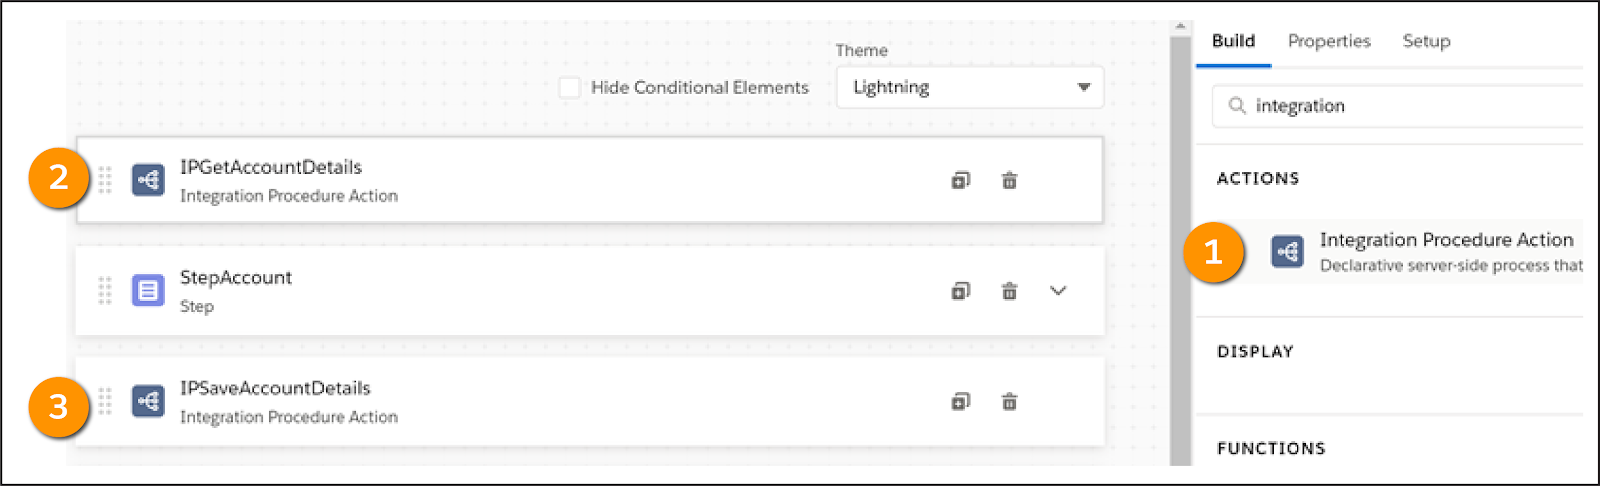
- From the Build panel, drag an Integration Procedure Action (1) onto the canvas. This calls an Integration Procedure that gets the data. Place the Action (2) above the Step element.
- From the Build panel, drag an Integration Procedure Action (3) onto the canvas to call the Integration Procedure that saves the data. Place it below the Step element.
If placed outside a step, Actions execute automatically in the order they appear. If placed inside a step, an Action appears as a button that must be clicked before it executes.
Actions have their own naming conventions. Use a prefix for the element type, such as DR for Omnistudio Data Mapper or IP for Integration Procedure. Then use VerbObjectDetail. In the Edit Account Omniscript, IPGetAccountDetails is the name of the Integration Procedure Action (2) above the Step, and IPSaveAccountDetails is the name of the Integration Procedure Action (3) below the Step.
Each Integration Procedure Action has a dropdown list from which you select the Integration Procedure you want to call from the Omniscript. When you link an Integration Procedure to an Omniscript, the Omniscript sends the entire JSON to the Integration Procedure by default.
When the JSON is small, as it's in the Edit Account Omniscript, there’s no need to trim or redefine it. However, you do need to confirm what the ContextId is in that JSON. For the Edit Account Omniscript, for example, you need to tell the Integration Procedure that the ContextId is the AccountId.
But isn’t AccountId an arbitrary name? Yes, it is! Still, it’s important to follow the best practice of being explicit about what type of RecordId you're sending to an Integration Procedure.
When an end user completes the Omniscript, the Navigate Action tells the Omniscript where to send the end user. If a rep opens the Omniscript from a Flexcard on a console, you can configure the Navigate Action to return the rep to the console.
Once you have added the Navigate Action and previewed the Omniscript, don’t forget to activate it!
And there you are. You haven't only learned about the power of Omniscripts to guide end users through a process, you’ve learned how to design and create a simple one-step Omniscript.
Resources
- Salesforce Help: Administering, Deploying, and Launching Omniscripts (Omnistudio for Managed Packages)
- Salesforce Help: Omniscript Data and External Integrations (Omnistudio for Managed Packages)
- Trailhead: Omniscripts with Branching
- Trailhead: Omnistudio Integration Procedures