Explore IDX Workbench
Learning Objectives
After completing this unit, you’ll be able to:
- List the various dashboards available in IDX Workbench.
- Explain how to migrate metadata between two Salesforce orgs using IDX Workbench.
Meet IDX Workbench
Vijay Lahiri is an OmniStudio developer. His team is currently working on a client project involving several OmniStudio components.

The development phase is complete, and his manager asks Vijay to use IDX Workbench to migrate the project metadata from their development org to the QA org for testing. However, Vijay has never used the tool before and is a little worried, because he has to learn quickly to be able to deploy their project data to the QA org. Vijay installs IDX Workbench on his laptop and is all set to start his learning journey.
So, what are we waiting for? Let’s help Vijay get up to speed with IDX Workbench.
Source to Target
IDX Workbench is a desktop application you can use to migrate OmniStudio DataPacks and Salesforce metadata from one environment to another. Metadata migration always goes in the same direction: from the source environment to the target environment.
IDX Workbench supports migrations between the following sources and targets.
| Source | Target |
|---|---|
|
A Salesforce org |
Another Salesforce org |
|
A Salesforce org |
A Git repository |
|
A Git repository |
A Salesforce org |
|
OmniStudio Process Library |
A Salesforce org |
|
A JSON file |
A Salesforce org |
|
A JSON file |
A Git repository |
Before we go further, let’s explore the UI of IDX Workbench, which gives you four dashboards.
Migration Dashboard
Let’s look at the Migration dashboard first. Use it to quickly configure and migrate data.
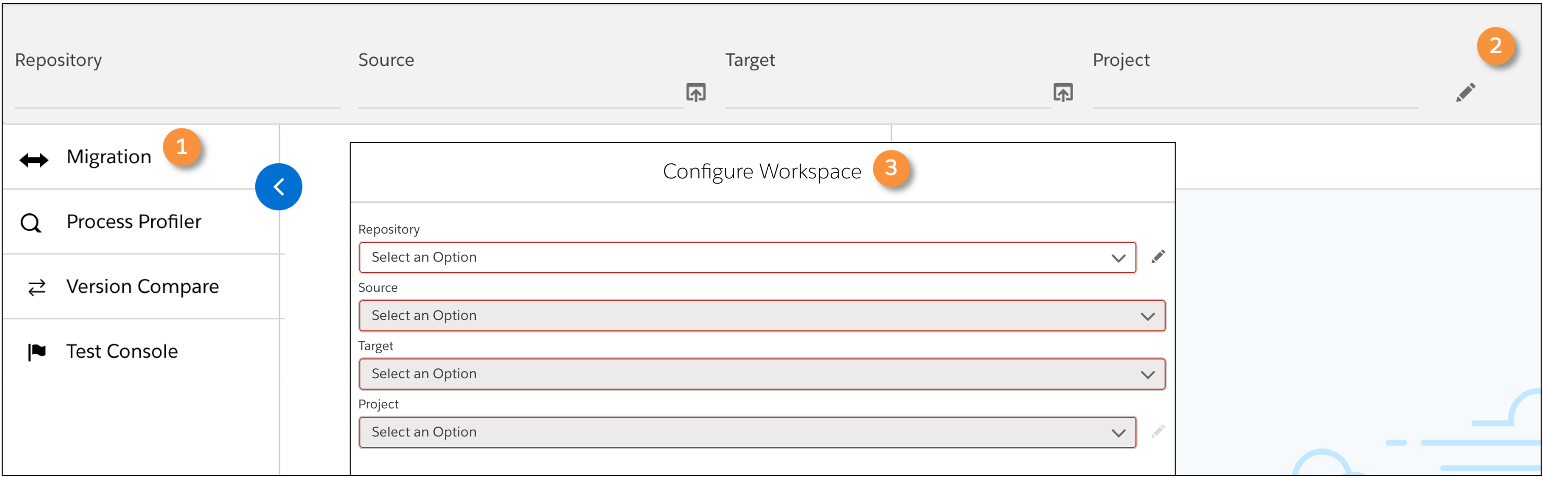
When you open IDX Workbench from your desktop, the Migration tab (1) is selected by default. Click the Edit icon (2) to open the Configure Workspace (3) dialog. Then, define the source environment, target environment, and components you want to migrate.
Other Dashboards
In addition to metadata migration, IDX Workbench gives you some other useful features.

Use the following table to learn about each dashboard.
|
Use this dashboard |
When you want to do the following |
|---|---|
|
Process Profiler (1) |
Profile performance and view runtime details for an OmniScript or Integration Procedure in a source or target org. |
|
Version Compare (2) |
Compare two versions of an OmniScript or Integration Procedure in the same source or target org. |
|
Test Console (3) |
Run Test Procedures and analyze the results. Note: Test Procedures are Integration Procedures that perform unit tests. |
Each dashboard has an Options (4) panel and a results (5) panel.
- Use the Options panel to configure and define the different options available for each dashboard.
- Use the results panel to view the output of your search results.
Vijay likes what he sees. Having familiarized himself with the UI of IDX Workbench, he now wants to know how to configure and migrate metadata between two Salesforce orgs. Let’s dive in.
Configure and Migrate Metadata
Before you migrate metadata, you need to specify the source org, the target org, and the objects to be migrated using the Configure Workspace dialog. You also have to create a repository for the project, even if both your source and target are orgs. A repository saves relevant configurations, project items to be migrated, and much more.
So, let’s see how to do this.
First, let’s configure the repository.

- Use the Repository (1) dropdown list, and select New Repository (2).
- In the New Repository dialog, specify a Name (3) and a Repository Folder (4). If the folder doesn’t exist, IDX Workbench creates it.
- Save the new repository details.
Now configure the source and target environments.

- From the Source (1) dropdown list, select New Environment (2). In this example, our source environment is a Salesforce org.
- In the New Salesforce Org dialog that appears, specify a Name (3).
- From the Organization Type (4) dropdown list, select the correct URL. For example, if your source is a sandbox org, set the Organization Type as https://test.salesforce.com. Otherwise, choose https://login.salesforce.com.
- Click Log in using OAuth (5). This opens the Salesforce login page.
- Use your credentials to authenticate and log in to your source org.
- Repeat this procedure to configure your target, adjusting the configuration settings to align with the target environment.
Now that you’ve set up the repository, source, and target, it’s time to configure the project and choose the components you want to migrate. For Vijay, this is a crucial step in the migration process, because it determines what gets migrated and what doesn’t. He doesn’t want to disappoint his boss!
Let’s configure the project.

- From the Project (1) dropdown list, select New Project (2). This opens the New Project dialog.

- In the New Project dialog, specify a Name (1) for your project. Then, select all the types of OmniStudio or Salesforce objects (2) to migrate. When finished, click Fetch DataPacks (3). This gets all the names of the DataPacks for the selected types from the source org.
- Under Pick datapacks for project (4), you can optionally type text to filter the names of the fetched objects. Select and move the objects you want to migrate from the All datapacks list to the Selected datapacks list (5). Use the Shift key to select multiple items in either list.
- Click Ignore Dependencies (6) if you want to exclude dependent objects from migration.
- Review and save your new project. The Configure Workspace dialog opens.
- Make sure all your changes are captured, and then save the workspace.
Your configuration is now complete. Now let’s show Vijay how to migrate this metadata.
Migrate the Metadata
IDX Workbench processes and fetches all the metadata to be migrated and lists the components in the left panel.
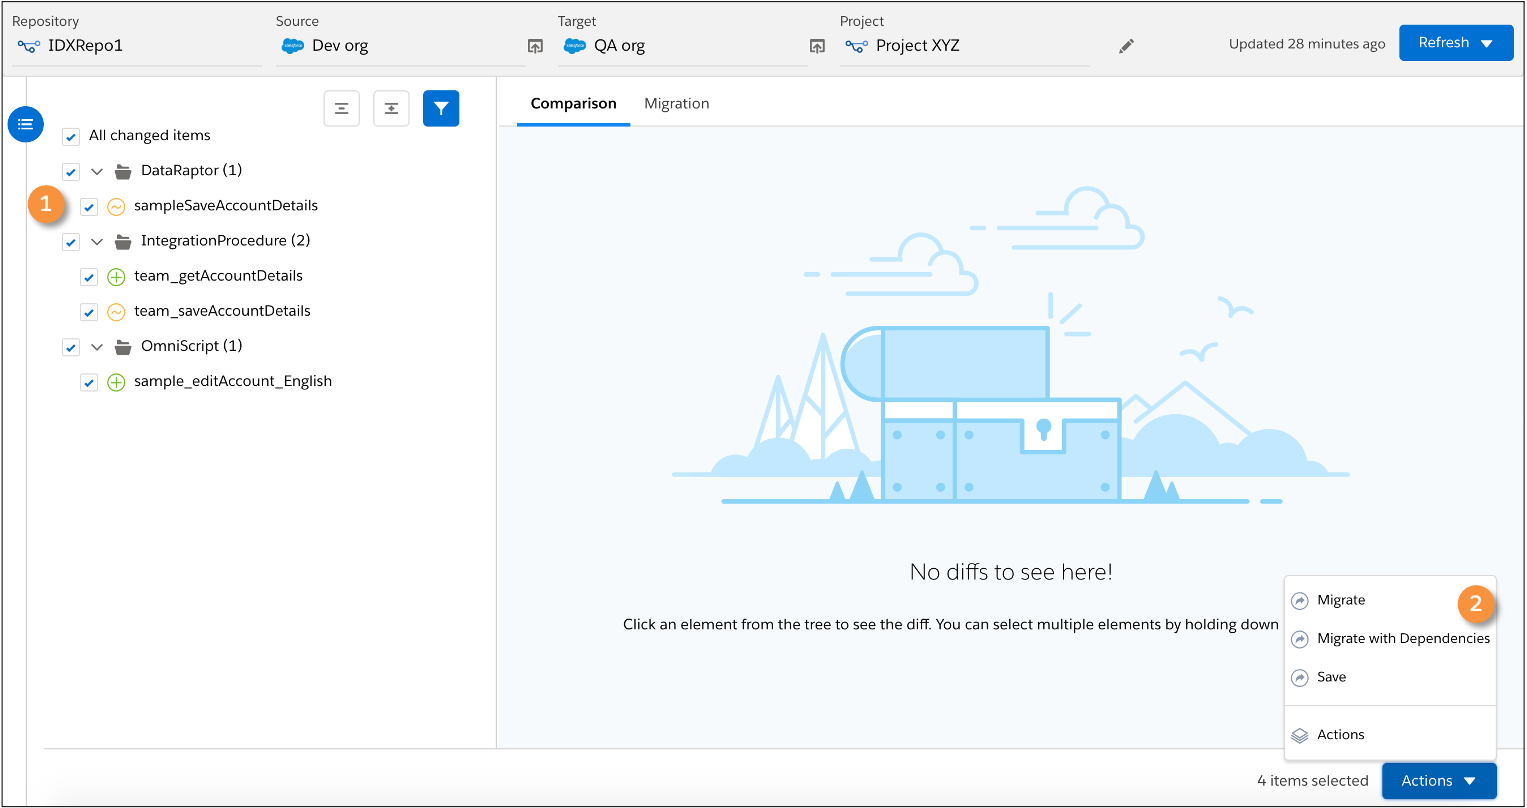
To migrate metadata to the target org, select the check box (1) next to each object to be migrated. Then, click Actions > Migrate with Dependencies (2). This migrates all your selected objects from the source org to the target org.
Validate the Migration
Once the migration process is complete, this is how your IDX Workbench screen looks.

To validate the success of your metadata migration, check for the Migrated (1) label next to each object listed. The presence of the label next to an object means the migration was a success. You can also view detailed information about the migrated objects under the Comparison (2) and Migration (3) tabs.
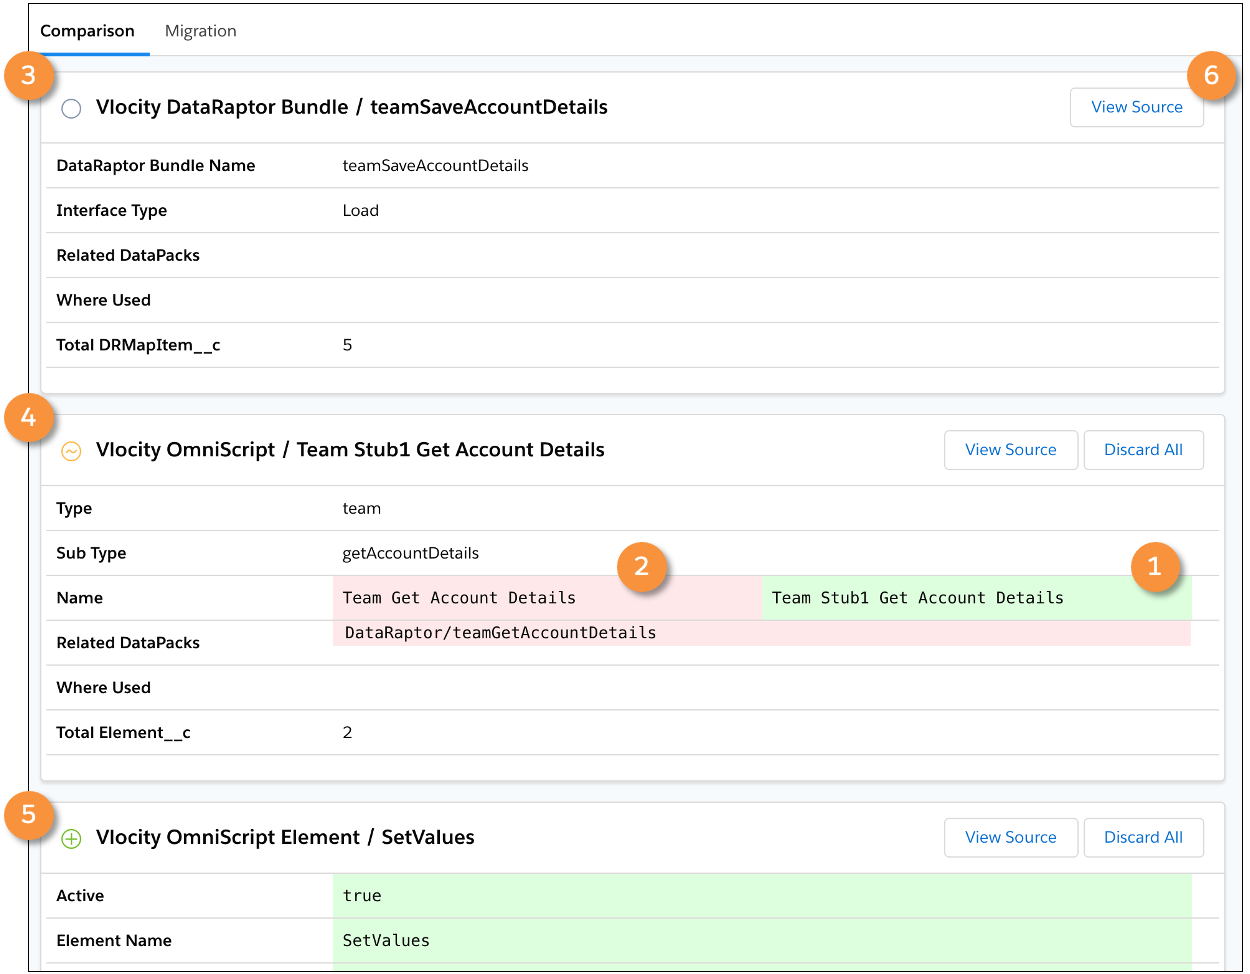
The Comparison tab summarizes the differences between the migrated objects and their previously deployed versions. Items in the source org are highlighted in green (1) and those in the target org are highlighted in red (2).
To the left of each migrated object, you see one of three circular icons.
- A white icon (3) indicates that the object is now the same version in both orgs.
- A yellow icon (4) tells you that the object is available in both source and target orgs, but the object version differs between the orgs.
- A green icon (5) means the object is new and the first version to be migrated to the target org.
To view the JSON code for each component in the source org, click View Source (6).
After walking through all the steps, Vijay is feeling confident about using IDX Workbench for his metadata migration task, and he’s happy with the progress he’s made so far.
Meanwhile, Vijay hears about OmniStudio Project Explorer from one of his colleagues, who says that using it with IDX Workbench makes data migration even easier. Vijay is intrigued and wants to learn all about Project Explorer. So, let’s introduce Vijay to OmniStudio Project Explorer in the next unit.