Get Started with Website Integration
Learning Objectives
After completing this unit, you’ll be able to:
- Describe the steps to integrate a Volunteers for Salesforce (V4S) site.
- Enable Salesforce Sites.
- Create your V4S site.
Before You Start
Before you start this module, make sure you complete the following content. The work you do here builds on the concepts and work you do in that content.
Bringing V4S to Your Website
If you’ve been following along with the Manage Volunteers for Nonprofits trail, you’ve done quite a bit of work so far. You learned how to structure Volunteers for Salesforce (V4S) campaigns, volunteer jobs, and volunteer shifts. You also learned how to enter volunteers and reconcile their hours. Now comes the most exciting part: learning how to let volunteers sign up for shifts directly on your website.
In this unit we’ll walk you through all of the steps to get V4S and Salesforce ready to integrate with your website. Unfortunately, we can’t show you how to do the actual integration with your website platform or content management system, because they’re all a little different.
Still, what we do in this module will get you 95% of the way there and create what you need to hand off to your website developer (who may also be you, of course). This might seem a little overwhelming at first, but we’ll take it step by step.
Let’s get started!
The 10,000-Foot View
The (fictional) nonprofit No More Homelessness (NMH) uses V4S to staff hotline volunteers, food servers, and other needs, too. NMH works with hundreds of volunteers each year, and it’s considerably easier for Enoch Allen, NMH’s volunteer coordinator, to let those volunteers sign up for shifts on their own whenever possible.
In this module, we’ll follow Enoch and NMH’s awesome admin, Gorav Patel, as they work together to get V4S and Salesforce ready to integrate with the NMH website.

Let’s begin with the 10,000-foot view of the steps to integrate V4S and Salesforce with the NMH website.
-
Create a site. This public web page displays volunteer job and volunteer shift information to prospective volunteers. Remember the Display on Website option you saw in previous units? That option tells the website which volunteer shifts to display.
-
Activate and test the site. In this step, you verify your campaigns and volunteer shifts on the site. You also test the sign-up form to check out how the data flows into Salesforce.
-
Customize your sign-up form. Here, you’ll choose how much or how little information to collect from each volunteer. For example, only first name, last name, and email—or additional information, such as phone number, title, and address.
-
Explore and select your site’s V4S pages. V4S includes other useful pages, too. We’ll take a brief tour of those other pages and what they do.
-
Provide your web developer with what they need. Give your web developer exactly what they need to finish the process and make your pages live on your website.
Now, on to the configuration work, which ultimately means less data entry for you and happier, more engaged volunteers for your organization.
Configuring Your V4S Site, Step by Step
What is a site in Salesforce? It’s a way to create public web pages—no code needed—that display Salesforce data you choose to make public. Salesforce Sites can also collect information from a volunteer and store it right to Salesforce.
Building a site is by far the largest part of the work you need to do to get V4S ready for your website. Here are the specific steps you need to take:
- Enable Salesforce Sites.
- Create a site.
- Configure data access using sharing rules.
- Configure data access using custom settings.
- Configure data access for Visualforce pages using profiles.
- Configure data access for object and field permissions using profiles.
- Set the time zone.
We’ll start in this unit, then continue in the next two.
Enable Salesforce Sites
By default, all of your Salesforce data is private and secure, which means that no one without a login to your Salesforce org can see or create data. You usually want this level of security, but we also want our volunteers to see event details on our website. And, most importantly, we want them to enter their contact information and sign up for shifts.
This is where Salesforce Sites comes in. With Salesforce Sites, you can make data publicly available on a website, but only the data you choose to share. You can also allow visitors to your public website to enter information and have that information flow directly and securely into Salesforce.
Follow along as we enable Salesforce Sites for NMH.
- Click the Setup gear (
 ), then Setup.
- Enter
Sitesin the Quick Find box, then select Sites under Sites and Domains.
- Enter a domain name for your Salesforce Site in the http:// field, and click Check Availability. The domain name is typically in the form of [Organization Name].force.com. But pause for a moment to think about this choice! You can’t change the domain once you register it. Ever. For now, that’s no big deal, because the V4S web pages are hosted on your organization’s own website, and volunteers will never see this domain name—but choose a reasonable name. Your future self will thank you.
- Read the Salesforce Sites Terms of Use and select the box to acknowledge them.

- Click Register My Salesforce Site Domain.
Voila! You’ve now enabled Salesforce Sites functionality.
Create a Site
The next step is to create a site, which contains the pages that display your volunteer jobs and shifts, and the volunteer sign-up page.
- On the Sites page, click New in the Sites list section.

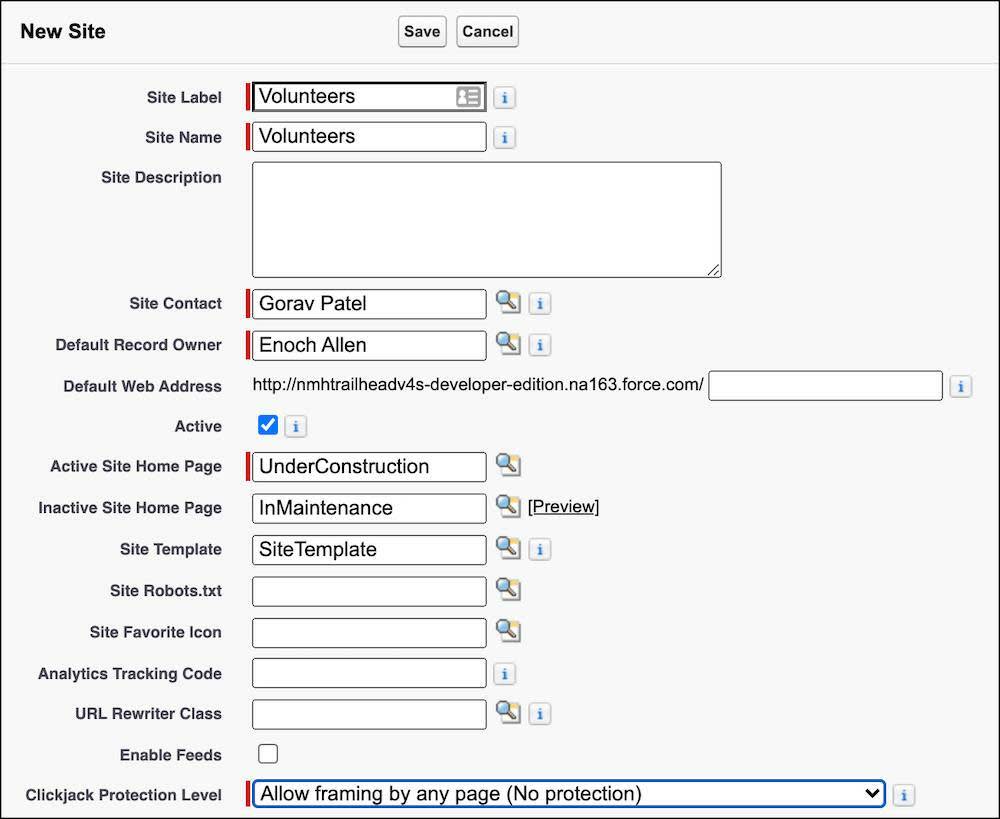
- Enter the required information in the New Site page.
- Site Label: Enter a descriptive name that tells you the purpose of this site. (Who knows, you might be so enamored with Salesforce Sites that you choose to make many more.) Let’s call this site
Volunteers.
- Site Name: This field is automatically populated with the same name as the Site Label. You can leave it as is.
- Site Contact: Choose an appropriate system administrator. NMH’s admin, Gorav, enters his own name.
- Default Record Owner: Choose the user who should be the owner for all new records that guest users create. Gorav enters Enoch’s name because, as NMH’s volunteer coordinator, he will work with V4S records more than anyone else.
- Active: Select this option to start testing your site right away.
- Active Site Home Page: For now, set the home page to use the default Under Construction Visualforce page. Click the Search icon (
 ), then find and select the UnderConstruction Visualforce page.
- Clickjack Protection Level: Select Allow framing by the same origin only (Recommended). To allow Sites to be IFRAMEd into your website, consider a less secure level. See Enable Clickjack Protection in Site.com in Salesforce Help for details
- Leave the other settings as they are for now, and click Save.
We’ve created a site! Now we need to make sure that volunteers can see event information and sign up for shifts. We’ll do that in the next unit.
Resources
-
Salesforce Help: Website Integration—A Tag Team Event
-
Salesforce Help: Set Up Your Salesforce Site
-
Salesforce Help: Volunteers for Salesforce (V4S) Documentation
-
Trailblazer Community Group: Volunteers for Salesforce (V4S) App
-
Salesforce Help: Salesforce Sites
-
Trailhead: Data Security