Set Up Inbound Scheduling for Existing and Prospective Customers
Learning Objectives
After completing this unit, you’ll be able to:
- Add the inbound appointment flow to the Experience Cloud site.
- Identify the purpose of guest scheduling.
- Set up object access and permissions for guest users.
- Add the guest appointment flow to the Experience Cloud site.
- Add the guest appointment flow to an external website.
An Experience Cloud Site
Matt has sorted out the settings situation and it’s time to give existing customers the power to schedule and modify appointments.
To set up scheduling for existing users, Matt adds the inbound appointment flow to the Experience Cloud site. Here’s what he does.
- From your inbound scheduling site, click Experience Builder in the profile menu.
- In Experience Builder, select the Components icon.
- Enter
Flowinto the search box. - Drag the Flow component onto the canvas.
- From the Flow list, select the desired standard flow template, such as Inbound New Appointment, Inbound Modify Appointment, Inbound Cancel Appointment, or a custom inbound scheduling flow.
- Click Publish to save and publish your changes.

Tap Into the Unknown (or Prospects)
With Experience Cloud sites, Matt ensures that existing customers at the bank can schedule appointments. But what about prospects who are not customers yet? Wouldn’t it be great if they could just as easily set up appointments with Cumulus Cloud Bank? Although the bank’s advisors can set up appointments with prospects who they’ve identified, Fola understands that there’s an unknown and large pool of prospective customers who might be interested in the bank's services. Giving them an easy way to set up appointments could bring a lot of business.
As always, Matt, the all-star admin at the bank, gets to work. Since prospects are not customers yet, they won’t be signing in or authenticating themselves. They’re unauthenticated or guest users. Let’s follow along as Matt sets up inbound scheduling for leads and prospects.
As with existing customers, there are two ways Matt would be setting up scheduling for guest users.
- Add the inbound guest appointment flow in the Experience Cloud site.
- Use a Lightning Out dependency app to add the inbound guest appointment flow to a page on the website.
Here’s a video demonstration.
Permissions and Time
First, Matt sets up object access and permissions for guest users.
- From Setup, enter
Digital Experiencesin the Quick Find box, then select All Sites. - On the All Sites page, click Builder next to the Experience Cloud site where you want to configure guest access.
- In Experience Builder, click the Settings icon
 .
. - On the General settings page, under Guest User Profile, click the guest profile link.
- In the profile page, click Edit.
- Under General User Permissions, select Run Flows.
- Under Standard Object Permissions, define appropriate access levels for these objects.
Object Permissions Leads, Service Appointments Read, Create Operating Hours, Service Resources, Service Territories, Work Types, Work Type Groups Read 
- Save your changes.
- Again on the profile page, under Field-Level Security, click View next to Time Slot and then click Edit.
- Enable read access for Maximum Appointments and Work Type Group and click Save.
Matt has sorted out the permissions for guest users. But in which time zone would most guest users be expected to schedule appointments? You got it right. The same time zone in which Cumulus Bank falls. Here’s what Matt does to set the guest user’s default time zone.
- On the profile page, click View Users.
- Click Edit next to Guest User.
- Under Locale Settings, set the time zone, and then click Save.
Security First
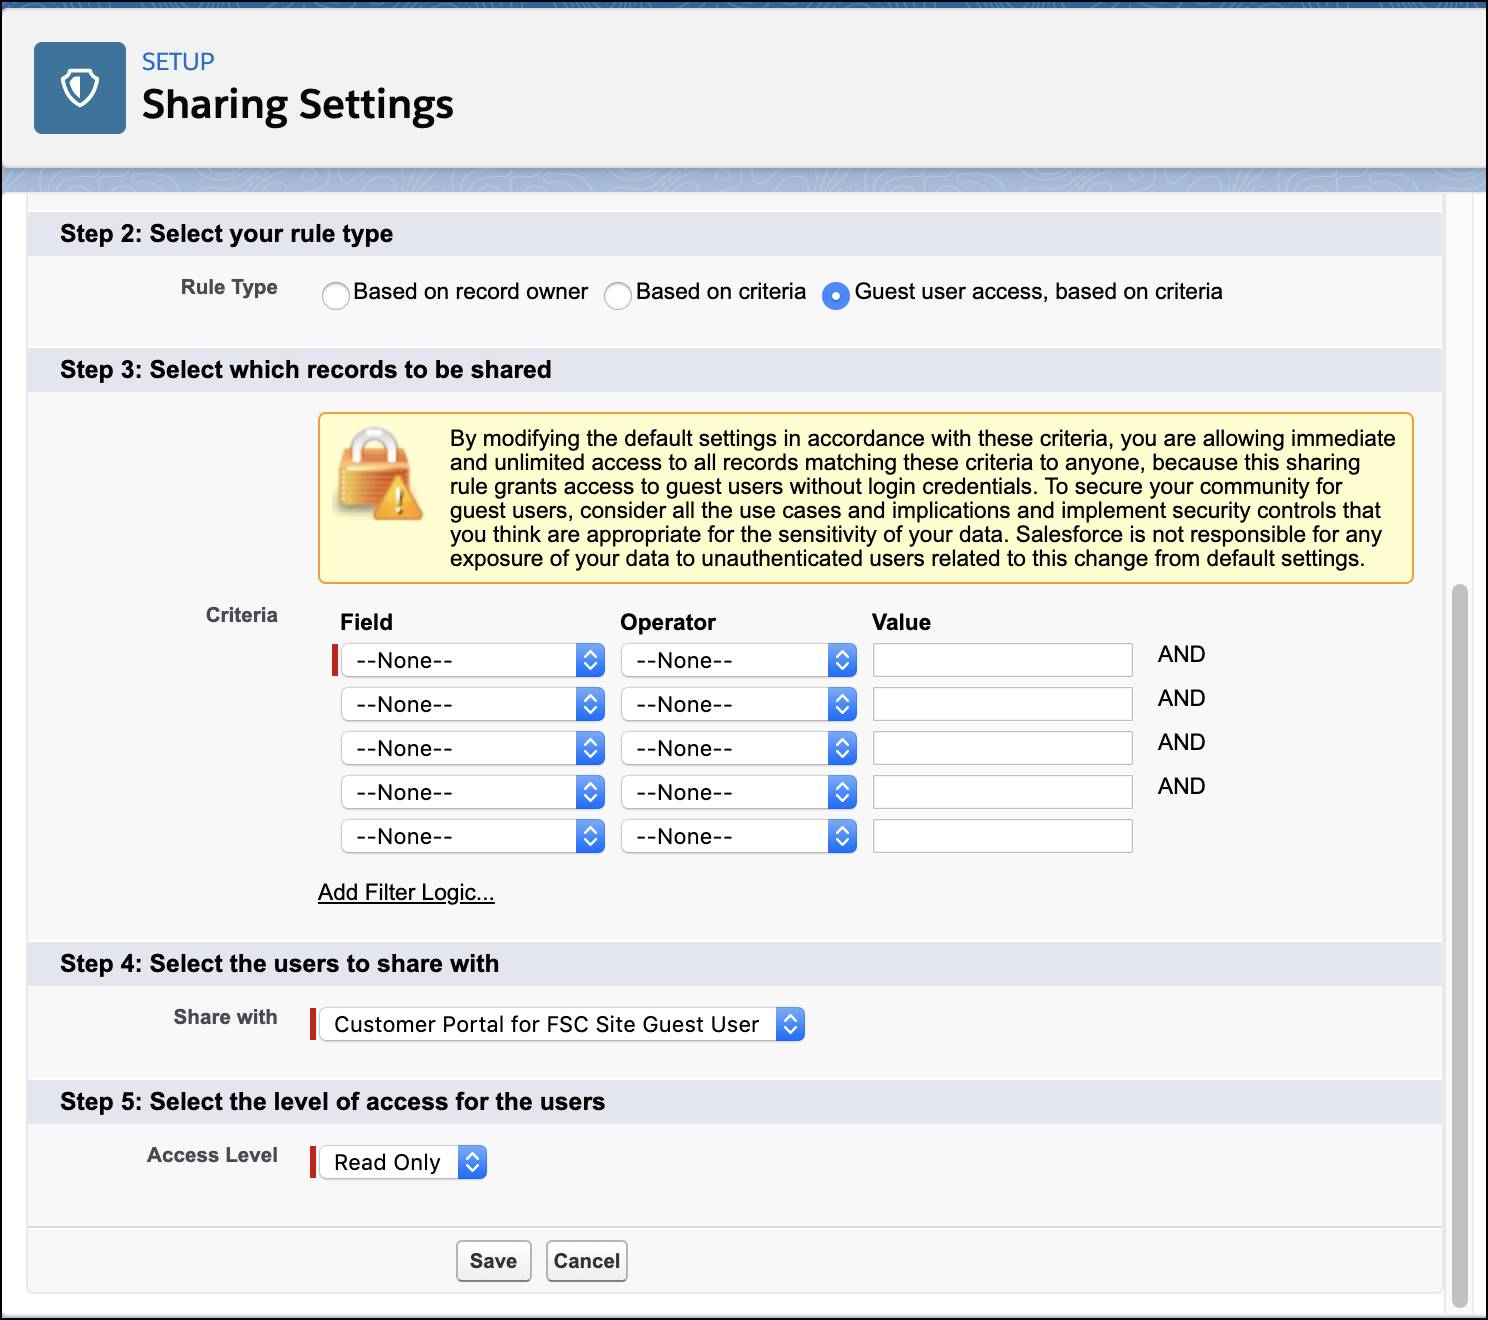
With guests or unauthenticated users coming in, it’s imperative to keep security in mind. Matt creates criteria-based record-sharing rules to control which records are exposed to the site’s guest user profile.
- From Setup, enter
Sharingin the Quick Find box, then select Sharing Settings. - Under Service Resource Sharing Rules, click New.
- Enter a label for the rule.
- Select Guest user access, based on criteria.
- Define the criteria for your guest record-sharing rule.
- From the Share with dropdown list, select your guest user.
- Set Access Level to Read Only, and then click Save.
- Repeat these steps for Service Territory, Work Type, and Work Type Group sharing rules.

Make the Guest Flow Work
With settings sorted out, it’s time to finally add the guest flow to an Experience Cloud site and the external website.
- In your site, click Experience Builder in the profile menu.
- In Experience Builder, select the Components icon.
- Enter
Flowinto the search box. - Drag the Flow component on a public page in your site.
- From the Flow list, select the Inbound New Guest Appointment flow.
- Click Publish to save and publish your changes.
Next, Matt adds a Lightning Out dependency app to the external website that gives unauthenticated users access to the guest flow.
- Create a copy of the Inbound New Guest Appointment standard flow template.
- Add a
<script>tag to your webpage that references the library directly, using a site endpoint URL. For example:<script src="https://yourSiteDomain/siteURL/lightning/lightning.out.js"></script>
- Add the JavaScript code to load and activate the lightningOutGuest app on your webpage. This code is standard Lightning Out, with the important addition that you must use one of your org’s site URLs for the endpoint. The endpoint URL takes the form
https://yourSiteDomain/siteURL/.
<script>
$Lightning.use("runtime_appointmentbooking:lightningOutGuest",
function() { // Callback once framework and app load
$Lightning.createComponent(
"lightning:flow", // top-level component of your app
{ }, // attributes to set on the component when created
"lexcontainer", // the DOM location to insert the component
function(component) { // API name of the Flow
component.startFlow(”Lightning_Scheduler_Unauthenticated”);
}
);
}, 'https://yourSiteDomain/siteURL/' // Site endpoint
);
</script>
There’s just one more thing left to do: Get things up and running for the customer session on investment banking.
Resources
- Salesforce Help: Add Inbound Flows to an Experience Cloud Site
- Salesforce Help: Set Up Scheduling for Unauthenticated (Guest) Users
- Salesforce Help: Enable Automatic Resource Assignment and Anonymous Scheduling
- Salesforce Developer: Lightning Scheduler Resources
- Salesforce Help: Control Public Access to Your Experience Builder Sites
- Salesforce Help: Create an Experience Cloud Site