Enable Concurrent Scheduling and More
Learning Objectives
After completing this unit, you’ll be able to:
- Enable Concurrent Scheduling.
- Distinguish between multi-resource scheduling and concurrent scheduling.
- Create a flow.
- List the purpose of using scheduling policy and APIs.
Enable Concurrent Scheduling
Do you recall the Investing 101 session that Fola has planned in the next quarter for customers at Pennsylvania headquarters? Although the session is several months away, Fola wants to make sure that customers can book multiple, simultaneous appointments with Sai Kumar Manlolu the same day, at their convenience. Matt tells Fola about concurrent scheduling, which enables multiple appointments within the same time slot against the same resource. Exactly what Fola wanted.
Matt enables concurrent scheduling to get them started.
- From Setup, enter
Salesforce Schedulerin the Quick Find box, and then select Salesforce Scheduler Settings. - Enable Concurrent Scheduling.

So what’s different between multi-resource scheduling and concurrent scheduling? The following table should help.
|
Multi-Resource Scheduling |
Concurrent Scheduling |
|
Allows multiple resources to be booked for the same appointment. |
Allows multiple appointments for the same time slot and for the same resource. |
Just as Matt did it for multi-resource scheduling, he tweaks the settings to give his team members access to concurrent scheduling.
- Click
 and select Setup.
 - Click Object Manager.
- Select Time Slot.
- Select Fields & Relationships.
- Select Maximum Appointment.
- Click Set Field-Level Security.
- Select the Visible checkbox for all profiles that need access to concurrent scheduling in Salesforce Scheduler, including the System Administrator.
- Click Save.
- Click Back to Time Slot Fields.
- Select Work Type Group.
- Click Set Field-Level Security.
- Select the Visible checkbox for all profiles that need access to concurrent scheduling in Salesforce Scheduler, including the System Administrator.
- Click Save.
Additional Settings
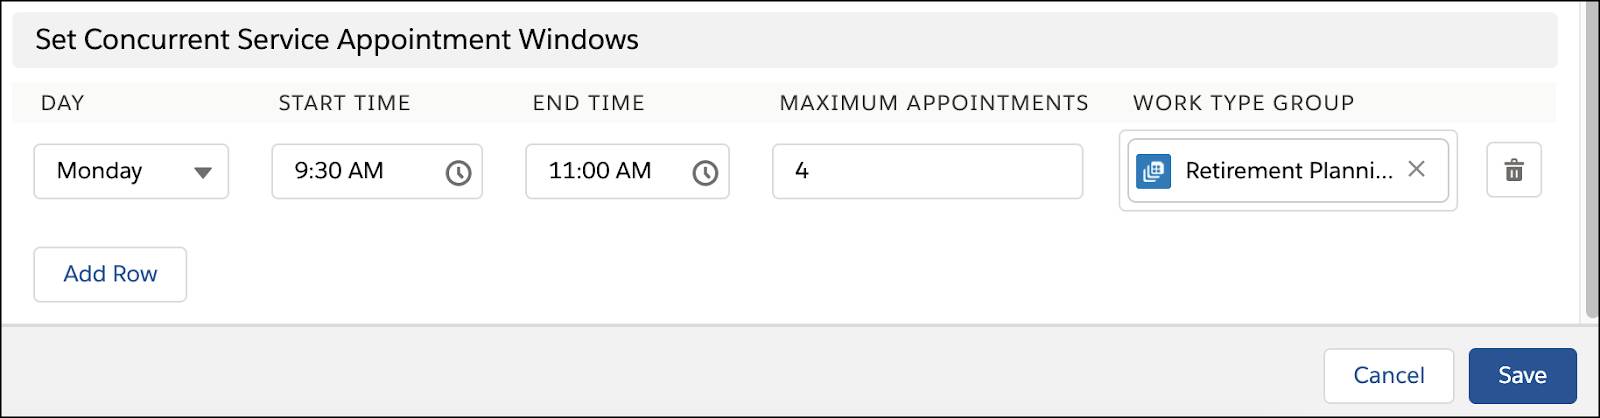
Fola tells Matt that she doesn’t want the free session to have more attendees than can be handled; a session with less than five attendees is easier to lead and more effective than the ones with large groups. She also doesn’t want the bookings to be done on any random day and time, leaving the trainer little time for preparation.
Matt updates Sai’s operating hours to specify the number of multiple appointments that can be made, the days and time slots in which they can be made, and the topic for each appointment.

- On the Operating Hours tab, select the operating hours record you want to set up concurrent scheduling for. Matt selects Sai’s record.
- Click Edit.
- In the Set Concurrent Service Appointment Windows section, click Add Row.
- Define the days, time slots, the maximum number of appointments per time slot, and the appointment topics for concurrent booking. Repeat for each desired day.
- Save your changes.
Go with the Flow—or Not
After a day of heavy admin work, Matt strikes up a conversation with Ancelot Mark Pinto over a cup of coffee. Ancelot’s a developer at Cumulus Cloud Bank who’s also deeply familiar with Salesforce orgs. He tells Matt that Salesforce Scheduler’s capabilities can be greatly expanded upon and customized by tweaking flows, scheduling policies, and APIs. Matt is intrigued and wants to learn more.
A flow is simply an app that automates a process by collecting data and doing something in your Salesforce org or an external system. It’s like the hard-working technician who’s active behind the scenes so that everything works the way it’s intended to. Salesforce Scheduler comes with standard, out-of-the-box flow templates that walk users through scheduling, modifying, and canceling appointments. Here are two of them.
|
Flow |
Purpose |
|
Outbound Flow (Outbound New Appointment) |
Walks a user through creating an outbound appointment with one or more employees and a customer. |
|
Outbound Modify Appointment |
Walks a user through modifying an existing outbound appointment. |
As the name suggests, they are templates that you can customize as needed. Ancelot shares a few scenarios for customizing a flow.
- You can put an extra step before you confirm an appointment.
- You can reorder and change the way things appear on the screen while booking an appointment.
- You can preselect a default appointment topic (work type group) or even skip the branch (service territory) selection.
- You can call a Service Resource a “Banker” or an “Advisor” just by going to Setup > Rename Tabs and Labels and—presto—the Service Resource gets renamed. So much power!
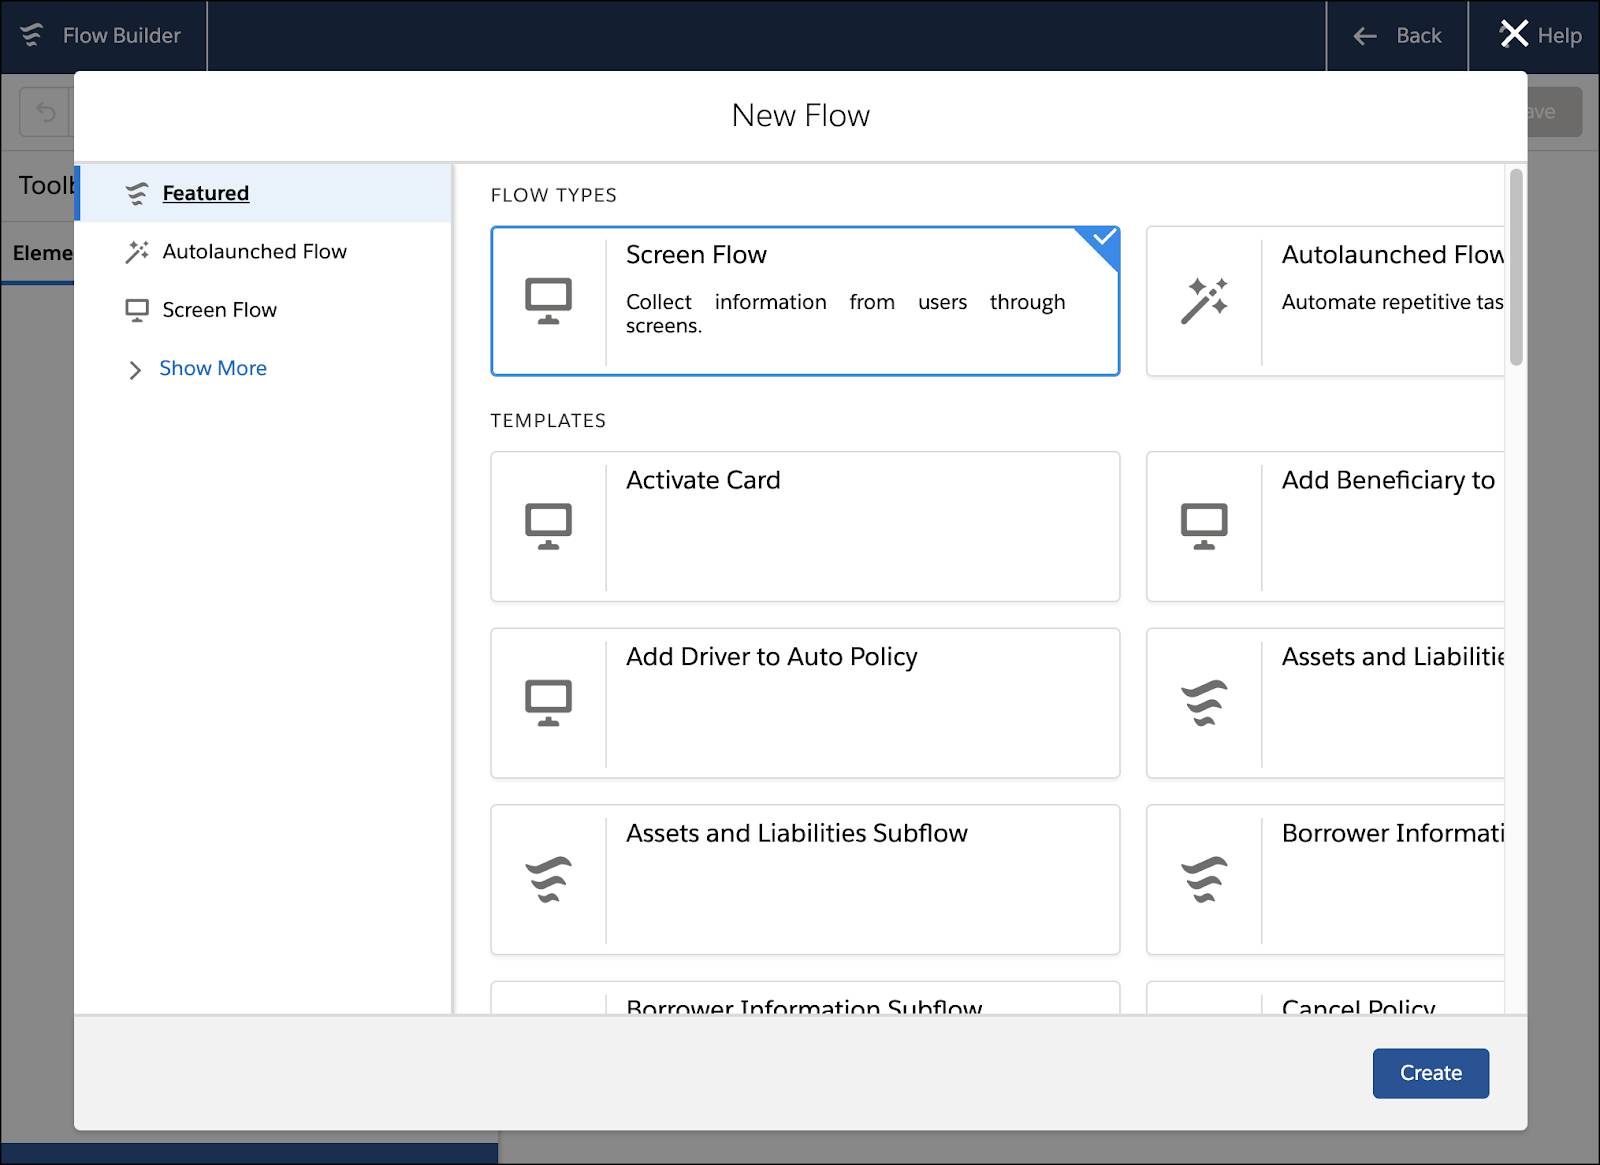
To customize a flow, start with a standard flow template. Here’s how to do it.
- From Setup, enter
Flowsin the Quick Find box, and then select Flows. - Click New Flow.
- In the list of templates, select the template that you want to customize.
- Click Create.
- Customize the flow according to your business requirements, and then save your changes.
- Activate the flow.
- In the list of flows, click the name of the new flow.
- Under Flow Versions, next to the latest version of the flow, click Activate.
Scheduling Policy
A scheduling policy lets you enforce one or more rules that help you find the best resources for appointments. For example, it considers resource skills and service territory membership when searching for resources. You can call these scheduling policies each time you are trying to get the available candidates or the available time slots for a candidate.
Here are a few of the scheduling policies available in Salesforce Scheduler.
|
Name |
Definition |
Usage |
|
Include Primary Service Territory Members |
Display all resources whose primary branch location matches the selected branch location. |
At a minimum, a scheduling policy must have Include Primary Service Territory Members or Include Secondary Service Territory Members selected. |
|
Match Skills |
Enforce skill matching when displaying resources and time slots to end users. |
See following. |
|
Match Skill Levels |
Enforce skill level matching when displaying resources and time slots to end users. |
Select this rule and the Match Skills rule to enforce skill level matching. |
APIs
An application programming interface, or API, lets you do more than what you can achieve by using flows. The standard flow components do a great job, but if you want a unique flow that stands out on your website, consider APIs.
Let’s say you chose an appointment topic—Insurance Planning—and want to search for all the resources who are available to help you with it across the different branches in the city. You can use the Get Appointment Candidates API that returns a list of available service resources (appointment candidates) based on the appointment topic and branches. You can also use the Get Appointment Slots API to build a customized time-slot screen after the resources have been selected.
Matt thanks Ancelot for the insight into what goes on behind the scenes and the ways to expand Scheduler capabilities. “I guess we’ve just scratched the surface of Scheduler,” he quips, as they finish their cups of cafe latte.
More Business—Thanks to Salesforce Scheduler
Fola and team gear up for the increased volume of customers and prospects (and revenue!) the appointments will bring to Cumulus Cloud Bank. A smooth, seamless, and state-of-the-art banking experience for everyone, thanks to Salesforce Scheduler!