Set Up Advanced User Access to Mortgage Features
Learning Objectives
After completing this module, you’ll be able to:
- Create and assign mortgage user profiles.
- Set up account sharing.
- Update the Residential Loan Application page layout.
- Create and assign roles.
- Set up an Actions and Recommendations list.
Create and Assign Mortgage User Profiles
Next up, Matt creates loan officer and underwriter profiles, for Sofia and Shah respectively, to give them appropriate access to mortgage objects and document checklist items.
- From Setup, in the Quick Find box, enter
Profiles, then select Profiles. - On the Profiles page, clone the Standard User profile.
- On the Clone Profile page, enter
Loan Officerfor the cloned profile name and save. - From Setup, in the Quick Find box, enter
Users, then select Users. - Click Edit next to the user that you want to assign the Loan Officer profile to. Matt selects Sofia.
- Select the Loan Officer profile from the Profile dropdown list and click Save.
- From Setup, in the Quick Find box, enter
Profiles, then select Profiles. - On the Profiles page, clone the Standard User profile.
- On the Clone Profile page, enter
Underwriter, for the cloned profile name and save. - From Setup, in the Quick Find box, enter
Users, then select Users. - Click Edit next to the user that you want to assign the Underwriter profile to. Matt selects Shah.
- On the User Edit page, select the Underwriter profile from the Profile dropdown list and click Save.
Set Up Account Sharing
Matt uses sharing settings to control user access to mortgage records. He sets up sharing for mortgage object records using an account sharing model. This can include an account team, sharing rules, or a role hierarchy.
Matt decides to get his feet wet by setting up Account Teams for sharing.
- From Setup, in the Quick Find box, enter
Account Teams, and then select Account Teams. - If account teams are disabled, enable account teams for your organization.
- On the Account Team Setup page, click Enable Account Teams, select Account Teams Enabled, and then click Save.
- On the Page Layout Selection page, select the page layout used by your mortgage teams, enable Add to users’ customized related lists, and save.
- On the Account Team Setup page, click Team Roles.
- On the Team Role Picklist Edit page, click New.
- Enter
Loan Officer,Underwriter, and other mortgage-related team roles at your company each on their own lines and save. - To move the new roles to the top of the picklist, click Reorder, select the new roles, then click Top, and save.
Update the Residential Loan Application Page Layout
Matt adds the loan applicant and loan application objects to the Related Lists section of the Residential Loan Application page layout.
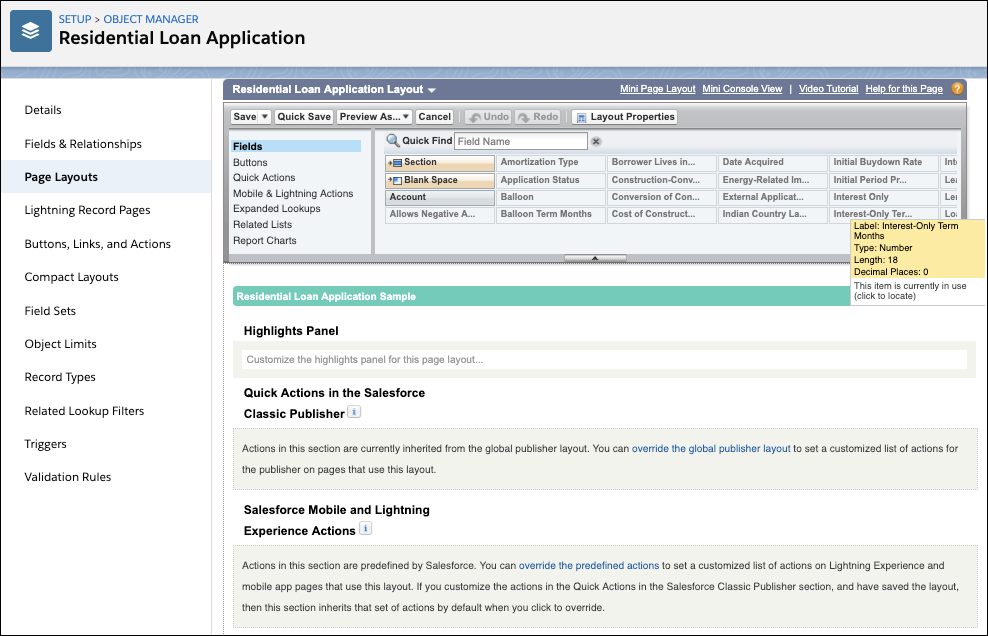
- From Setup, open Object Manager.
- In the Quick Find box, enter
Residential Loan Application, then click Residential Loan Application. - Click Page Layouts and then select the Residential Loan Application layout that your mortgage users see.
- On the palette, select Related Lists.
- Drag the following objects from the palette to the Related Lists section:
- Loan Applicants
- Loan Applicant Addresses
- Loan Applicant Declarations
- Loan Applicant Employments
- Loan Applicant Incomes
- Loan Application Assets
- Loan Application Financials
- Loan Application Liabilities
- Loan Application Properties
- Loan Application Title Holders
- Document Checklist Items
- Click Save. If you’re prompted to overwrite user’s related list customizations, click Yes.
Create and Assign Roles
For a loan officer like Sofia to be able to create a customer user like Richard Bennett in Salesforce, Matt must first assign a role to her.
- Create a loan officer and an underwriter role.
- From Setup, in the Quick Find box, enter
Roles, and then select Roles. - Click Set Up Roles.
- On the Creating the Role Hierarchy page, find the role that the loan officer role reports to, and click Add Role beneath it.
- Enter a label for the new role. Matt enters
Loan Officer. - Save your changes.
- Repeat steps a through e for
Underwriter.
- From Setup, in the Quick Find box, enter
- Assign a role to loan officers.
- On the Creating the Role Hierarchy page, click Assign next to the role you want to assign.
- Under Available Users Search, select All Unassigned.
- Select Sofia Lopez, click Add, and save.
- Repeat steps a through c for Shah Jahan.
Set Up an Actions and Recommendations List
Finally, Matt creates a list of flows to display to Sofia in the Actions and Recommendations list on residential loan application record detail pages.
- From Setup, in the Quick Find box, enter
Recommendations, and select Actions & Recommendations. - Click New Deployment, and then click Next.
- Enter a label for your deployment. Matt enters
Mortgage Flows. - Select Flows and quick actions and click Next.
- Under Available Objects, enter
Residential Loan Application, and select Residential Loan Application. - To add Residential Loan Application to the Selected Objects list, click the right arrow, and click Next.
- Under All Actions, drag the following flows into the Top Pinned box on the right:
- Lender Loan Information - Flow
- Borrower Information - Flow
- Assets and Liabilities - Flow
- Click Next.
- On the Select actions to add page, click the checkbox to the left of Action Label to deselect all actions.
- Under Action Label, select Assets and Liabilities, Borrower Information, and Lender Loan Information.
These will become available from a Residential Loan Application record. - Click Save, and then click Go to Lightning App Builder.
- On the Lightning App Builder page, click New.
- On the Create a new Lightning page, select Record Page, and click Next.
- Enter
Residential Loan Application Record Pagefor label, set Object to Residential Loan Application, and click Next. - Select CLONE SALESFORCE DEFAULT PAGE and then click Finish.
- Drag the Actions & Recommendations component onto the Residential Loan Application Record page into the right column.
- In the Actions & Recommendations properties sidebar, set Actions & Recommendations Deployment to the deployment you created.
Matt sets it to the Mortgage Flows deployment. - Click Save, and then click Activate.
- On the Activation page, click Assign as Org Default.
- On the Assign form factor page, select Desktop and phone, and then click Next.
- Click Save.
With this, Matt’s done setting up all the required user access to mortgage features. In the upcoming units, Matt sets up borrower access to mortgage applications in Experience Cloud sites. He also enables document tracking and approvals, ensuring end-to-end digitization.