Set Up Your Account
Learning Objectives
After completing this unit, you’ll be able to:
- Identify your Marketing Cloud Engagement account member identification code (MID).
- Complete company settings for your account.
- Configure security settings.
- Explain the importance of data protection and privacy.
Introduction
You got a new Marketing Cloud Engagement account and you’re super excited to get started! But where do you start? Don’t worry—we’ve got you covered. We’re going to walk you through the most important information you need to start administering your new Marketing Cloud Engagement account.
First, in case you need a refresher on what you can do with Marketing Cloud Engagement, take a quick look at this demo.
In this module, we assume you are a Marketing Cloud Engagement administrator with the proper permissions to set up your new Marketing Cloud Engagement account, manage users, business units, and default settings. If you’re not an administrator for Marketing Cloud Engagement, that’s OK. Follow along to learn how your administrator would set up your company’s Marketing Cloud Engagement account.

Getting to Know You
Marketing Cloud Engagement is an any-size business solution. Whether your company is a team of 10 or a team of 10,000 in 10 countries, you can use Marketing Cloud Engagement in a way that fits your company’s needs. Marketing Cloud Engagement is currently available in Basic, Pro, Corporate, or Enterprise. It’s important to know what edition you purchased so that you understand what products and features are included in your account. If you’re not sure what edition you purchased, talk to your Marketing Cloud Engagement account executive. Just know that we discuss features in this module, such as business units, that may not be included in your Marketing Cloud Engagement edition. That said, for the most part, this content is applicable to all Marketing Cloud Engagement editions. Ask your Marketing Cloud Engagement account executive about any features you’re interested in adding.
Now that that’s out of the way, let’s take a look at how Marketing Cloud Engagement accounts are structured and identified.
Tenants
The Marketing Cloud Engagement edition your company purchased dictates the type of tenant you’re working with. You’ll encounter the term tenant when reviewing Marketing Cloud Engagement documentation, and it helps to understand how your account is structured.
Tenant Type |
Description |
|---|---|
Enterprise 2.0 |
A tenant is the top-level account and includes all associated business units. |
Enterprise 1.0 |
A tenant is the top-level account and includes all associated On-Your-Behalf or Lock & Publish business units. |
Core |
A tenant is a single account. |
Agency |
Each top-level account and each associated client account is a separate tenant. |
Account Name and MIDs
Your initial account name is set at the time your Marketing Cloud Engagement account is provisioned for you. A unique member identification code, or MID, is assigned to every account (whether it’s Core, Enterprise, or Agency) and any associated child accounts. The MID value identifies that entity. So, depending on your Marketing Cloud Engagement edition, tenants can include single or multiple MIDs.
- An Enterprise 2.0 tenant includes multiple MIDs for Enterprise-edition accounts.
- An Enterprise tenant includes multiple MIDs.
- A Core tenant includes a single top-level account with one MID.
- An Agency tenant includes only the top-level account. Each associated client account unit is a separate tenant.
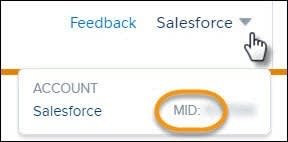
There are a few ways to locate the Account Name and MID after you log in to Marketing Cloud Engagement (using your credentials at https://mc.exacttarget.com).
Option 1: Your account name is located immediately to the left of your username in the top corner of the Marketing Cloud Engagement interface. Hover over your account name to see the MID.
Option 2: Under your username, navigate to Setup. Use Quick Find to navigate to Account Settings. You can find the Account Name and MID listed as the Account ID.

Marketing Cloud Engagement Instance
There’s one more piece to understand for identifying your Marketing Cloud Engagement account—your Marketing Cloud Engagement instance. Knowing your instance is necessary to configure the Web Collect URL, SOAP API, and more. It also helps you monitor any performance concerns on the Salesforce Trust site and use the release schedule to predict when new features are released to your account. For now, it’s important to learn your Marketing Cloud Engagement instance so you can reference it in the future.
- Copy the MID value that you just located in your Marketing Cloud Engagement account.
- In a separate browser tab or window, navigate to https://trust.salesforce.com.
- Click Status for status.salesforce.com.

- To search for incidents related to your MID, enter the copied MID value.

The site returns your Marketing Cloud Engagement instance. You can visit the site any time to get your instance information and check on Marketing Cloud Engagement performance information. Take the Marketing Cloud Engagement Trust Site Trailhead module to learn more.
IP Allowlist
After you get your Marketing Cloud Engagement instance, use that information to determine what IP addresses you need to allowlist. The recommended best practice is to allowlist the entire set of IP ranges for your region. This practice ensures that Salesforce login pools can process your end users’ login authentication when accessing Salesforce anywhere and avoids any unintended service disruptions due to movement between primary and secondary instances. Learn more about IP Addresses for Inclusion on Allowlists in Marketing Cloud Engagement and get the complete list of IP addresses on Salesforce Help.
Account Settings
Now that you know a bit about your Marketing Cloud Engagement account, it’s time to configure some default settings. Let’s start with some basic settings that are applied to all the users of your Marketing Cloud Engagement account, including any users you add in the future.
To get started, log in to Marketing Cloud Engagement and navigate to Setup (hint: you can find the link under your username).

We spend all of our time for this module in the Marketing Cloud Engagement Setup app so keep the page open in your browser to follow along.

Company Info
First, let’s complete some basic information about your company.
- In Marketing Cloud Engagement Setup, click Company Settings.
- Click Account Settings.
- Click Edit.
- In Company Information, update these fields as needed:
- Company Name
- Street
- City
- State
- Zip/Postal Code
- Country
- In General Settings, select a Time Zone and Date Format that are the default settings for all of your users. Don’t worry, individual users can change these for their own account.
Let’s stay on this page for a moment. In General Settings, there are fields for Email Display Name and Email Reply Address. These settings are used as the defaults for email sends from your Marketing Cloud Engagement account. Marketing Cloud Engagement users with appropriate permission can set up additional names and email addresses to select for Marketing Cloud Engagement sends. It’s important to choose these defaults carefully in case they are used for email sends to your subscribers.

After you set the Email Display Name and Email Reply Address, click Verify to send a test message to that email address and verify that the domain is valid. You can learn more about Domain Verification on Help or in the Email Studio Basics Trailhead module.
While you’re in the Company Settings section, take a look at the Alert Manager setting. This feature sends the specified email address a message whenever something goes wrong with a send. Did a triggered send run into an AMPscript error and shut down? Did a Journey Builder process run up against a subscriber send limit? Wouldn’t you like to know important information like this without digging through reports or contacting Salesforce Customer Support? Then this feature is for you! Follow these steps to avoid hassle down the road.
- In the Company Settings section of Setup, click Alert Manager.
- Click Edit.
- Click the dropdown and select the appropriate email address.
- Click Save.
Choose your email address wisely and make sure that person is available, because that email address is where all further notifications for Alert Manager go. Update this setting as necessary to make sure issues are handled quickly.
Save your changes.
Headers and Footers
Headers and Footers are the last information to complete on General Settings page for your initial setup. Marketing Cloud Engagement can automatically add text and images to the beginning and end of your email messages that ensures compliance with CAN-SPAM regulations. Let’s customize how those headers and footers appear by default at your account level. Later, your users can also create send classifications in Email Studio to customize the content for their emails.
- In Account Settings, click Edit.
- In the Headers and Footers section, select a setting for HTML and Text Headers, and HTML and Text Footers. You can use the system generated defaults to comply with CAN-SPAM act, customize your own, or select None to remove any defaults.
The HTML version of the Header and Footer is used for HTML emails, whereas the Text version is used for non-HTML text-based versions of emails.
Hover your mouse cursor over Preview to preview a custom header or footer.

Save your Settings.
Check out Headers and Footers in Email Messages for Marketing Cloud Engagement on Salesforce Help for more information about legally required information, customizing these sections, and getting additional settings enabled in your account. You can also learn more about Send Classifications.
Security Settings
Marketing Cloud Engagement includes several settings to help you keep your account secure. In Marketing Cloud Engagement Setup, use Quick Find to navigate to Security Settings. There are several settings you can manage for all users of your Marketing Cloud Engagement tenant, including session timeout, requiring a secure connection, expiration for logging in, and much more. To get started, here are some best practices we recommend for your security settings:.
Field |
Recommended Setting |
|---|---|
Session Timeout |
20 minutes |
Login Expires After Inactivity |
90 days or less |
Invalid Logins Before Lockout |
3 |
Count Invalid Logins Across Sessions |
Yes |
Minimum Username Length |
8 characters |
Minimum Password Length |
8 characters or more |
Enforce Password History |
8 passwords remembered |
User Passwords Expire In |
90 days |
Send Password Change Confirmation Email |
Enable |
Enable Audit Logging Data Collection |
Enable |
You can also secure your Marketing Cloud Engagement tenant using Multi-Factor Authentication (MFA). This feature requires users to log in with their username, password, and another verification method they can register for themselves, including:.
- The Salesforce Authenticator mobile app
- Security keys that support U2F or WebAuthn, such as Yubico’s YubiKey or Google’s Titan Security Key
- Time-based one-time passcode ( TOTP) authentication apps, like Google Authenticator, Microsoft Authenticator, or Authy
Review the complete list of Marketing Cloud Engagement Security Settings and best practices on Salesforce Help.
Privacy and Data Protection Law
Before you start using Marketing Cloud Engagement, we highly recommend you take the Learn Privacy and Data Protection Law trail. If your business collects, stores, or uses personal information for European or US citizens, it is critical that you understand the impact European Union and US privacy laws can have on your business.
Now your initial setup is complete. In the next unit we take a look at how to set up and manage users in your Marketing Cloud Engagement account.
Resources
- Blog: Data Privacy and Customer Engagement with Salesforce
- Salesforce Help: Domain Verification
- Salesforce Help: IP Addresses for Inclusion on Allowlists in Marketing Cloud Engagement
- Trailhead Trail: Learn Privacy and Data Protection Law
- Salesforce Help: Marketing Cloud Engagement Security Settings
- Salesforce Help: Marketing Cloud Engagement Setup Page
- Salesforce Help: Marketing Cloud Engagement Tenant Types
- Trailhead Module: Marketing Cloud Engagement Trust Site
- Trust: Salesforce Trust
- Web: Salesforce Marketing Cloud Engagement Editions
- Salesforce Help: Send Classifications