Install and Set Up in Salesforce CRM
Learning Objectives
After completing this unit, you’ll be able to:
- Install the managed package in your Salesforce CRM org.
- Modify page layouts for email.
- Set up the CRM API User.
- Update admin permissions to use Marketing Cloud Connect.
Before You Begin
As we mentioned in the beginning of this module, we assume you are a Marketing Cloud Engagement and Salesforce CRM admin with the proper permissions to access and configure both accounts. If you are an admin for one but not the other, be sure to work with someone who has the appropriate permissions to complete the installation steps. Also, confirm that you are using the Salesforce Classic UI and that you have Custom Platform Events enabled in your Salesforce CRM. It must be enabled for the managed package to install successfully.
Follow Along with Trail Together
Learn more about the following steps and processes with Trailhead Academy instructor, Brian Richardson.
2: Install the Managed Package
 It’s time to install the managed package. A managed package is a collection of components and applications that makes the connection between your Salesforce CRM and Marketing Cloud Engagement accounts work. Follow along with these steps to download the latest version of the managed package.
- Confirm you are using the most recent version of a supported web browser, then click one of these URLs.
- Production Org: https://sfdc.co/MCC
- Sandbox Org: https://sfdc.co/MCCSandbox
- Log in to your Salesforce CRM account using your admin credentials, and then select Install for Admins Only.
- Click Install. (If prompted, grant access to these third-party websites).
- Click Continue.
Be sure to wait until the managed package installation is complete before moving on to the next step.
3: Configure CRM Settings

Now that you’ve installed the managed package, there are a few initial configuration updates that need to happen in your Salesforce CRM account. So go ahead and log in to your Salesforce CRM account with your admin credentials, if you haven’t already.
Learn more about the following steps and processes with your instructor.
Modify Page Layouts
In order for users to see email activity from within a Salesforce CRM account, we need to make some modifications to page layouts.
- In the Salesforce CRM org, click Setup.
- Enter
Usersin the Quick Find box and select Users under Build > Customize.
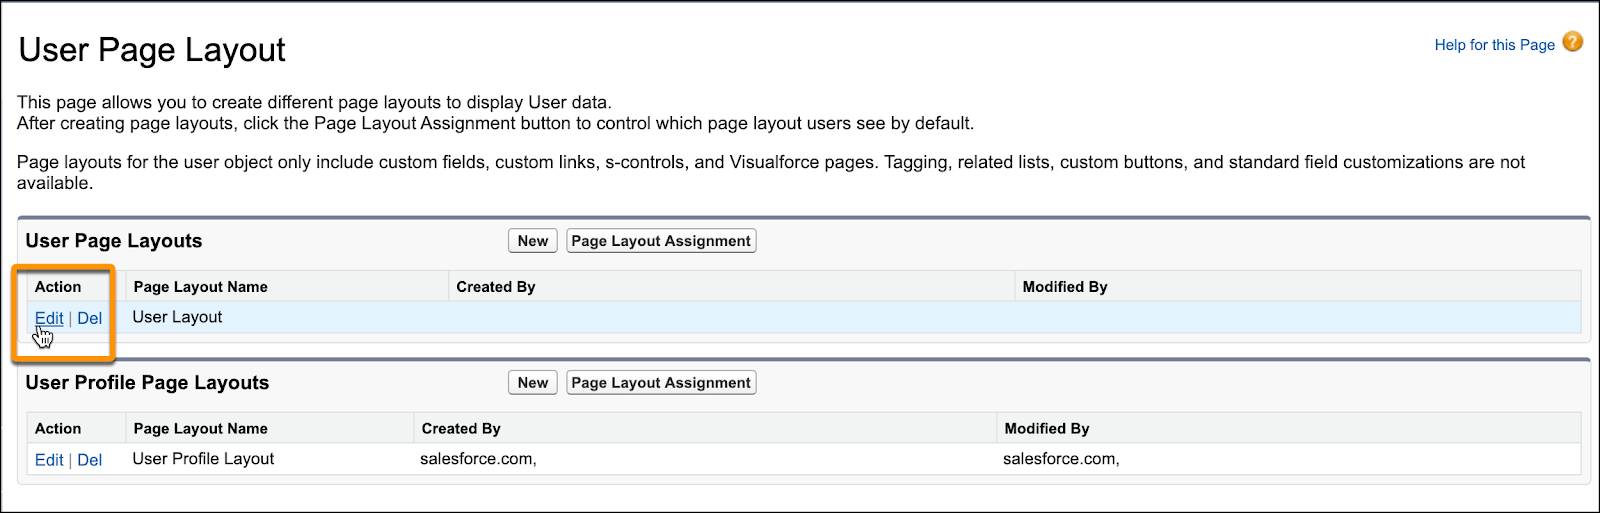
- Under Users, click Page Layouts.
- Under User Page Layouts, click Edit next to User Layout.
- Scroll down to view the Additional Information section of the user page layout.
- Drag Marketing Cloud Engagement for AppExchange Admin from the palette to the Additional Information section of the user page layout.
- Drag Marketing Cloud Engagement for AppExchange User (1) to the same section.
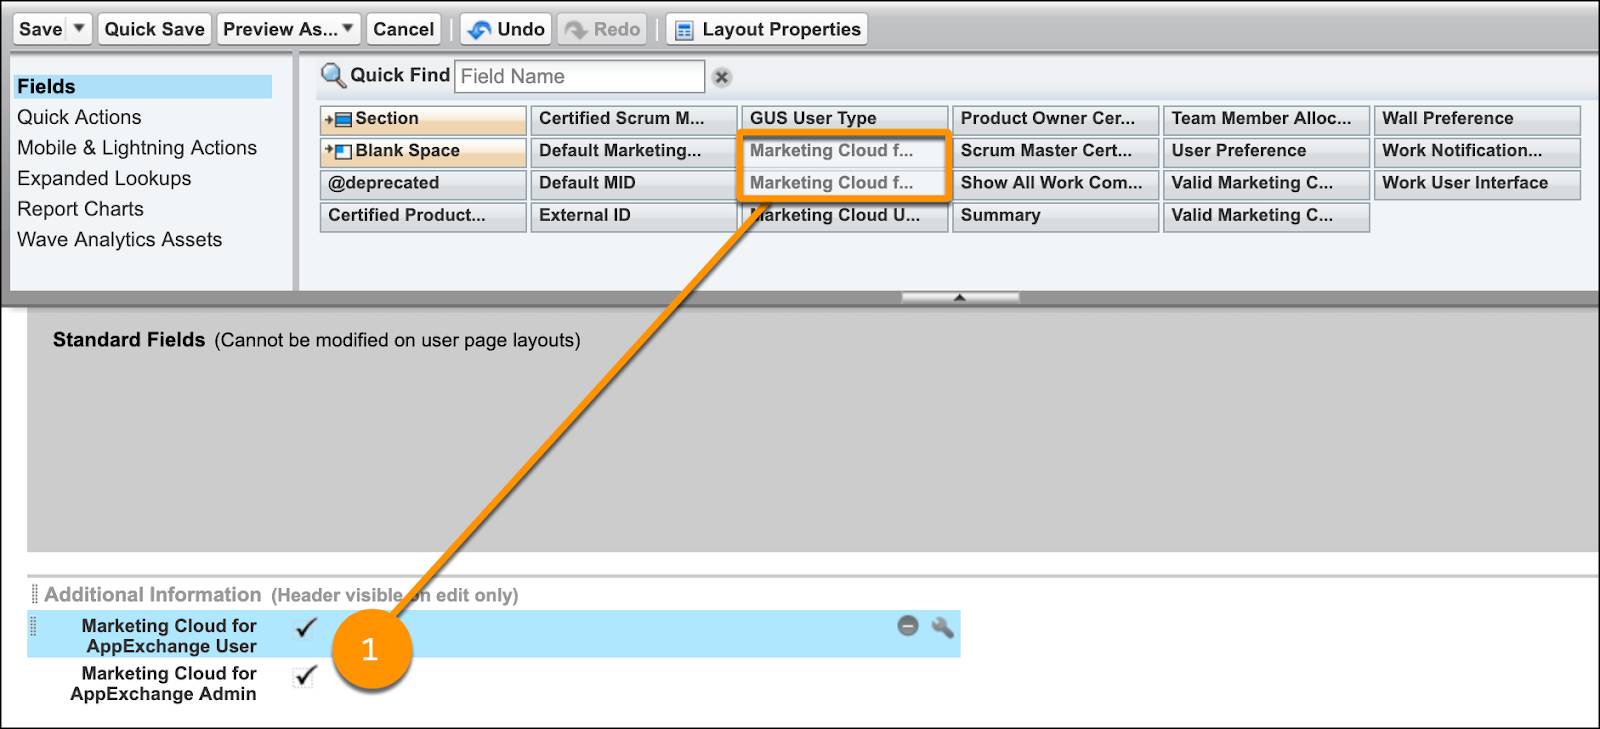
- Click Save.
Modify Lead Page Layout
Now let’s configure the lead page to ensure Marketing Cloud Connect users can see the relevant Marketing Cloud Connect fields.

- Still in CRM Setup under Build > Customize, click the arrow icon to expand the Leads menu.
- Click Page Layouts.
- Identify a page layout to work with and click Edit.

- In the layout you selected, from the tool palette options select Related Lists.
- Drag Email Sends from the palette to the bottom of the Lead page layout (1) to create a new related list.

- Then drag Individual Email Results from the palette to the bottom of the Lead page layout to create another new related list.
- Next, select Visualforce Pages from the palette options.
- Drag LeadActions from the palette to the Description Information section of the Lead page (1).

- Click Save.
- Click Yes to Overwrite Users’ Related List Customizations?
Modify Contact Page Layout
Now let’s repeat similar steps to modify your contact layout from the Setup screen.
- Still in CRM Setup under Build > Customize, click the arrow icon to expand the Contacts menu.
- Click Page Layouts.
- Once again, select a layout to update that only admins see. Once selected, click Edit next to the name.
- In the tool palette, select Related Lists.
- Drag Email Sends from the palette to the bottom of the Contact page layout to create a new related list.
- Drag Individual Email Results from the palette to the bottom of the Contact page layout, following Email Sends, to create another new related list.
- Click Visualforce Pages in the palette.
- Drag ContactActions from the palette to the Additional Information section of the Contact page.
- Click Save.
- Click Yes to Overwrite Users’ Related List Customizations?
You now have visibility into the email sends for both leads and contacts. Nice work!
Grant Access to Your Marketing Cloud Connect Admin
Let’s move on to user permissions. It’s time to grant some permissions to your Marketing Cloud Connect admin (this can be you or another user). Follow these steps to assign the permissions to that user from the Setup menu.
- Under Administer in the Setup menu, click the arrow icon to expand the Manage Users menu.
- Click Users.
- Click Edit next to the name of the admin user you’ve identified.
- Under Additional Information, select Marketing Cloud Engagement for AppExchange Admin and Marketing Cloud Engagement for AppExchange User.

- Click Save.
Perfect, permissions granted to the admin!
Set Up the CRM API User
Next up, you create the CRM API user (also called the Salesforce System user), which connects Marketing Cloud Engagement to your CRM org.
- Under Administer in the Setup menu, click the arrow icon to expand the Manage Users menu.
- Click Users.
- Click New User. Create a new user with the following settings:
- First Name:
MC - Last Name:
Connect-CRM - Email: Use an email address that you have access to.
- Username: Must be unique and in the format of an email address. We suggest:
mc-connect-crm@youremail.com.
- User License: Salesforce
- Profile: System Administrator
- Role: <None Specified>
- Under General Information, click the Marketing User checkbox.
- Under Additional Information, select the Marketing Cloud Engagement for AppExchange Admin and Marketing Cloud Engagement for AppExchange User checkboxes.
- Select the checkbox for Generate new password and notify user immediately.

- Click Save.
Important: An email will be sent to the address you specified. Follow the instructions in that email to verify the identity of the new user record and specify the password for this new user account.
Create Permission Set in Salesforce CRM
For the two systems to communicate properly, we need to create a generic permission set in Salesforce CRM and update Marketing Cloud Connected app settings. This is necessary to grant access to users connecting to Salesforce CRM from Marketing Cloud Engagement.
- Under Administer in the Setup menu, click the arrow icon to expand Manage Users.
- Click Permission Sets and click New.
- Give the permission set a memorable label and description. We suggest
Marketing Cloud Connected Appand a description ofGives access from CRM to Marketing Cloud Engagement.
- Click Save.
- Click Manage Assignments and then click Add Assignments.
- Select the CRM API User account you created in the last section.
- Click Assign and then Done.
A permission set without a permission? Don't worry- you are doing this correctly! This permission set's purpose is for connection and authentication.
Update Field-Level Security
Email Opt Out is a standard field on the Contact and Lead objects. For Marketing Cloud Connect to work properly, you need to ensure that all Marketing Cloud Connect users have view access to this field.
- Under Build in the Setup menu, click
 to expand Customize.
- Next expand Leads.
- Click Fields.
- In the list of standard fields, click Email Opt Out.
- Click Set Field-Level Security.
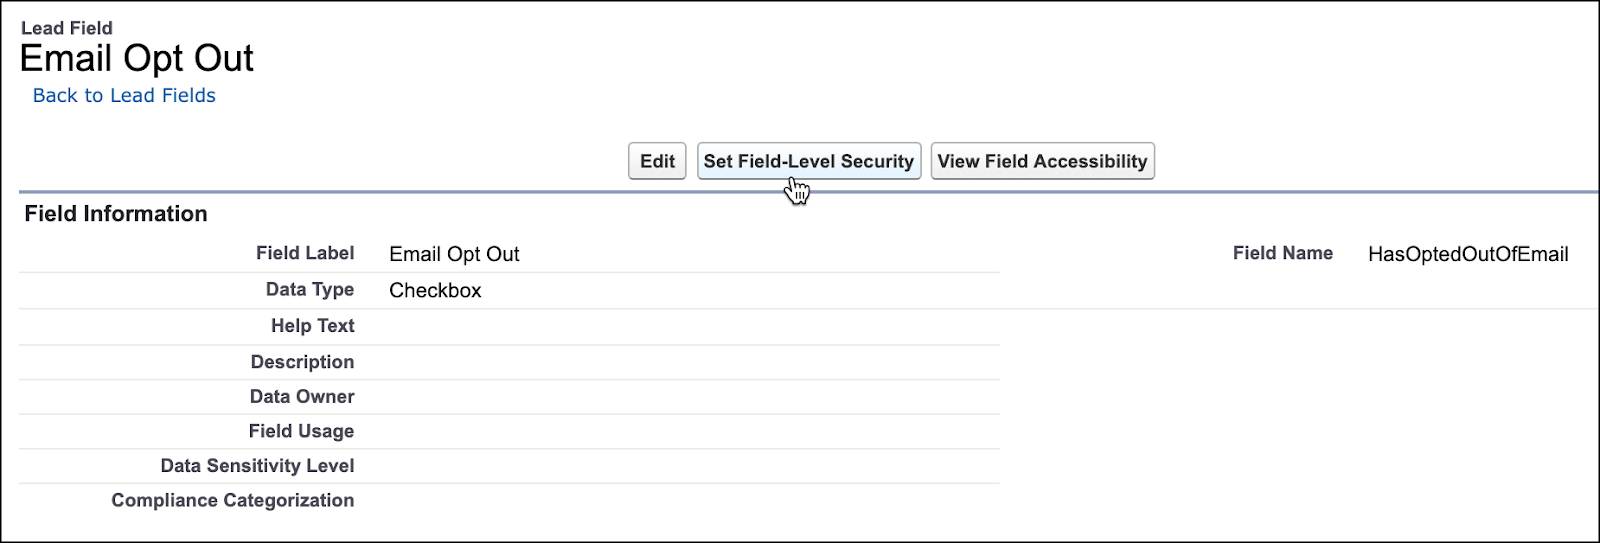
- Select the Visible checkbox for all user profiles that need access to Marketing Cloud Connect including the System Administrator profile. Add read-only restrictions based on your business requirements to any user profiles that should not be able to edit this value, such as the Partner Community User.
- Click Save.
- Back on the Setup menu, under Build > Customize, click
 to expand Contacts.
- Click Fields.
- In the list of standard fields, click Email Opt Out.
- Click Set Field-Level Security.
- Select the Visible checkbox for all user profiles that need access to Marketing Cloud Connect, including the System Administrator profile. Add read-only restrictions based on your business requirements to any user profiles that should not be able to edit this value.
- Click Save.
Great job getting those CRM settings configured! Grab a snack and then head to the next unit to begin setup in Marketing Cloud Engagement and finalize configuration.
Resources
-
Salesforce Help: Install the Marketing Cloud Connect Managed Package
-
Salesforce Help: Page Layouts
-
Salesforce Help: Permission Sets