Learn How Coding Concepts Apply to Lightning Web Components
Learning Objectives
After completing this unit, you’ll be able to:
- Explain the architectural differences between Visualforce and Lightning Web Components.
- Map Visualforce coding concepts to Lightning Web Components.
In this unit, you learn how your Visualforce knowledge applies to Lightning Web Components architecture and coding concepts.
Lightning Web Components Architecture
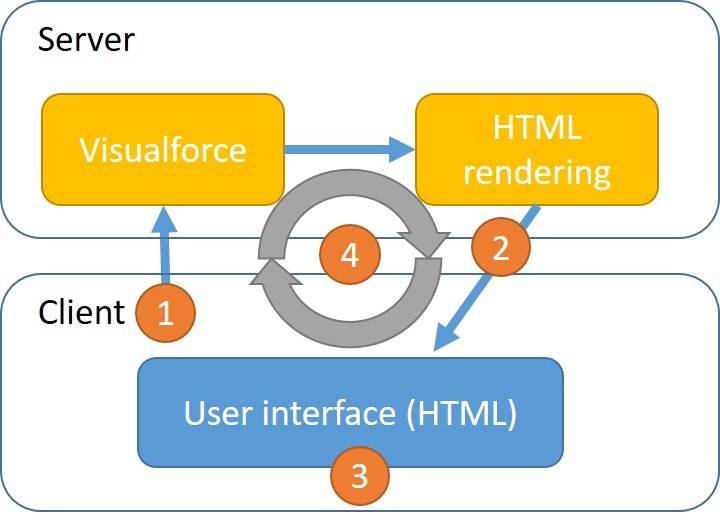
Visualforce is a server-side templating language. When the client (browser) requests a Visualforce page, the server renders it, and sends it to the client as HTML. When the UI needs to change (in response to a link click on the page, for example), the client requests a newly rendered page from the server. The server processes the UI change and sends the full page back to the client.
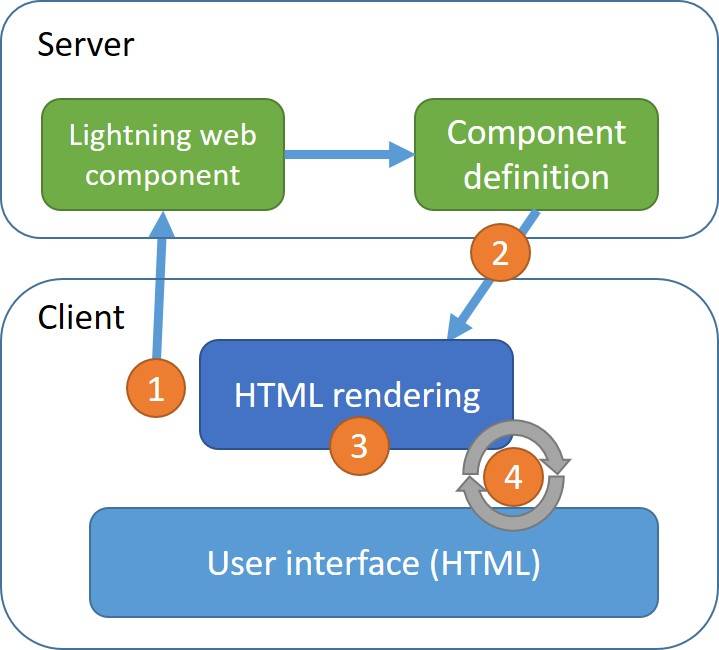
In Lightning web components, the client does most of the heavy lifting. To render a Lightning web component, it requests the component files from the server, processes the files to generate the appropriate markup, and then renders the component UI. Because the client can handle logic, sometimes it performs UI changes without a full callback to the server. It calls the server only when needed, such as when the component needs new data. Even then, the client requests the minimum amount of data needed.
| Traditional Visualforce Requests |
Lightning Web Component Requests |
|---|---|
|
|
|
|
JavaScript plays a big role in Lightning web components. Every component has a JavaScript file that regenerates the UI when needed. Components also call the server using JavaScript to retrieve or modify Salesforce data when needed. We cover data access later in this module.
Lightning Web Components Coding Concepts
Visualforce and Lightning Web Components are quite different, but there are several Visualforce concepts that are helpful in understanding how JavaScript and HTML interact in a Lightning web component.
Tracking State with Properties
In Visualforce, properties are defined in an Apex controller (an Apex class file) and referenced in the page markup (the Visualforce page). In Lightning web components, properties are defined in the component’s JavaScript file and referenced in the page markup (the component’s HTML file). Properties track the state of the Visualforce page and the Lightning web component. Here’s a basic example of the syntax.
hello.html
<template>
    {greeting}
</template>
hello.js
import { LightningElement } from 'lwc';
export default class Hello extends LightningElement {
    greeting = 'Hello World';
}
The value of greeting can be read from JavaScript, but it can also be written, in response to a user action, for example. When the value of a property referenced in markup changes, the Lightning Web Components engine rerenders the component. The user action and resulting rerendering occur entirely on the client. No server request is needed.
Tracking State with Getters and Setters
The getters and setters that you know in Visualforce exist in Lightning web components as well. You define them in the JavaScript file. A getter executes logic when a property is read. A setter executes logic when a property is written to. This is a convenient way of extending the functionality of properties.
To define a getter, create a method that contains your logic and precede it with the get keyword. To define a setter, do the same with set. Defining a setter is optional.
In this example, we define the itemName property using a getter and a setter. The setter converts the value to upper case every time the itemName property is set. When the value of uppercaseItemName changes, the Lightning Web Components engine computes a new value for itemName and then rerenders the component.
todoItem.html
<template>
    {itemName}
</template>
todoItem.js
import { LightningElement } from 'lwc';
export default class TodoItem extends LightningElement {
    uppercaseItemName;
    get itemName() {
        return this.uppercaseItemName;
    }
    set itemName(value) {
        this.uppercaseItemName = value.toUpperCase();
    }
}
Note: The markup for Lightning web components does not support expressions that compute values. Instead, consider using a getter to compute values in the JavaScript file.
Conditional Rendering
In Visualforce, you use the rendered attribute to render markup conditionally. To render markup conditionally in Lightning web components, you use the lwc:if and lwc:else template directives. HTML template directives are special attributes that add dynamic behavior to a template. Other well-known front-end frameworks, such as Angular and Vue, use template directives too.
In this example, the areDetailsVisible property is defined in the controller (not shown). We use the value of the areDetailsVisible property to control the visibility of a section on the page, like this:
helloConditionalRendering.html
<template>
    <template lwc:if={areDetailsVisible}>
        These are the details!
    </template>
</template>
The template that contains “These are the details!” is displayed only when the value of the areDetailsVisible property is true.
Rendering Lists
In Visualforce, you use the <apex:repeat> tag to iterate through a list. In Lightning web components, two template directives perform iterations: for:each and iterator:iteratorName. In this example, we iterate through the contacts property in the controller.
compositionIteration.html
<template>
    <template for:each={contacts} for:item="contact">
        <p key={contact.Id}>
            {contact.Name}
        </p>
    </template>
</template>
Code highlights:
- Line 2: We use the
for:eachtemplate directive to iterate through all of the contacts, one at a time. Then we use thefor:itemtemplate directive to create thecontactvariable, which contains the individual contacts, one at a time, in every iteration. - Line 3: All immediate children of
for:itemmust include a uniquekeytemplate directive.
Invoking JavaScript
In Visualforce pages, when a user interacts with a page, the page can execute JavaScript. For instance, the page may contain an <apex:commandButton> that executes JavaScript logic in response to the button click event. You achieve that by binding the JavaScript logic to the onclick attribute of the button. Invoking JavaScript in Lightning web components works the same way; however, the logic must be defined in a method in the JavaScript file, and the method must be bound to the event, like this:
eventHandler.html
<template>
    <a onclick={handleButtonClick}></a>
</template>
eventHandler.js
import { LightningElement } from 'lwc';
export default class EventHandler extends LightningElement {
    handleButtonClick(event) {
        // Do whatever...
    }
}
Code highlights:
eventHandler.html
- Line 2: We use the standard
onclickattribute to specify a handler for the standardclickDOM event. The curly braces{}indicate that the event handler is thehandleButtonClickmethod in the JavaScript file.
eventHandler.js
- Line 3: We define the
handleButtonClickhandler to receive theeventas a parameter.
Use the event object when your handler needs to access state or data carried by the event. In this case, you can use the event object to find the object onto which the event was dispatched or the number of times it was clicked. We talk more about events later in this module.
Standard Components
The Standard Component Reference in the Visualforce Developer Guide is a library of standard Visualforce components. Similarly, the Lightning Developer Guide Component Reference is a library of base (standard) Lightning components.
Tip: To see only the base Lightning web components in the reference, expand Filters and then select Lightning Web Components under Programming Models.
Use base components to quickly and easily develop apps. Salesforce maintains base components, and creates new features that you automatically receive.
Base Lightning web components reflect the Salesforce look and feel. They have integrated styling provided by the Salesforce Lightning Design System (SLDS). The Design System includes blueprints for all base components as well as CSS classes that you can use in your own components. Use the SLDS website to learn about the styling guidelines that we apply when we build custom components.

To learn which base Lightning web components match some of the standard Visualforce components, see Visualforce Standard Components and Base Lightning Web Components Side by Side in the Resources section.
Composition
In Visualforce, you use tags such as <apex:component> and <apex:include> to implement composition. When a Visualforce page includes a Visualforce component, passing information down to the component is easy with the <apex:attribute> tag. Passing information back up to the page, however, involves more complex patterns, such as hierarchies of Apex controllers.
Composition in Lightning web components is similar. A parent Lightning web component can include a child component and communicate with it.

The composition and communication mechanisms are streamlined, so that every component’s logic is correctly encapsulated and loosely coupled with other components.
To include a child component within a parent component, instantiate the component using the child component name in kebab case (yes, it looks like a kebab), preceded by its namespace. The default namespace for custom components is c. Base components use the lightning namespace.
In this example, the contactTile custom component and the lightning-badge base component are included as children of the compositionBasics component.
compositionBasics.html
<template>
    <c-contact-tile contact={contact}></c-contact-tile>
    <lightning-badge label="LWC rocks!"></lightning-badge>
</template>
To pass information from a parent component down to a child component, you use public properties and public methods. Preceding a property or method with the @api decorator in the JavaScript file makes it public, so that other components can access it. To pass information from a child up to its parent component, you dispatch a standard DOM event or a custom event (see CustomEvent) from the markup. Custom events are outside the scope of this module. The parent component must have an event handler that listens for the event. Let’s consider an example, in which the lightning-input base component notifies its parent component whenever the user changes its value.
accountSearch.html
<template>
    <lightning-input
        type="number"
        label="Number of Employees"
        value={numberOfEmployees}
        onchange={handleChange}>
    </lightning-input>
</template>
accountSearch.js
import { LightningElement } from 'lwc';
export default class AccountSearch extends LightningElement {
    numberOfEmployees = null;
    handleChange(event) {
        this.numberOfEmployees = event.detail.value;
    }
}
Code highlights:
accountSearch.html
- Lines 2–7: We use the
lightning-inputbase component to read the values a user enters into an input field.lightning-inputis a child ofc-account-search. - Line 5: We pass the
numberOfEmployeesproperty value fromc-account-search(the parent component) tolightning-input(the child component), by binding the parent’snumberOfEmployeesproperty to the child’svalueattribute. We can do this because thelightning-inputbase component has a public property namedvalue. - Line 6: We bind a handler named
handleChangeto thechangeevent that thelightning-inputcomponent fires, passing information up to the parent.changeis a standard DOM event. This is how thelightning-inputcomponent sends user input toc-account-search.
accountSearch.js
- Line 5: We read the user input from
event.detail.value.
To learn more about these communication patterns, see Handle Events in Lightning Web Components in the Lightning Web Components Basics module.
Resources
- Trailhead: Lightning Web Components Basics
- Trailhead: Learn to Work with JavaScript
- Lightning Web Components Developer Guide: Create Lightning Web Components
- Lightning web Components Developer Guide: Communicate with Events
- Reference: Visualforce Standard Components and Base Lightning Web Components Side by Side