Navigate Lightning Experience and Setup
Learning Objectives
After completing this unit, you’ll be able to:
- Explain how Lightning apps and the navigation bar work
- Search for records
- Identify where to find Help on each page
- Find objects and apps in Lightning Experience using the new Setup and the App Launcher
- Describe the enhancements, changes, and limitations of the new Setup
- Find Lightning Service Setup flows
Navigation and Setup in Lightning Experience
Setup is where you make the magic happen. As a Salesforce admin or developer, you spend a lot of time using Setup. It’s where you customize and configure your organization, support users, build functionality, and more.
One of the huge productivity upgrades that comes with the new Lightning Experience is the improved Setup. We’ve done a lot of usability testing and refactoring to revamp the Setup tree. We simplified it to have a logical and easy-to-navigate structure, using broad categories to make things more discoverable. In addition, child nodes are now in alphabetical order.
The navigation bar in Lightning Experience provides an efficient and consistent interface to navigate through your organization’s various apps and items. Similar to Salesforce Classic, apps in Lightning Experience give your users access to sets of objects, tabs, and other items all in one convenient bundle in the navigation bar. However, apps in Lightning Experience take things to another level beyond apps in Salesforce Classic by letting you brand your apps with a custom color and logo. In Lightning Experience you can even include Lightning page tabs and a utility bar that allows instant access to productivity tools, like integrated voice, in the footer of Lightning Experience.
Ready to see them in action?
The Lightning Experience Navigation Bar
If you know Salesforce Classic, the Lightning Experience navigation model will feel like a familiar friend, only better.
Each Lightning app has a navigation bar at the top of the page, letting your users:
- Find what they need using item names for easy recognition
- Complete actions and access recent records and lists with a single click
- Personalize the navigation bar to suit the unique way they work
Think of the navigation bar as a container for a set of items and functionality. It’s always there, but the items within it change based on the app you’re using.
- The app name (1) displays on the left side of the navigation bar and custom colors and branding (2) make each app unique and easy to identify.
- Your users can access other items and apps by clicking the App Launcher icon (3).
- Your users can create records and access recent records and lists directly from the navigation bar (4) for items like Opportunities.
What can you put in the Lightning app navigation bar?
If you’re familiar with Salesforce Classic, you know that Classic apps can contain:
- Most standard objects, including Home, the main Chatter feed, Groups, and People
- Your org’s custom objects
- Visualforce tabs
- Lightning component tabs
- Canvas apps via Visualforce tabs
- Web tabs
Lightning apps can contain everything on this list plus Lightning page tabs and utilities like Lightning Voice. If your org uses utility features, you can enable a utility bar in your app that allows instant access to productivity tools, like integrated voice, in the Lightning Experience footer.
As we mentioned, you and your users can still get to custom apps and objects via the App Launcher, which we’ll look at next.
How can users personalize the navigation bar?
Personalized navigation in Lightning Experience is similar to customized tab sets in Salesforce Classic but better. In Lightning Experience, the navigation bar can contain more than just object-level items, like Accounts. You can add granular items, like a dashboard, list, or record. Let’s look at the different ways users edit the navigation bar.
You can drag items on the navigation bar to change their order.

Want to make several changes to the navigation bar? Click the pencil icon on the navigation bar. From the enhanced editor:
- Reorder the items already in your navigation bar.
- Rename items you’ve added. A pencil icon is next to the items that you can rename.
- Add items to the navigation bar. Click Add More Items. Search through your favorites or all available items in your org, and choose what to add. After you make your selections, you can reorder or remove items before saving your changes. You can’t delete items that your admin has specified for the app.
A few considerations to keep in mind.
- Help users get the most out of personalized navigation by upgrading your Classic apps to Lightning apps. Users can’t personalize the navigation bar of Classic apps in Lightning Experience.
- Check what’s in your apps. Users can’t remove the items you include in the navigation bar, and they can’t personalize the navigation bar when it contains more than 50 items. For example, if you include 32 items in an app’s navigation bar, users can add 18 more personal items.
- Items that you add to an app’s navigation bar are added to the end of users’ personalized navigation bars in the order that you added them.
- When you remove an item from an app, that item remains in your users’ personalized navigation bars, and users can then delete it.
- If you don’t want your users to personalize the navigation bar for a specific app, disable personalization. From Setup in Lightning Experience, go to the App Manager. For the desired app, select App Options. Select Disable end user personalization of nav items in this app.
- If you don’t want your users to personalize the navigation bar for any app, disable personalization. From Setup, enter User Interface in the Quick Find box, then select User Interface. Select Disable Navigation Bar Personalization in Lightning Experience. Salesforce recommends disabling navigation personalization by app instead of for the entire org.
- Control if temporary tabs are created when users access items outside of the app. From Setup in Lightning Experience, go to the App Manager. Edit the desired app. On the App Options page, select Disable temporary tabs for items outside of this app.
- The tab’s dropdown menu includes an option to create an item. For example, create an account by selecting + New Account from the Account tab’s dropdown menu. However, the New action doesn’t appear if:
- Users don’t have the create permission for the object
- The New action isn’t part of the search layout for the object’s list view
Fast Track Navigation in Lightning Experience with Favorites
Favorites are another great way for your users to boost productivity by personalizing how they navigate. Think of the favorites star at the top of the page in Lightning Experience as a constellation in the sky. It’s always there, so your users can easily navigate to what they need no matter where they are.
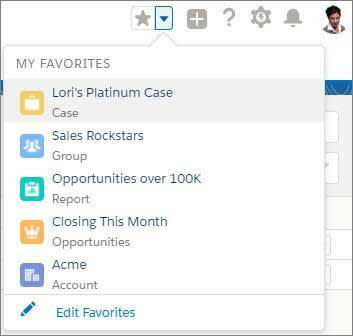
Click the favorites star to add the current page—for example, opportunities closing this month—to your favorites. Saved favorites are always just a click away in the favorites list. A highlighted star means you’re on a favorite page. To remove a favorite, click the highlighted star. Your users can easily personalize their favorites lists by renaming favorites and rearranging items in the list.
If an item in the navigation bar has a dropdown menu, it automatically includes the user’s top favorites for the item.
The App Launcher in Lightning Experience
In Lightning Experience, your users switch between apps through the App Launcher. They can browse the App Launcher to find available apps. Or they can search for an app by name from the Find an app or item box at the top of the App Launcher.
In Salesforce Classic, your users commonly switch between apps through the app menu or the App Launcher.

Or, click View All to see everything. Apps show up as large tiles under All Apps. Apps can include Salesforce standard apps, custom apps, and connected apps like G Suite. Other items, such as custom objects, tasks, events, and the feed, show up under All Items.

When you click in an app, you see the app name on the left side of the navigation bar. Items associated with the app appear to the right. Your users can create records and access recent records directly from the navigation bar for certain items like Accounts.

As a Salesforce admin, you can change which apps appear in the Lightning Experience App Launcher. You can also control the order in which the apps appear from the app menu.

- From Setup, enter App Menu in the Quick Find box, then select App Menu.
- From the list of app menu items, drag the apps to change their order. Changes take effect immediately.
- Optionally, click Visible in App Launcher or Hidden in App Launcher to show or hide individual apps from the App Launcher for all users in the org.
The app menu lists all apps installed in the org. However, the apps that users see in their App Launcher and app menu vary depending on each app’s visibility settings and user permissions. Users see only the apps that they are authorized to see according to their profile or permission sets.
Users can drag tiles to sort their personal view of the App Launcher to their liking. Their sort order overrides the order that you set here.

Search for Records
You’ve got a ton of useful data in Salesforce. How do you get to what you need, when you need it? Let’s face it, no one has time to browse anymore. It’s all about search. So let us introduce you to the Lightning Experience global search box. It’s at the top of every page, and it’s the fastest way to bring what you need right to your fingertips.
Think of search as your personal assistant—your very smart personal assistant. It anticipates your needs and helps you find what you’re looking for from anywhere in the app.

Get Instant Results, Top Results, and More
As soon as you click into the box, search starts working for you. A list of recent items provides quick links to records you’ve recently visited.

Start typing, and the list dynamically updates with matches from all searchable objects. If you see what you’re looking for, select it to go right to the record.

Don’t see what you need in the dropdown list? Don’t worry—you’ve got options. To see results only for the object you’re on, select the second option in the instant results dropdown list.
Alternatively, you can select the first option or press Enter to search across your entire organization. You’ll land on the Top Results page, which shows you the most relevant results from your most frequently used objects.
You also get a glimpse of how search helps you find what you need. Features like spelling correction and synonyms return matches that are similar to your search term. You might find one that’s just what you’re looking for.
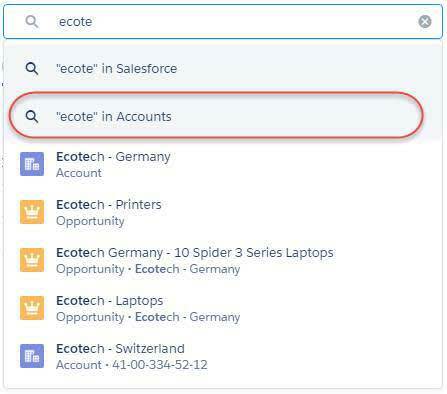
Know which object you want to search? Start typing the name of the object next to the global search box. You can filter the dropdown list (1), or scroll to find what you're looking for. The objects you use most frequently are at the top (2), followed by all searchable objects, listed alphabetically (3).
To select a highlighted object, click it or press Enter. As you type your search term, the instant results are limited to the selected object. Press Enter to see full search results for only that object.
To remove the filter, change the object to All.

Refine Your Results
From the high-level overview of Top Results, it’s easy to zoom in on what you need. See results for a specific object by selecting it on the left, under Search Results. You can see how many results were found for each object.
If you don’t see an object that you need under Search Results, don’t worry, it’s close at hand. Select Show More to see all objects available to you, listed in alphabetical order.

You can filter search results for accounts, cases, contacts, dashboards, files, Knowledge articles, leads, notes, opportunities, people, and tasks, and for custom objects. To see filtering options, click the object name in the Search Results sidebar.
You can also sort most search results. When you first get to the search results page, you see that results are sorted by relevance. That sounds smart—and it is!—but what does it mean, exactly? Several things are considered, like:
- How unique is the search term?
- How often does the search term appear in a record?
- Do you own the record you’re searching for?
You can also sort search results by clicking column headers or using the sort dropdown menu.

You can adjust column widths on the search results page by clicking and dragging the borders in the column header.

Text wrapping is on by default, but you can change this preference for a column by clicking the down arrow in the column header.

Can’t Find What You’re Searching For?
- If you get too many results, try using more—and more specific—search terms.
- Check whether the object or field is searchable.
- Make sure that you have access to the record. Search only returns results you have permission to view.
- If you recently created or updated the record, wait a few minutes for the record to be indexed. If you can’t find your record after 15 minutes, contact your admin.
For more tips, see Search for Records in the Resources section.
We think you’ll agree you’ve found the perfect assistant—it has a broad perspective, yet directs you to the important things. It saves you so much time and effort that you'll probably wonder how you'd get your work done without it.
Lightning Experience Help Menu
In Lightning Experience, each page has a contextual Help Menu with links to resources related to the tasks on that page and resources for getting started. View help topics directly in the Help Menu, and dock them to keep them open while you work.
On object pages, the menu replaces the “Help for this Page” link that you’re used to seeing in Salesforce Classic. The link still appears on many Setup pages, but we encourage you to use the Help Menu (  in the header) instead for more useful information.
If an admin added custom resources for working in an org, users see those resources first (1). When you’re new to Lightning Experience or want some fresh tips, check out Getting Started (2). Watch helpful videos and read informative topics and Trailhead content on your journey to becoming a Lightning Experience pro. Admins and users see different sets of resources that are appropriate to their work in Salesforce. As you read, more suggested resources are displayed, so you’re continually learning something new.

When appropriate, Salesforce suggests help topics, videos, Trailhead modules, and more under Help for This Page (3). If there’s no suggested resources for the page, the section is hidden. For general tasks, such as searching documentation and Trailhead, giving feedback to Salesforce, or learning about keyboard shortcuts, look under More Resources (4). Admins see a link to view release notes.
Getting help doesn’t mean leaving the app. When you click a help topic (  ) in the Help Menu, the topic opens in the Help menu. To keep the topic open while you work, click the docking icon.

The topic stays available at the bottom of your screen. You can minimize it, expand it, or close it.

For those new to Lightning Experience, be sure to check out Getting Started to get up to speed on the basics. Different resources are shown to users and admins. As you read the suggested resources, more topics are rotated to the top of the list, so you’re continually learning something new.
The Help Menu is no longer just for resources created by Salesforce. Admins can add a custom help section at the top of the Help Menu on every page in Lightning Experience. Guide users as they work in your org with links to your own URLs to websites, PDF files, videos, or Trailhead mixes. You get to name the section and pick the resources to display.
In case users still need more help, they can search through Salesforce documentation from within the Help Menu. Click Search Salesforce Help, type in a search term, and see a list of documentation and Trailhead results. Then, read a topic inside the Help Menu. When you open a Trailhead link in the search results, a new browser tab opens. Get your question answered and get back to the job at hand right away.
Meet the New and Improved Setup
A nip here? A tuck there? No, we’ve given Setup a whole new face!
You can navigate to Setup from the top of any page in Lightning Experience by clicking  | Setup .

The Setup tree has been completely reorganized and recategorized. In Salesforce Classic, the Setup tree had a lot of specific node categories, often with several nodes as nested subcategories. Sometimes there were many different ways to get to a destination. You might have mastered the click paths after a while, but to new users, this structure was often an overwhelming hurdle. The new Setup provides a streamlined interface for viewing and managing your administrative setup tasks.
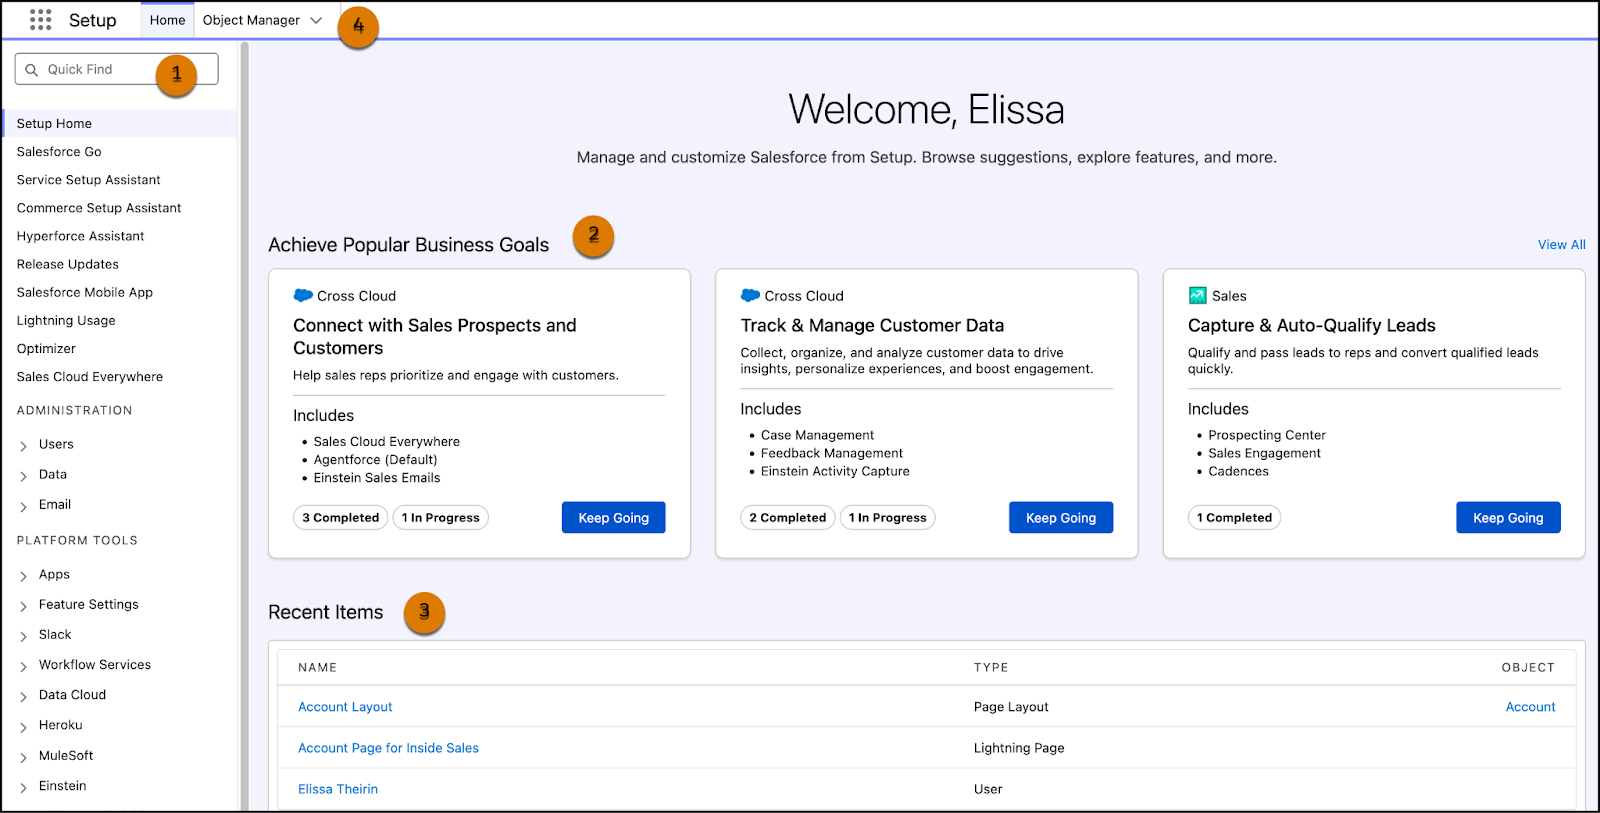
The new Setup includes these enhancements.
- The Quick Find (1) lets you quickly navigate to any node using a keyword. Quick Find is the best way to find what you’re looking for if you know its name. Quick Find is your power tool for getting where you need to go!
- A carousel of quick-access tiles (2) gives you instant access to important setup tools and information.
- The Recent Items list (3) on the Setup Home page shows your most recently used records or customization features in Setup. You can quickly link back to what you were working on by clicking its name.
- The Object Manager (4) provides a one-stop shop for managing all objects in your organization, both standard and custom. We’ll look at the object manager in more detail shortly.
Users can access their personal settings at the top of any page by clicking their profile image, then clicking Settings.
Administration, Platform Tools, and Settings, Oh My!
In the improved Setup, we’ve changed the five Setup tree sections from Administer, Build, Deploy, and Checkout to three sections: Administration, Platform Tools, and Settings. We completely reorganized all the child nodes to fit into these sections where appropriate, and added broader subcategories to make finding nodes easier, even if you don’t know the exact name you’re looking for.
Not only that, there are fewer child nodes to choose from, as many repetitive nodes in the tree have been removed. We reorganized the platform tools into a more process-oriented organizational structure rather than being feature-oriented. Now you can see pieces of the application life cycle broken up into subcategories: Apps, Objects and Fields, Process Automation, User Interface, Custom Code, and Environments.
At the bottom of the tree, in the Settings section, you can view company information or configure security.
Where Did Some of the Nodes Go?
You might have noticed that some of the nodes are missing altogether. Only nodes that are related to customizing the new Lightning Experience are included in the Setup tree. For example, the Service Cloud related nodes are gone, as well as some of the Sales Cloud features. And, we moved all the object-related nodes to the Object Manager, which we’ll look at shortly.
Don’t worry! From a customization and development standpoint, all of the tools are still there. And as the other features become supported in Lightning Experience, you’ll see them in Setup too.
Highlighted Features in the Improved Setup
Name |
Description |
|---|---|
Object Manager |
|
App Menu |
Use it to:
|
View Release Notes |
|
Limitations
Advanced Setup Search isn’t available in Lightning Experience. However, you can work around that while in Setup by entering a term in global search and selecting the in Setup option in instant results. The search results page lists records that match your search term.
The Setup tree in Lightning Experience is limited to:
- Pages that support Lightning Experience features
- Administration pages that apply across your organization, such as user management, security, and company settings
Use Salesforce Classic to access administration pages for features that aren’t in Lightning Experience.
Object Manager
The Object Manager is a one-stop shop for managing all objects in your organization, both standard and custom. Access all objects and their related functions—fields, validation rules, page layouts, and so on—from a single entry point.

To access the Object Manager, from Setup, click Object Manager.
- To find an object, enter the first few characters of its label or name in the Quick Find box.
- To edit a custom object, click
 , then Edit.
- To view more details about an object or to access its related functions, click the object label.
From the object detail page, you can view the object details and access all related functions, such as fields, validation rules, and page layouts. To quickly jump to a function or control, use the links in the sidebar.

Limitations
The Object Manager is limited to objects that support Lightning Experience features.
These object functions aren’t listed in the Object Manager. You can access them from elsewhere in Setup.
- Case Comment Triggers
- Feed Comment Triggers
- Feed Item Triggers
- Feed Item Layouts
- Group Layouts
- Group Triggers
- Group Member Triggers
- Group Record Triggers
- Publisher Layouts
- Topic Triggers
- Topic Assignment Triggers
Service Setup Flows
Get your service team up and running quickly on a variety of support channels. Service Setup flows offer a guided step-by-step experience to walk you through setting up various support features like email support, integrating with X (formerly Twitter) and Facebook, and enabling a Knowledge base. Service Setup in Lightning Experience features an intuitive setup tree and a performance metrics dashboard too.

The tiles across the top of the Service Setup Home page provide recommended setup flows, content, and one-step experiences that take the guesswork out of ramping up Service Cloud. The dashboard is customizable and shows at-a-glance metrics about your customer service team with daily performance or long-term trends. These insights help you assess and anticipate bottlenecks, and streamline calls to increase productivity.
Resources
- Salesforce Help: Find Object Management Settings in Lightning Experience
- Salesforce Help: Personalized Navigation Considerations
- Video: Personalize Navigation in Lightning Experience
- Salesforce Help: Favorites Considerations
- Salesforce Help: App Launcher
- Salesforce Help: Configure Lookup Search Results in Lightning Experience
- Video: Searching in Salesforce: Lightning Experience
- Salesforce Help: How Search Crowding Affects Search Results
- Salesforce Help: Manage the Search Index